
In this tutorial, I will walk you through the process of creating the black box in the pivotal scene from Dune where the Reverend Mother Gaius Helen Mohiam tests Paul Atreides. The Gom Jabbar is the name for the handheld needle tipped with meta-cyanide poison. When driven into a victim, it brings almost instantaneous death. The Gom Jabbar test was used to determine whether an individual's awareness was stronger than their animal instincts. If their awareness of the Gom Jabbar's presence was strong enough, it would override their instincts to withdraw from the immense pain of the test.
In this project, I created a Python script that uses gpiozero to interface with an HC-SR04 ultrasonic sensor to detect the presence of a hand and a servo to actuate the Gom Jabbar. Multiple processes are used: one for playing the audio and the other to constantly check the ultrasonic sensor to see whether the hand has been removed from the box and actuate the servo motor with the pin. If you leave your hand in for the duration of the test, you can remove it safely at the end. If you remove it before, you will be pricked with the Gom Jabbar.
GitHub Repository: https://github.com/mjdargen/Gom-Jabbar
Gom Jabbar scene from David Lynch's Dune (1984): https://www.youtube.com/watch?v=QrCfivcQe48
Denis Villeneuve talking about the scene from his 2021 version: https://www.youtube.com/watch?v=GoAA0sYkLI0
Supplies
- Raspberry Pi (2/3/4 or Zero)
- 3.5 mm stereo audio cable
- Speaker with 3.5mm stereo aux port
- Breadboard
- 470-ohm resistor
- 330-ohm resistor
- Servo motor (I used an SG92R micro servo)
- HC-SR04 ultrasonic sensor
- Dupont pin-socket jumper wires
- Hot glue gun
- A black box large enough to fit a hand (Adafruit boxes work great!)
- Pin-type object to act as Gom Jabbar
Step 1: Setting Up Raspberry Pi

If you have not already set up the operating system on your Raspberry Pi, you will want to set up Raspberry Pi OS using the Raspberry Pi Imager. The Raspberry Pi Imager is a great new tool for loading an OS onto a microSD card to easily boot your Raspberry Pi. Just download the program and follow the prompts.
You can select either the Raspberry Pi OS Full (desktop) or Lite (headless). Both of them will work for this project, so it is just a matter of what other uses you have for your Raspberry Pi. When you have the Raspberry Pi Imager open, pushing Ctrl-Shift-X will open an “Advanced” menu. From there, you can do things like enabling SSH, setting up your Pi's hostname, configuring wifi, etc. This can be particularly helpful if you want to configure a headless Pi without a console cable.
All of the information for getting started on Raspberry Pi is here: https://www.raspberrypi.com/documentation/computers/getting-started.html.
Step 2: Setting Up Environment & Dependencies

In order to run the code required for this project, you will need to install Python 3, git, and FFmpeg. On most versions of Raspberry Pi OS, these are installed by default. However, in case they are not, I have provided an installation script for you and have written the steps out for you.
Git Project Files
Now you will need to retrieve the installation file, machine learning models, and the demo Python program from my Github repository. As mentioned previously, git should already be installed with your Raspberry Pi OS image. To confirm, run the “git –version” in your terminal and ensure it returns a version. If it does not, you can install it using the following command:
sudo apt-get install git
To download the files required, you can navigate to the repository in your browser and download a zip file or you can use your git client. The link and the git command are described below.
https://github.com/mjdargen/Gom-Jabbar
git clone https://github.com/mjdargen/Gom-Jabbar.git
Installation Script
The installation script will perform the following tasks for you.
- Upgrade existing packages
- Install Python 3 and pip
- Install FFmpeg for pydub
- Install python dependencies: pydub, simple audio, pigpio
You can perform these tasks on your own or you can run the installation script I have provided. To run the installation script, complete the following steps:
- Make the script executable – “sudo chmod +x ./install.sh”
- Run the script – “./install.sh”
- The script can take ~5 minutes to run depending upon your system and internet connection.
Step 3: HC-SR04 Ultrasonic Sensor

You can think about an ultrasonic sensor like a bat or dolphin using echolocation. An ultrasonic sensor emits high-frequency (ultrasonic) sound waves and calculates the time it takes for the sound waves to reflect off an object and return to the sensor.
To use an ultrasonic sensor like an HC-SR04, you must provide 5 V and GND and connect up to its TRIG and ECHO pins with GPIO pins. TRIG or the trigger pin is treated as a digital output while ECHO or the echo pin is treated as a digital input. To take a measurement with the sensor, a 10-microsecond pulse is sent to the sensor's trigger pin. When the sensor receives this signal, it emits eight 40 kHz sound waves. The sensor then drives the ECHO pin high until the sound waves are received back. It is up to us to detect and calculate the duration that the echo pin is high using code on the Raspberry Pi.
Wire up the sensor as shown in the diagrams and as described by the pinouts below. The HC-SR04 operates at 5 volts; however, the digital inputs on the Raspberry Pi can only withstand 3.3 volts. Because of that, we need to use a voltage divider to reduce the voltage and protect the Raspberry Pi. We will use a 330 Ohm resistor and a 470 Ohm resistor to reduce the voltage appropriately.
Pinout
- VCC – 5V
- TRIG – GPIO23
- ECHO – indirectly toGPIO24 – needs 330/470 Ohm voltage divider
- GND – GND (also connected to ground on voltage divider)
To view the pinout of your Raspberry Pi, type the command “pinout” in the terminal.
Step 4: Servo Motor

A servo motor is a special type of motor with internal electronics. Most servos can only rotate 180 degrees. A pulse is sent to the servo with varying on-times which tells the servo which angular position it should be in.
For this project, I used an SG92R servo motor. It can rotate 180 degrees and can move 60 degrees in 0.1 seconds. There are three pins on the servo: 5V (red), GND (brown), and Pulse (orange). A 50 Hz pulse (every 20 milliseconds) is sent to the orange signal wire. The on-time is varied between 1 and 2 ms to change the position of the motor.
Wire up the servo as shown in the diagrams and as described by the pinouts below. Make sure your power supply and Raspberry Pi can withstand the power draw of the servo motor; otherwise, you will need to power the servo from an external power source (remember to connect the GND of your external power source to the GND of your Raspberry Pi so it will work properly).
Pinout
- BROWN – GND
- RED – 5V
- ORANGE- GPIO17
To view the pinout of your Raspberry Pi, type the command “pinout” in the terminal.
Step 5: Code Setup
For this project, I used the multiprocessing library. This library allowed me to create two different processes: one for playing the audio and the other for consistently polling the ultrasonic sensor and controlling the servo motor. Without these multiple processes, we would have to run the program atomically meaning that we could not interrupt the audio to check the ultrasonic sensor.
“gom_jabbar.py” is the main file that you will call. It sets up the processes and the pipe connection between them for communication. “gj_processes.py” contains the bulk of the code because it contains the two processes.
The audio process starts playing the entire audio clip (1 minute and 48 seconds long). While it is playing, it continues to check for messages from the other process. If it receives a message from the other process, that means the person removed their hand from the box. It interrupts the sound clip, plays the die sound clip, then ends the process.
The ultra process initializes the start position of the servo. It then polls the ultrasonic sensor consistently to check the distance and detect whether there is a hand present in the box. If it detects 5 or more sequential readings over the threshold, it sends a message to the audio process and actuates the servo. It checks for 5 or more sequential readings because occasionally there can be a misread of the sensor.
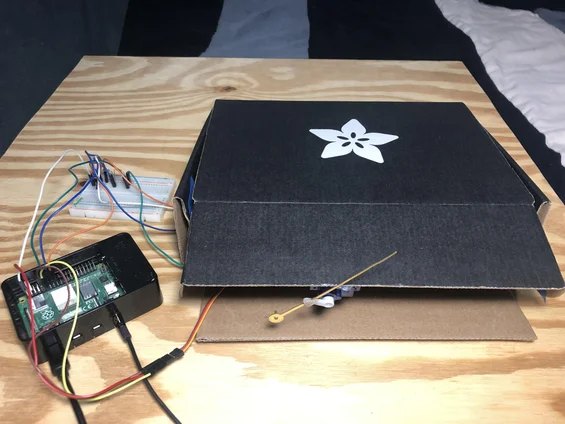
Step 6: Mechanical Setup

You will want to find a black box of some sort that will fit someone's hand. This Adafruit box worked perfectly. You can also cut the cardboard down to size, paint it, and assemble one yourself. You will want to make sure that you have left places for the wires to be run into the box for the ultrasonic sensor and the servo.
For the ultrasonic sensor, place it at the back of the box facing forward. Try to center it and make sure it is angled straight outwards. Otherwise, it may detect the sides of the box as someone's hand being present and it will never trigger. After positioning the sensor, use tape or some other adhesive to keep it in place.
For the servo, the Reverend Mother placed the Gom Jabbar at Paul's throat. For the purposes of this project, I mounted it inside the box and pointed it at my hand. When positioning the servo, keep in mind that servos can only rotate 180 degrees. Test out the rotation angles and the attachments before positioning the servo. You can adhere the servo to the box with hot glue.
For the actual Gom Jabbar, I used a second hand for a clock that I had lying around. It was the closest thing resembling a pin that wasn't actually a pin and wouldn't penetrate the skin. Again, I adhered it to the servo arm using hot glue.
Step 7: Run!
Now, it's time to run the program! To run the program, use the following command:
python3 gom_jabbar.py
If the project is not quite working properly, there are a few bits of the code you can tweak to get it to work for your specific environment.
- Adjust detection distance. Your box may be larger or smaller, so you may want to set a different distance threshold. Outside of this distance, it will register as someone's hand being removed from the box. To adjust the angle modify the “if ((dist_sensor.distance * 100)) > 20:” line in the gj_processes.py file. You can uncomment the “print(distance: {dist_sensor.distance * 100} cm')” line to see the distances that the ultrasonic sensor is measuring.
- Adjust the servo angles. Mine rotated from 90 degrees to -90 degrees. You may not want yours to rotate in that direction or you may want it to rotate less. Modify the “servo. angle = ” lines in the gj_processes.py file.
- Adjust the count and delays. If your project is misfiring the servo, you may want to adjust the count value or the delay between ultrasonic sensor readings. The count determines how many sequential readings are outside of the range it must detect before triggering. Adjust the “sleep” value or this line “if count >= 5:”.
- Finally, if the script is starting before you are ready, you can add delays at the beginning. Another option would be to modify the code to only begin once it has detected a hand has been inserted.
If you see any messages in the terminal recommending that you use pigpio to improve accuracy or reduce jitters, you want to make sure that you ran the line “export GPIOZERO_PIN_FACTORY=pigpio” in the install.sh script. You then want to make sure that you start the pigpio daemon with the command “Sudo pigpiod” and then stop the daemon when finished with the command “sudo killall pigpiod”. For more information, visit the pigpio library website: https://abyz.me.uk/rpi/pigpio/download.html.
Make sure to set up the audio configuration appropriately for your setup. Raspberry Pi can play audio through the 3.5mm stereo “headphone” jack or through HDMI. Go to your Raspberry Pi configuration settings to make sure you have selected the correct audio output. You can do this by typing “sudo raspi-config” in the terminal.
Source: Gom Jabbar From Dune