
Overview
Our workshop will introduce students to the project “Graphic Design Display using Raspberry Pi and Adafruit LED”. This workshop is part of our club initiative to engage students in computer science courses through STEAM project experiences. The project is designed to incorporate technology and creative artwork in real-life experience. In our workshop, participants will be organized into groups with 3-4 students per group. Each group will have a set of equipment and material to work in the hands-on section. Faculty organizers will provide instruction and help for each group. Peer mentors will also take a lead in hands-on practice.
STEM Education
Project Goal and Description
Our workshop will introduce students to the project “Graphic Design Display using Raspberry Pi and Adafruit LED”. This workshop is part of our club initiative to engage students in computer science courses through STEAM project experiences. The project is designed to incorporate technology and creative artwork in real-life experience. In our workshop, participants will be organized into groups with 3-4 students per group. Each group will have a set of equipment and material to work in the hands-on section. Faculty organizers will provide instruction and help for each group. Peer mentors will also take a lead in hands-on practice.
Instruction on Project Set Up
Devices
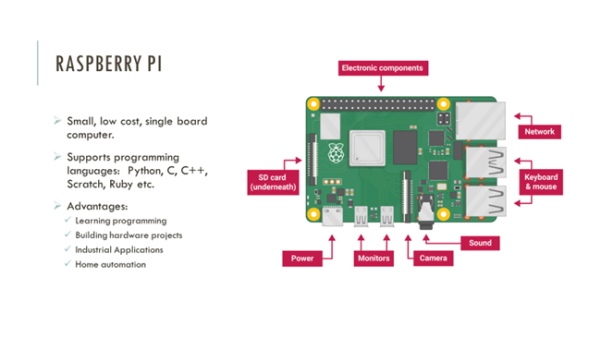
We used Raspberry Pi B+, Adafruit RGB LED 32 X 32 Matrix Panel, and Adafruit Matrix Bonnet for this project.
Linux Commands
Participants need to know basic Linux commands for this project. Participants were introduced to basic Linux Commands and they did hands-on during the workshop.
- ~$
- : Username of the current user
- : The hostname. Basically, the computer’s name. It helps to identify your computer on the network.
- Represents the current directory. In Linux, the ~(tilde) represents the directory /home/pi
- $: The prompt symbol. After this symbol user can enter commands.
- ls : To know what files are in the directory you are in.
- cd <directory name> : To go to a directory.
[root@localhost PiWorkshop]# cd ..
[root@localhost ~]# ls
PiWorkshop dos hello.c
- mkdir <directory name> : To create a folder or a directory.
[root@localhost ~]# mkdir Programs
[root@localhost ~]# ls
PiWorkshop Programs dos hello.c
- rmdir <directory name> : To remove / delete a folder or a directory.
[root@localhost ~]# rmdir Programs
[root@localhost ~]# ls
PiWorkshop dos hello.c
- pwd : To know which directory you are in. It gives you the absolute path, which means the path that starts from the root. Root, denoted by a forward slash( / ), is the base of the Linux file system. It is denoted by a forward slash( / ).
[root@localhost ~]# cd PiWorkshop/
[root@localhost PiWorkshop]# pwd
/root/PiWorkshop
- clear: To clear the terminal if it gets filled up with too many commands.
- cd – : Switching back to the last working directory.
- cd or cd~ : Going back to the home directory.
[root@localhost PiWorkshop]# cd
[root@localhost ~]#
- exit: exit from the terminal.
- sudo halt and sudo reboot : Can power off or reboot the computer.
- Create a file:
[root@localhost ~]# nano sample.txt
- cat: To print the contents of a file to the screen
[root@localhost ~]# cat sample.txt
Welcome to the Raspberry Pi – Adafruit Workshop!!
- echo: To display line of text
[root@localhost ~]# echo “Hi there”
Hi there
- echo <line of text> >> <file name> : To add/ concatenate line of text to a file
[root@localhost ~]# echo Today is Wednesday. >> sample.txt
[root@localhost ~]# cat sample.txt
Welcome to the Raspberry Pi – Adafruit Workshop!!
Today is Wednesday.
- cp: To copy from one file to another file
[root@localhost ~]# cp sample.txt textfile.txt
[root@localhost ~]# ls
dos hello hello.c sample.txt textfile.txt
[root@localhost ~]# cat textfile.txt
Welcome to the Raspberry Pi – Adafruit Workshop!!
Today is Wednesday.
- rm: To delete a file
[root@localhost ~]# rm textfile.txt
[root@localhost ~]# ls
dos hello hello.c sample.txt
To write a C program
- nano hello.c
#include <stdlib.h>
#include <stdio.h>
int main(int argc, char **argv)
{
printf(“Hello World\n”);
return 0;
}
- Compile the program:
[root@localhost ~]# gcc -o hello hello.c
- Run the program:
[root@localhost ~]# ./hello
Hello World
Requirements of the Assignment
Participants need to know C/ Python programming, and basic Linux commands for this assignment. We used C programming for this assignment. Sample programs were provided during the workshop. Participants ran those programs to see the display on Adafruit RGB LED matrix display.
Sample Program
- Open terminal
- Enter “cd Desktop”
- Enter “mkdir PiWorkshop”
- Enter “cd PiWorkshop”
- Enter “sudo nano sample.txt”
nano – Terminal-based text editor
- A screen will open, enter your desired text in it
- Press CTRL+O to write contents to the file.
Command to run sample program to display output
Go to the directory where you have your program saved.
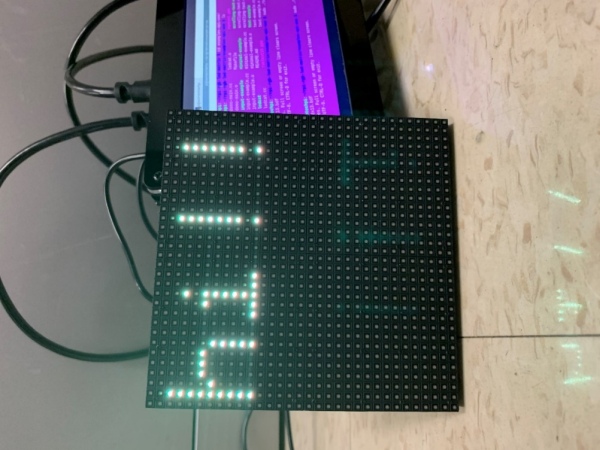
- I. To display user given text:
pi@raspberrypi: ~$ sudo ./text-example -f ../fonts/6×13.bdf
pi@raspberrypi: ~$ hi!!
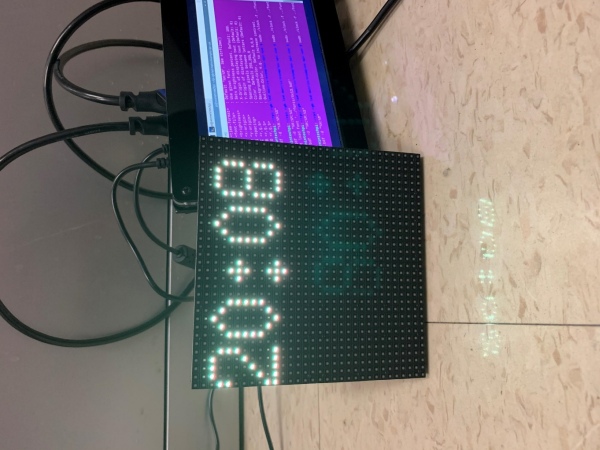
- II. To display digital clock:
pi@raspberrypi: ~$ sudo ./clock -f ../fonts/6×13.bdf -d “%H:%M”
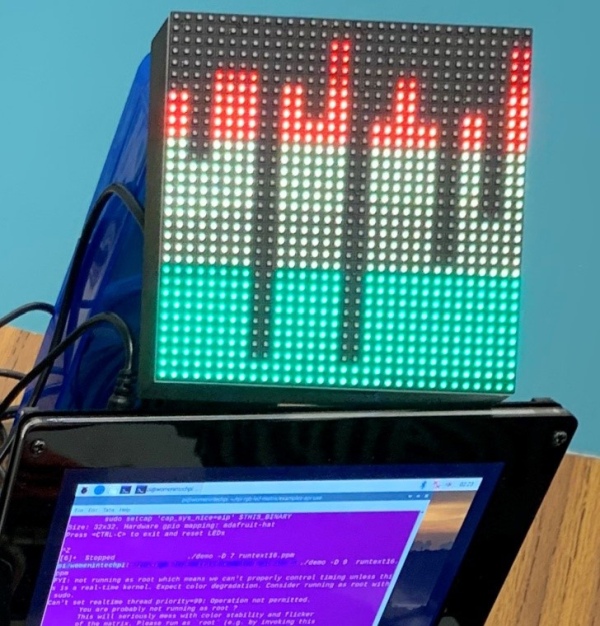
III. To display volume bars

pi@raspberrypi: ~$ ./demo -t 10 -D9 runtext.ppm
Outcomes and Summary
In total, we have 52 students attended the workshop. All small groups were able to make progress on their graphic design and display activity using provided equipment. Post survey revealed that all participants rated 5 (the highest score) for the overall quality, usefulness of the workshop format and the individual activities. All participants rated 5 (the highest score) the speaker presentations. Our survey results suggested the success of our workshop and students’ satisfaction.
Our project can train students to design their own digital display and animation using Raspberry Pi and Adafruit LED. It is not always about the code. The project can be used as an exercise in understanding how real world systems are devised. Computational thinking is a useful skills across disciplines. Through the project, students are able to combine their own artistic expressions with coding skills in this project. The product can be used as traffic lights and lights exhibited in festival or holiday celebrations.
References
[1] https://www.raspberrypi.org/products/raspberry-pi-3-model-b-plus/
[2] https://www.adafruit.com/product/607
[3] https://github.com/hzeller/rpi-rgb-led-matrix
[4] https://learn.adafruit.com/adafruit-rgb-matrix-bonnet-for-raspberry-pi/pinouts
Source: Graphic Design Display using Raspberry Pi and Adafruit LED Workshop