
It's been a while since I've created any noteworthy projects, but here is something that will hopefully turn some heads. I've been tinkering with the Raspberry Pi 4 in the last year or so and have noticed that there aren't any great cooling products out there for this device. To get the greatest performance out of the Raspberry Pi, you will need to have a highly effective cooling system to cool down the CPU. The sleek cooling products on the market are limited in their performance and the larger ones do perform much better but lack an appealing design.
Although this project did come at a cost, it does combine both functionality and design, a product that does not currently exist. So grab your tools, grab your gear, and let's get started…

Supplies
For this project, you will need the following tools and items:
– Raspberry Pi with all of its operating accessories
– Raspberry Pi case, I used a Flirc Case
– Clothes iron
– Dremel with cutting and sanding wheels
– 6mm long heat pipe
– Copper fins made for the 6mm heat pipe
– Polished copper pads
– Thermal compound
– Solder
– 25mm fan
– Gloves
– Tweezers
Step 1: Assembling the Heat Pipe
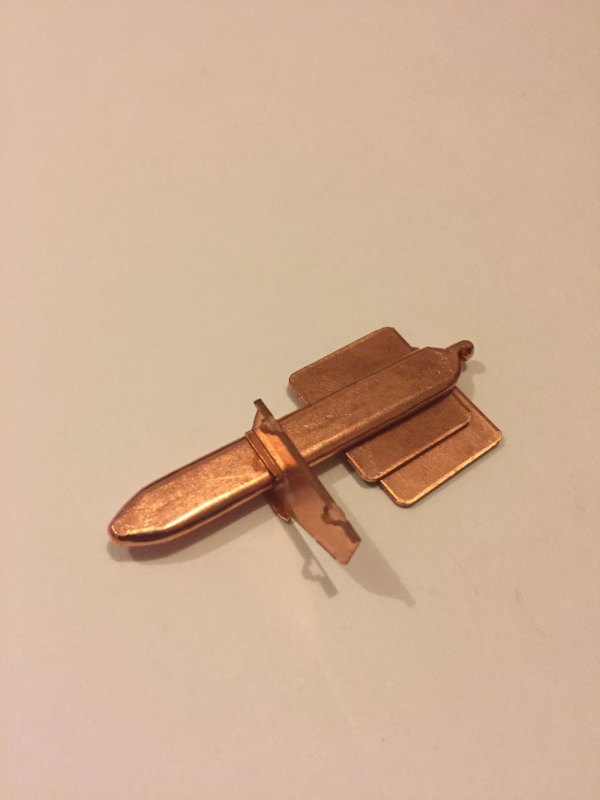
The heat pipe is an encapsulated tube of porous and hard copper that can be internally damaged when assembled with extreme heat. A typical soldering iron will not be hot enough to solder the part, and a flaming torch would be too hot. An ideal temperature is one that is just hot enough to melt the applicable solder. A typical household clothes iron will do the trick. Adjust the settings of your iron from low to high, so that solder can melt fairly quickly, but not too quickly. When soldering, apply heat, then solder and remove from heat immediately once the joint is complete. Prolonged heat will cause the heat pipe to bulge, potentially damaging it or reducing its ability to function. For safety purposes, please use gloves and tweezers to handle hot parts.
1. To start, invert the iron securely on a table with the iron surface facing up.
2. Once the iron is heated, apply one of the copper pads on the iron along with some solder. When the solder is melted, sandwich a second copper pad onto it.
3. Apply a bit of solder on the top layer and attach the heat pipe at a slight angle like in the photo above.
4. Connect and solder on all of the cooling fins, sanding down the edges so that it appears like the photo.
Once the assembly is complete, the hard part is now complete.
Step 2: Modifying the Case
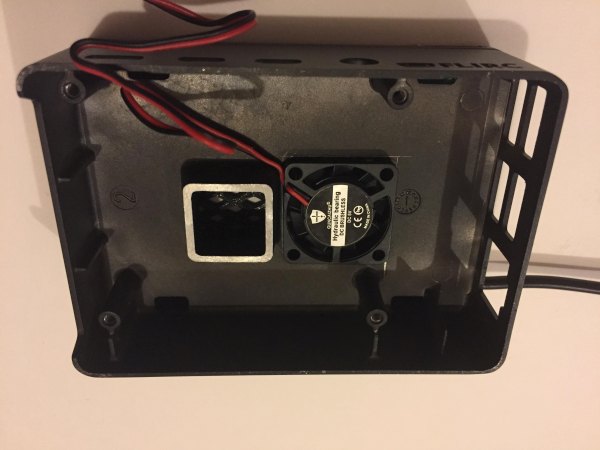
In order for the heat pipe and fan to fit, the Flirc case will require slight modifications. If you are using a different case, you can modify your case however you see fit. In my case, I sanded down the post that makes contact with the CPU, allowing it to accommodate the size of the copper pads and heat pipe. I next cut a square hole matching the size and location of the fan directly above the cooling fins.
Step 3: Finalizing the Assembly
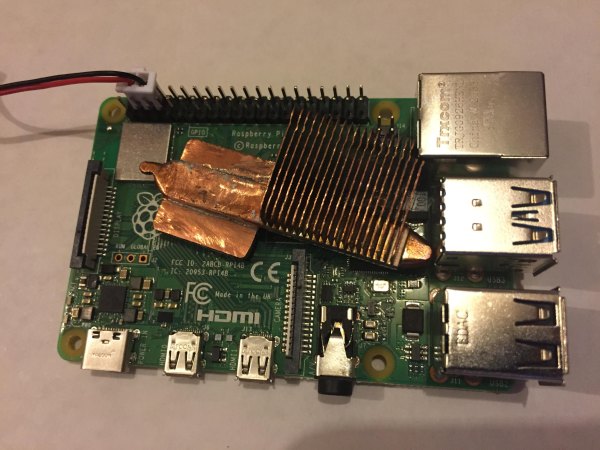
In the final steps, test the fan by applying power to the GPIO pins. For 5 volts, red will be on pin 4 and black on pin 6. For maximum effectiveness, make sure the fan is blowing down onto the fins. Apply the thermal compound onto the CPU. Align the copper pads directly over the CPU and carefully close the enclosure without moving the heat pipe. Tighten the screws in an X cross pattern so that equal pressure is applied evenly against the CPU. The circuit board might bend ever so slightly.
For my case, I also designed a 3D-printed lid that encapsulated an HDMI input. You can finalize your case, however, you see fit.
Step 4: Stress Testing the Raspberry Pi

Once assembled, run the Raspberry Pi and install a stress testing program.
Open a terminal window and update your Pi with the following commands:
sudo apt update
sudo apt full-upgrade
Install the Stressberry Program:
sudo apt install stress
pip3 install stressberry –user
Create a directory for the data files, and change the current directory:
mkdir ~/TemperatureTests
cd ~/TemperatureTests
Use the following command to start the test:
/home/pi/.local/bin/stressberry-run -n “My Test” -d 1800 -i 300 -c 4 mytest.out
Use the following command in your TemperatureTest directory to export a PNG image of the test data
MPLBACKEND=Agg /home/pi/.local/bin/stressberry-plot mytest.out -f -d 300 -f -l 400 1600 -t 30 90 -o mytest.png –hide-legend –not-transparent –line-width 2
*My export did not work, and so I resorted to using Excel.
Step 5: …and the Results Are In!

Three tests were compiled for this project:
First was the bare CPU. At ~600 MHz, the temperature was ~45 degrees. At ~1500 MHz, the temperature climbed to ~75 degrees then dropped back to ~50 degrees at ~600 Mhz.
Step 6: Heat Pipe and Fan Test

For the second test, the heat pipe and fan were activated. At ~600 MHz, the temperature held at ~30 degrees. When clocked at ~1500 Mhz, the temperature climbed to ~42 degrees then dropped back down to ~33 degrees at ~600 MHz.
Step 7: Overclocked CPU Test

For the third test, the CPU was overclocked to ~2000MHz. The CPU started at ~600 MHz where the temperature held at ~30 degrees. At ~2000MHz, the temperature peaked at ~49 degrees before falling down to ~35 degrees back at ~600 MHz.
I hoped this project worked out as well for you as it did for me. It took me a while to research, design, test, and assemble this project. In terms of function, this active heat pipe functions just as well (peak 42 degrees versus 42 degrees) as the “Ice Tower” as seen floating around the internet. Its size, however, exceeds that of its competitors.
Feel free to upload any photos of your completed projects to further inspire other creators. Cheers!
Source: Heat Piping the Raspberry Pi