
Introduction
If you’ve checked out my Rover project – an autonomous obstacle avoidance robot – you’ll know that I am a robot junkie. But my interest isn’t limited to wheeled vehicles. I have had a biped on the workbench for over a year but inevitably, whenever I turn my attention back to it, a brighter, shinier object always seems to distract me. This time the distraction was in the form of a hexapod. This project is the first phase of a larger project to create an autonomous, interactive pet for my daughter – Hexapet.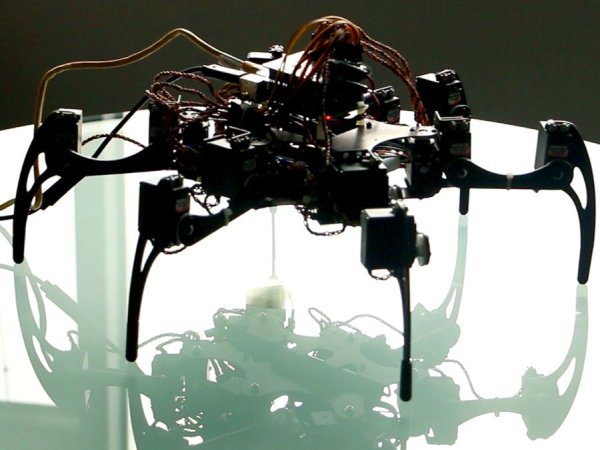
I started with an off-the-shelf frame kit but instead of using the manufacturer’s Arduino compatible microcontroller and servo controller, I decided to build Hexapet using Windows 10 IoT Core running on a Raspberry Pi 2. My platform choice delivers much more computing power than what’s needed for this phase. But, in future phases of the project, as Hexapet becomes much more sophisticated, the reason for selecting Windows 10 IoT Core will become evident. I used Adafruit’s Servo HATs to drive the servos and an Xbox controller to direct Hexapet’s movements.
The goal of phase 1 is to understand Hexapet’s basic mechanics – movements, speed, strength, and power consumption. I find the 3 degrees of freedom on each leg fascinating; with 6 legs and 18 servos, there is a lot of movement going on with each motion. Admittedly, Hexapet’s movements aren’t the most graceful at this point but there is a lot of room for refinement through software; the hardware platform provides the necessary precision and control. Now that everything is operational, I'll start tracking battery life as well as trying to optimize speed.
I would rate this as an intermediate project. While the physical construction of Hexapet wasn’t complex, it was a little more involved than my past projects considering the number of servos and the need to do some mechanical trimming of the servos’ center points. On the software side, relatively speaking, the program isn’t all that sophisticated but since I am still learning software development and C#, this project introduced me to a lot of new concepts and programming constructs. (My goal for the next phase of this project is to implement some of the new object oriented concepts I am currently learning.)
Here are some of the resources I found very useful throughout the course of this project:
- Microsoft Virtual Academy’s C# Fundamentals for Absolute Beginners course. It was well worth the time and I feel much more confident now with the Microsoft platform.
- Adafruit’s tutorial on using their Servo HATs.
- Lynxmotion’s forums provided good support when I ran into issues building their hexpod kit.
Prerequisites
- Get Windows 10 IoT Core running on your Raspberry Pi 2 (instructions here).
- Get Windows 10 and Visual Studio 2015 running on your PC (instructions here).
- Deploy a simple Windows app to the Raspberry Pi to ensure everything is working (instructions here).
What You'll Need
Parts:
- Raspberry Pi 2 and standard accessories: 8GB micro SD card, power adapter, network cable or WiFi dongle.
- Adafruit 16-Channel PWM / Servo HAT for Raspberry Pi.
- Lynxmotion Phoenix 3DOF Hexapod kit.
- Xbox controller.
- 3S 3200mAh LiPo battery.
- 5V/6V switched-mode universal battery elimination circuit (UBEC).
- 2S 1000mAh LiPo battery.
- Voltage converter with 5V USB charger.
Tools:
- Soldering iron
- Optional: servo tester
Project Instructions
Step 1: Assemble the hexapod kit
Time: 2 hours
Tools: Screwdriver
Parts: Hexapod frame and servos
Follow the instructions that come with your hexapod kit to assemble the frame and install the servos. The instructions that came with my Phoenix kit were relatively clear and well written. Yet, it still took about two hours to assemble all the legs and the body given the number of servos involved. If you have a servo tester, go ahead and center your servos before assembly – it’s easier than having to remove the servo horns and realigning them later. (I centered all the servos before assemble and only had to do some minor realignment on 3 servos after powering up the servo control boards.)
Step 2: Mount the Raspberry Pi 2
Time: 15 minutes
Tools: Screwdriver
Parts: Raspberry Pi 2, stand-offs and screws and nuts
The mounting location and method will vary based on your frame. The Raspberry Pi was too long to fit between the stand-offs connecting the top and bottom plate of the frame so I mounted it on top of the top plate; plus, the space in between the frames is ideal for battery placement. This top mounted position of the Raspberry Pi also made it easy to plug in peripherals when needed including the Xbox controller (as well as the HDMI cable, wall wart, and network cable during development).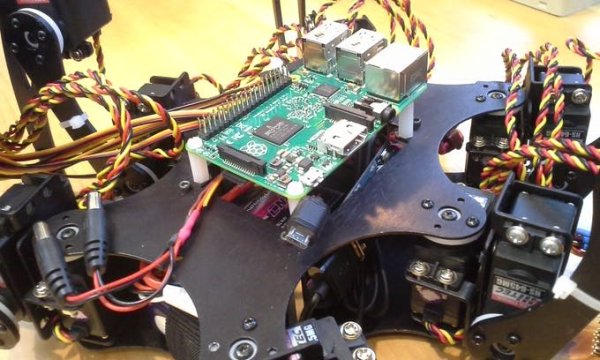
I was able to attach the Raspberry Pi to the two front stand-offs using the Pi's pre-drilled mounting holes. The two rear stand-offs didn't align with the Pi's mounting holes so I just rested the Pi on top of them.
For more detail: Hexapet