
Chapter 1 : Introduction and problem statement :
The following subsections have an overview, short description, problem analysis, list of requirement and objectives.
1.1 Introduction
Everyone wants to know who is at his front door, Which day and at what time they came, to be notified when they arrived. Our project solves this problem mainly by using, a single credit- card-sized single-board computer, which is called Raspberry Pi. It is a new technology having small size, low price. It may be plugged into a computer monitor or TV, and uses a standard keyboard and mouse. It is a capable little device that enables people of all ages to explore computing, and to learn how to program in programming languages like Scratch and Python. It’s capable of doing everything you’d expect a desktop computer to do, from browsing the internet and playing high-definition video, to making spreadsheets, word-processing, and playing games. Has the ability to interact with the outside world, and has been used in a wide array of digital computerized projects, from music machines and parent detectors to weather stations and tweeting birdhouses with infra-red camera. Our project also has a sensor to detect human movement for a relatively long distance. Moreover, it contains a camera with good accuracy, good resolution, small size and cheap. A powerful programming language that’s easy to use, easy to read and write will be used. Finally, smart phone. Most people these days are using smart phones, facilitating easy to sending and receiving voice and image data through the Wi-Fi. These reasons motivated us to use this new technology along with the aforementioned necessary hardware to build our project.
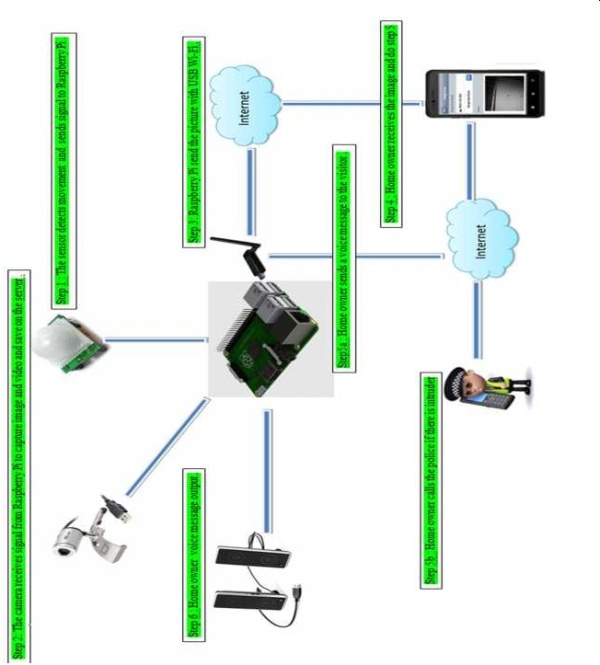
If there is someone in front of the door, the sensor will work and send a signal to the single-board computer. The single-board computer sends a signal to the camera to start capturing image. The camera captures an image for the visitor in front of the door .The single- board computer saves the image in the server with the date and time. After saving the visitor image, the single-board computer starts recording a video for the visitor. The video will be saved on the server along with date and time.
After receiving the image and saving it, the single-board computer will send the image to the home owner through Wi-Fi connected with the single-board computer. The home owner will receive a message on a mobile application . The application programmed and installed on the smart phone of the home owner. The content of the message is the image of the visitor.
The home owner can send feedback to the single-board computer by the mobile application. The feedback is a voice message to the visitor in front of the door. When the voice message reaches to the single-board computer, the visitor will hear it through a speaker.
If the homeowner discovers that the visitor is an intruder, he can notify the police by calling him to come to the referred home.
If the visitor get out from the range of the sensor, camera will stop recording the video after ten seconds. The user can check all videos, images and audio sending stored on the server.
1.2 Problem definition and analysis
As home automation specialists working to educate the public on the benefits of new technologies, we are often told, “ I am too technically challenged to use a home automation system.” To be honest, we love to reveal why this statement is one of the biggest myths of the 21st century. The truth is that home automation systems have the power to simplify everything within your home and life. Everyone wants to know who is at his front door, Which day and at what time they came, to be notified when they arrived. Wants to communicate with them with simple, fast and easy way. If the visitor is an intruder makes him go away.
The project is composed of two parts. The first part is Hardware component, which represent Raspberry Pi, camera, speaker, smart phone, Wi-Fi, and PIR sensor. The second part software, which represents the interface for the homeowner on his mobile, Raspberry Pi operating system and programming language.
1.3 Project Requirements
The following subsections have the list of requirements of the project.
1.3.1 Hardware components
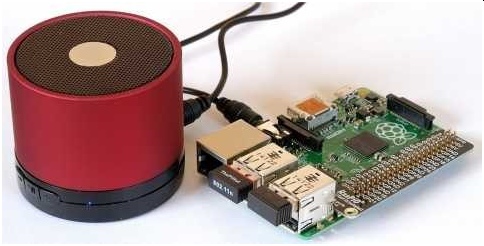
- Raspberry Pi: a single-board computer, the main component that connected all components of the project.
- Speaker: used to output the voice message for the visitor.
- PIR sensor: used to detect the visitor motion.
- ADSL link and Wi-Fi : used as broker between Raspberry Pi and smart phone to send and receive data.
- Camera: used to capture images and videos.
- Smart phone: used to receive images, send voice messages and call police if need.
1.3.2 Software components
- Mobile application: facility to send and receive data to/from Raspberry Pi and call police.
- Raspberry Pi operating system and programming language: We are used Raspbian operating system for Raspberry Pi and python programming language.
1.4 Objectives
Our main objective is to build a home automation system. This is accomplished via the following objectives:
1- Using a sensor to detect the visitor motion in front of the door. 2- Using a camera to capture image and record video.
3- Sending image to smart phone by Wi-Fi. 4- Enabling the owner to view the image.
5- Enabling the owner to record a voice message to communicate with the visitor or call police if he felt visitor is intruder.
Chapter 2: Component Background
The following subsections have a short description of the parts used in our project considering, specification, Justification and constrains.
2.1 Raspberry Pi
The Raspberry Pi is a credit-card-sized single-board computer developed in the UK by the Raspberry Pi Foundation with the intention of promoting the teaching of basic computer science in schools. By the Raspberry Pi company, where it formed a team of scientists, teachers and researchers to work with the device fits the needs of children.
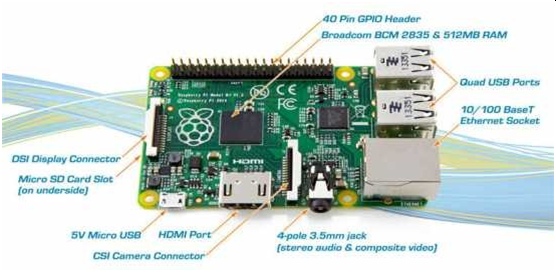
In our project we used Raspberry Pi model B+, which has the following property [17]:
1- System on Chip (SoC ): Broadcom BCM2835 (CPU,GPU,DSP,SDRAM, and single USB port ).
2- CPU: 700 MHz ARM1176JZF-S core (ARM11family, ARMv6 instruction set). 3- GPU: Broadcom VideoCore IV 250 MHz . OpenGL ES 2.0.
4- Memory: SDRAM , 512 MB (shared with GPU ).
5- USB 2.0 ports: 4 (Via the built in integrated 3-port USB hub ). 6- Video input: 2* MIPI camera interface (CSI) connector.
7- Video output: Composite video , HDMI , MIPI display interface for LCD panels.
8- Audio output: analog audio via 3.5 mm phone jack. 9- Onboard storage: Micro SD card.
10- Onboard network: 10/100 Mbit/s Ethernet. 11- Power rating: 300 mA.
12- Power source: 5 volt via MicroUSB. 13- Size: 85.60 mm * 53.98 mm.
14- Weight: 45 g .
15- Operating System: Arch Linux ARM, Gentoo , Fedora ,, Raspian OS , RISC OS.
2.2 PIR Sensor
A Passive Infrared Sensor (PIR sensor) is an electronic sensor that measures infrared light radiating from objects in its field of view. They are most often used in PIR-based motion detectors. PIR sensors are used to detect motion from pets/humanoids from about 7 meters away. This one has an adjustable delay before firing (approx 2-4 seconds), adjustable sensitivity and we include a 30 cm cable with a socket so you can easily reposition the sensor or mount it using the two drills on either side. Runs on 5V-16V. Digital signal output is 3.3V. Sensing range is about 7 meters (120 degree cone) [9].
2.3 Camera , Images and Videos
In our project we took images and record videos for visitors. There are two types of cameras that can be used, Raspberry Pi camera and web cam. We used Raspberry Pi camera for the reasons in subsection 2.3.1.
2.3.1 The Raspberry Pi camera
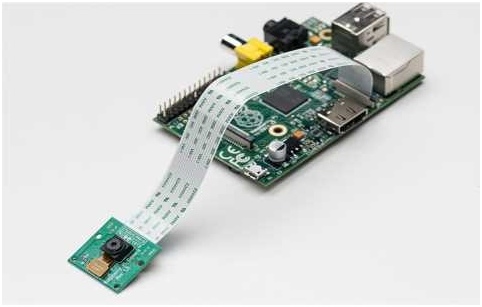
The Raspberry Pi camera module can be used to take high-definition video, as well as stills photographs. It’s easy to use for beginners, but has plenty to offer advanced users if we’re looking to expand our knowledge. There are lots of examples online of people using it for time- lapse, slow-motion and other video cleverness. We can also use the libraries we bundle with the camera to create effects. It attaches via a 15cm ribbon cable to the CSI port on the Raspberry Pi. There are numerous third-party libraries built for it, including the Pi camera Python library. The camera module is very popular in home security applications, and in wildlife camera traps. We can also use it to take snapshots [16].
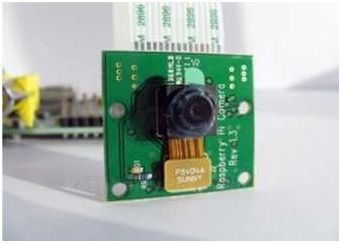
“The Raspberry Pi Camera Module is a custom designed add-on for Raspberry Pi. It attaches to Raspberry Pi by way of one of the two small sockets on the board upper surface. This interface uses the dedicated CSI interface, which was designed especially for interfacing to cameras. The CSI bus is capable of extremely high data rates, and it exclusively carries pixel data. It also weighs just over 3g, making it perfect for mobile or other applications where size and weight are important. It connects to Raspberry Pi by way of a short ribbon cable. The sensor itself has a native resolution of 5 megapixel, and has a fixed focus lens onboard. In terms of still images, the camera is capable of 2592 x 1944 pixel static images, and also supports 1080p30, 720p60 and 640x480p60/90 video. The camera is supported in the latest version of Raspbian, Raspberry Pi’s preferred operating system[3]”.
“Not only can the Raspberry Pi camera capture photos but it can also capture full HD video at 1920×1080(default resolution) . We can change this resolution by command . We must use an 8GB or larger SD card as you will find the space useful once you start capturing video. If we got over 3GB free which is enough for 30 minutes for full HD video. With the default options we will need up to 115MB per minute of HD video [11]”.
Camera outputting to SD card and over the Ethernet. The camera connects to the GPU, which does all the camera setup, encoding etc. The already compressed video is finally handed over to the ARM side where it simply gets written to SD card. If we use the Pi Camera Python module we can tell the camera to start and stop recording. This module is installed by default on the official Raspbian image now.
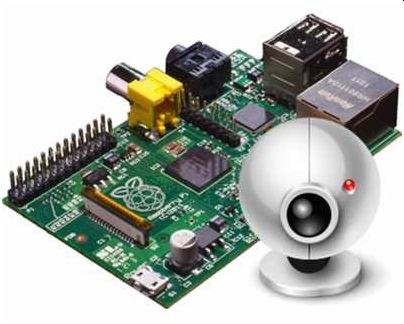
2.3.2 USB web camera
Rather than using the Raspberry Pi camera module, you can use a standard USB webcam to capture images and video on the Raspberry Pi. The quality and configurability of the camera module is highly superior to a standard USB webcam.
2.4 Audio and Sound record
The Raspberry Pi has an on-board audio jack, which is super handy for all kinds of sound effects and speech, just plug and go. However, for when we want better audio for music playback, a USB audio card can greatly improve the sound quality and volume. Don’t get us wrong, it’s a great thing to have audio on board but this USB audio card will make it even better. We like this particular dongle for not being too bulky, we can plug it in without blocking the secondary USB port. It also works great with a Raspberry Pi once the firmware has been updated on the Pi. We’ve tested it successfully with Raspbian[19].
We used Raspberry Pi jack to connect speaker to output the voice message from home owner to the visitor. The voice message recorded by home owner smart phone using Q-python application.
2.5 Server and Police
We used Raspberry Pi itself as a server to save videos, images and voice messages. Contacting the police, if there is an intruder, will be done by calling him through Q-python application.
2.6 Wi-Fi
Wi-Fi is used to help sending and receiving messages from/to home owner.
2.7 Raspian operating system
Raspbian is a free operating system based on Debian optimized for the Raspberry Pi hardware. An operating system is the set of basic programs and utilities that make your Raspberry Pi run. However, Raspbian provides more than a pure operating system. It comes with over 35,000 packages, pre-compiled software bundled in a nice format for easy installation on your Raspberry Pi [28].
“ The initial build of over 35,000 Raspbian packages, optimized for best performance on the Raspberry Pi. However, Raspbian is still under active development with an emphasis on improving the stability and performance of as many Debian packages as possible”[28].
Raspbian is not affiliated with the Raspberry Pi Foundation. Raspbian was created by a small, dedicated team of developers that are fans of the Raspberry Pi hardware, the educational goals of the Raspberry Pi Foundation and, of course, the Debian Project[28].
Raspbian is a community funded and supported free software effort. Although Raspbian is free software, the development cost associated with it are not free. As a user of Raspbian, we can support ongoing development of Raspbian by making a donation today [28].
2.7.1 Why Raspian operating system
Raspian is the default choice. Based on Debian Linux. Provide over 35,000 packages. Native Raspberry Pi Camera software, very easy to enable and use.
2.8 Python Programming Language
Python is powerful programming language that’s easy to use and easy to read and write. With Raspberry Pi, lets us connect our project to the real world. Python syntax is very clear, with an emphasis on readability and uses standard English keywords. Start by opening IDLE from the desktop. Developed under an OSI-approved open source license, making it freely usable and distributable, even for commercial use. Python’s license is administered by the Python Software Foundation.
The basic features of this language are [13]:
- Working on a lot of platforms(Windows, Linux, Mac ).
- Scalable and developed.
- Supports graphical interfaces( GUI Programming ).
- Dealing with the support of the majority of the rules.
- Python language is case-sensitive.
The Python Package Index (PyPI) hosts thousands of third-party modules for Python. Both Python’s standard library and the community-contributed modules allow for endless possibilities. Examples of applications: Web and Internet Development, Database Access,
Desktop GUIs, Scientific and Numeric, Education, Network Programming, Software and Game Development [13].
2.8.1 Why Python
The beginner-oriented Raspberry Pi has certainly influenced Python’s new role as a teaching tool, but also its increasing adoption at organizations like Google, Yahoo and NASA that make it valuable to know even after a programmer is no longer a beginner. In modern times, it has routinely been ranked as one of the eight most popular programming languages since 2008. We’ve noted a few key characteristics that make Python easy to grasp .Here are some of the reasons Python makes a great first programming language depend on analysis of the top 39 computer science departments as ranked by U.S. News in 2014 [29].
- Very minimal setup .
- It’s written in simple english.
- Errors appear on runtime: When we’re learning something for the first time, we’re inevitably going to make mistakes. Python makes it easy to identify and fix these mistakes immediately. That’s because Python displays errors at run time, instead of simply failing to compile the program.
- Shallow learning curve.
2.8 Q- python and SL4A
In our project image messages received on the home owner smart phone by Q-python application. Also the voice messages recorded and sent to the Raspberry Pi by the same application.
2.9.1 Q-python
Q-python is a script engine that runs python on android devices. It lets our android device run python scripts and projects. It contains the python interpreter, console, editor, and the SL4A library for android. It’s python on android. It offers the development kit which lets us easily develop python projects and scripts on your android device[22].
Main Features
1- Supports python programming on android including web applications, games, and SL4A programming.
2- Run python scripts and projects on android devices.
3- Can execute python code and files from QRCode.
4- QEdit lets us create and edit python scripts and projects easily.
5- Includes many useful python libraries.
6- Support pip.
2.9.2 SL4A
The Scripting Layer for Android, SL4A, is an open source application that allows programs written in a range of interpreted languages to run on android. It also provides a high level API that allows these programs to interact with the android device, making it easy to do stuff like accessing sensor data, sending an SMS[24].
Chapter 3 :Design
The following subsections have description of the system, detailed design and necessary information about the design.
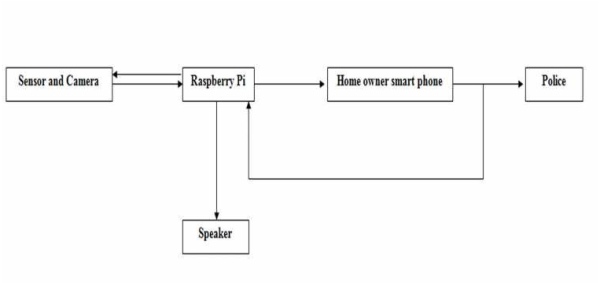
3.1 Project block diagram
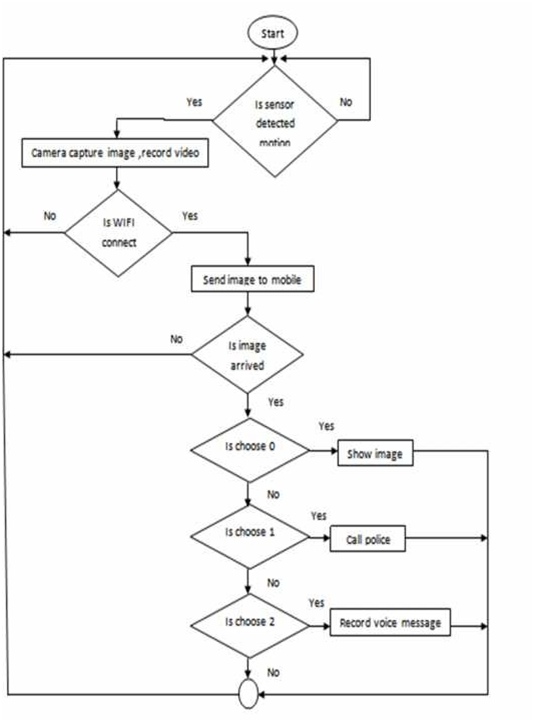
Figure 3.1 is the general block diagram of the project. As illustrated below, the sensor detects motion and sends signal to raspberry pi. Consequently, Raspberry pi sends signal to camera to capture an image, record a video and save them in raspberry pi. Raspberry pi sends the image to home owner smart phone via Wi-Fi, the home owner can view image, call police if he felt visitor is an intruder, and record a voice message and send it to Raspberry pi. The visitor will hear the voice message via a speaker.
3.2 The system design
The following image describes the system elements and how they are connected to each other.
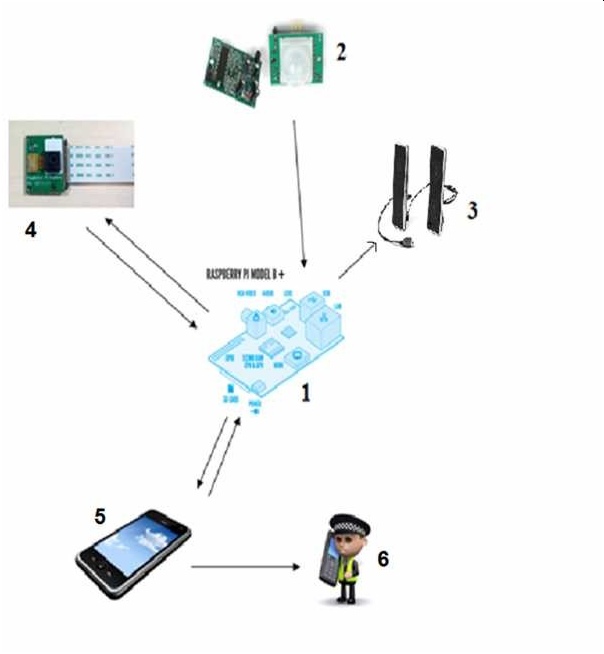
Figure 3.2 shows the main components of our system. Look the following :
- Raspberry Pi: The main component in the system , which will be linked to the other components. Represent the inlet and outlet of the signals and information.
- PIR sensor: Sensing if there is any person around home in range about 7 meters (120 degree cone), then send a signal to Raspberry Pi to give an order to the camera to capture an image.
- Speaker: used for audio output send by home owner to the visitor.
- Camera: used for video and images input that capture to the visitors after take an order from Raspberry Pi.
- Home owner smart phone: receives images from Raspberry Pi by Wi-Fi and sends feed back to the visitor if need. Call police if there is an intruder.
6. Police Mobile: receives call from home owner if there is an intruder.
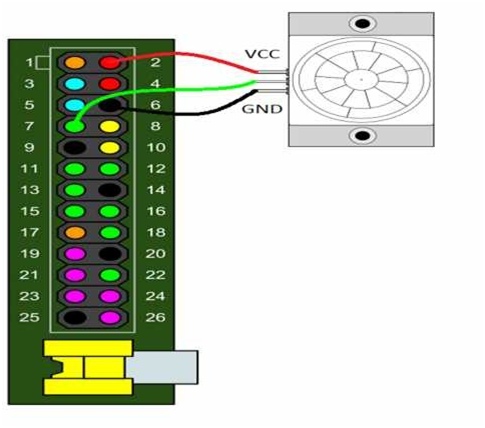
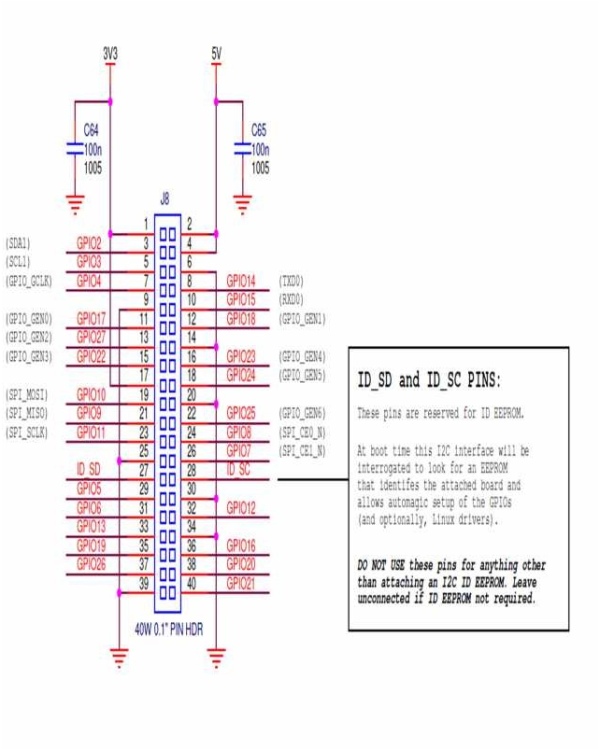
3.3 PIR sensor design and connection
The sensor is regarded as passive because it doesn't send out any signal in order to detect movement. It adjusts itself to the infra red signature of the door it's in and then watches for any changes. Any object moving through the door will disturb the infra red signature, and will cause a change to be noticed by the PIR module We don't need to worry about its inner workings. What we're interested in are the three pins on it; we can connect those to the Raspberry Pi GPIO pins. One pin is for +5 volts, one pin is for ground and the other is the sensor pin (the middle pin on our Pi). This sensor pin will receive power whenever motion is detected by the PIR module. We can then see that happening on the Raspberry Pi and take action accordingly. Look to the following circuit diagram [9].
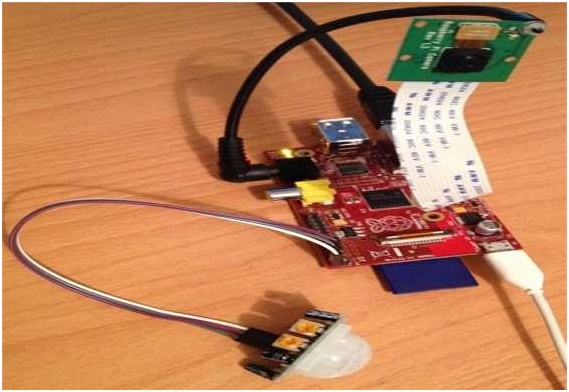
We connected the pi camera module to the CSI port, located behind the Ethernet port, and enabled the camera software. Then , tested the camera. Look to the following figure 4.5 .
3.4 The Q-python application design
The Q-python application on home owner smart phone gives the home owner three choices after receiving visitor image. First choice, show the image again to insure the face of visitor. Second choice, record sound message and send it to Raspberry pi. Third choice, call police if the visitor is intruder. Look figure 3.6.

Chapter 4: Software
The following subsections have description of the software and information about the software developed to drive the system.
4.1 Downloading the operating system on Raspberry Pi:
We can download the operating system by two ways. By ISO copy or using a NOOBS zip file. NOOBS (New Out Of the Box Software) is an easy operating system install manager for the Raspberry Pi. We can download NOOBS as free and install it on SD card of Raspberry Pi. Put SD card on any computer and install NOOBS on it. Extract the file from the zip. It is best to format SD card before copying NOOBS file on it.
Whether we want to use the NOOBS installer or a standalone distro image, the minimum size SD card we recommend using is 6 GB, but we’d recommend 8GB for safety. This will give our the free space we need to install additional packages or make programs of our own.
After installing NOOBS on SD card, we can install the operating system by connect Raspberry Pi directly with laptop or desktop by link the following devices with Raspberry Pi:
- Keyboard connected through USB port.
- Mouse connected through USB port.
- Monitor: by two ways:
- Using HDMI port with HDMI monitor.
- Using HDMI port with HDMI AGP link and AGP Monitor.
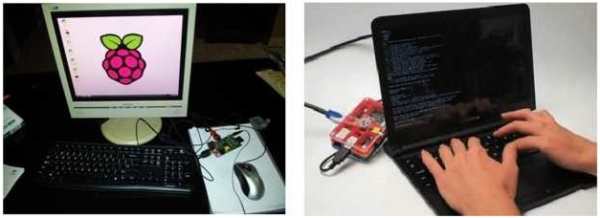
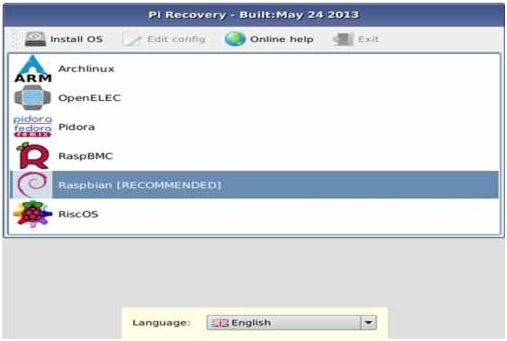
Connect power cable to Raspberry Pi and turn it on. NOOBS will make Booting automatically. We must choose which operating system we want as the following figure. We can download more than one operating system, but we will choose Raspian operating system. Download time between 30-40 min.
We can work on Raspberry Pi after install the operating system by Terminal screen or GUI as any operating system.
4.2 Downloading SL4A on smart phone:
Installing SL4A on an android device is similar to the process for any other android application. We can scan the QR code on the main SL4A project site with our device to download the SL4A installation file. It should automatically launch when the download is finished[24].
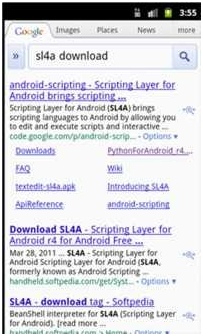
The final step is to install the python interpreter on our device. We can do so using any of several methods. From the emulator, we can enter SL4A download in the browser's search box (Figure 4.4)[24].
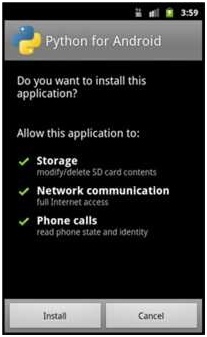
Clicking the PythonForAndroid_r4.apk link starts the download. To actually launch the installer, view the notification screen by clicking and dragging from the top of the emulator screen toward the bottom of the screen. Clicking the download complete message launches the Python for Android installer (Figure 4.5)[24].
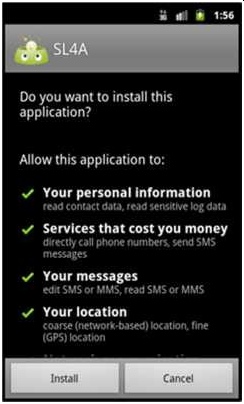
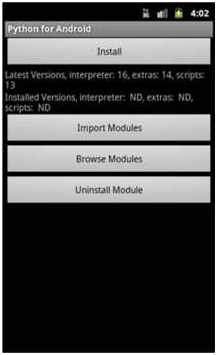
Clicking install launches a process that downloads and unpacks several .zip files. For the purposes of this article, simply click install on the primary installation screen (Figure 4.6)[24].
We should see three separate progress windows. The first shows the download, and then the extraction of the files onto the SD card. If everything works, an “Installation Successful” message appears[24].
4.3 Auto starting a python program on power up
When the Raspberry pi is used in control applications, there is often no need for a Keyboard, mouse or monitor. One is just using it to monitor inputs and control some outputs in a particular application[2].
Step 1:
Make sure that the Pi starts up desktop on power up . From the command line prompt or LXTerminal, type “sudo raspi-config”. For boot behavior select desktop. When you next power up, the raspberry Pi will load up the GUI automatically without you having to type in “startx”.
Step 2:
Check for Auto start file and if necessary create one. On the taskbar of the Raspberry Pi
open file manager. Type /home/pi/.config in the address bar at the top.
Step 3:
Create desktop file for python program. Using the text editor “leafpad” type the following. You can find Leafpad under other applications in file manager. Call this “mypythonprogram.desktop” and save in /home/pi/Desktop
[Desktop Entry] Encoding=UTF-8 Type=Application Name=mypythonprogram Comment=
Exec=sudo python /home/pi/mypythonprogram .py StartupNotify=false
Terminal=false Hidden=false Step 4:
place this in the Autostart directory. Use the File Manager to cut and paste this file into the
/home/pi/.config/autostart directory.
Step 5:
Test it out. Unplug the power supply and reconnect it. Your pyton program should start running automatically after a few seconds.
4.4 Flowcharts :
The following subsections have description of the flowcharts for the whole project, camera and sensor.
4.4.1 Project main flowchart:
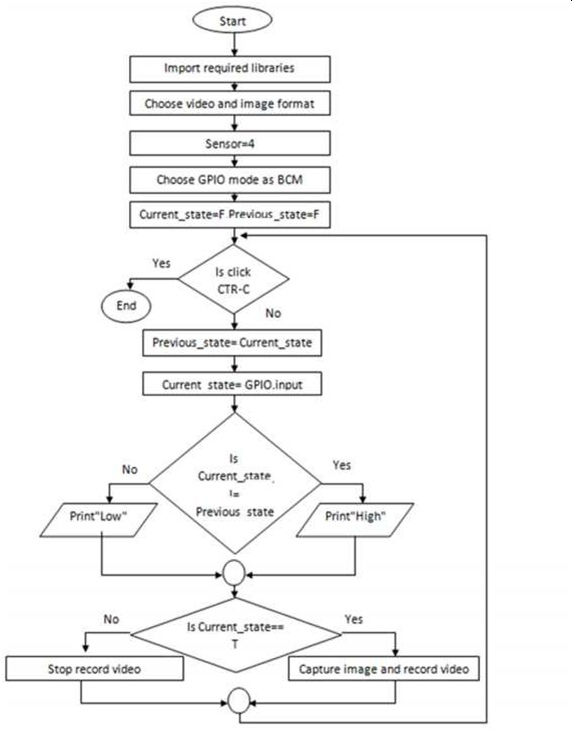
4.4.2 Camera test flowchart:
4.5 Pseudocodes :
The following subsections have description of the pseudocodes that are used in system as camera, output sound, sensor, code on raspberry pi and code on smart phone.
4.5.1 Camera test pseudocode:
Import required python libraries like RPi.GPIO, time, picamer and datetime Choose video format like h264
Choose image format like jpg
Determine number of pin that used to output signal of sensor Choose system type for GPIO like BCM
Use two variables to know sensor state like Previous_state, Current_state and give it initial value false
Call ready object and put it in cam variable and choose resolution and framerate Infinite loop
Wait time for delay Previous_state= Current_state
Read signal from sensor and put it in Current_state If Current_state not equal Previous_state
If Current_state equal true New_state equal “High”
Else
New_state equal “Low”
Print New_state
If Current_state equal true Capture image by camera
Record video for 10 second
Else
End loop End of code
Stop camera
Stop record video
4.5.2 Sound Output test pseudocode:
Import required python libraries like os and time Use play sound command and put file's name Wait time for delay
End of code
4.5.3 Sensor test pseudocode:
Import required python libraries like RPi.GPIO and time Choose system type for GPIO like BCM
Determine number of pin that used to output signal of sensor Set pin as input
Use two variables to know sensor state like Previous_state, Current_state and give it initial value zero
Infinite loop until PIR output is 0
Current_State equal 0 and print ” Ready” End loop
Infinite loop until users quits with CTRL-C Read PIR state
If Current_State equal 1 and Previous_State equal 0 :
print ” Motion detected!” and change Previous_State to 1 else if Current_State equal 0 and Previous_State equal 1 :
If Current_state equal true
Set the server address(IP address) to variable host
Sets the variable port(port number not used in other application) Binds the socket. Note that the input to the bind function is a tuple Determine the size of buffer as 4096
Make socket connect Capture image by camera
read the captured image and put it in buffer and send it to android Record video for 10 second
Make other connection to receive sound from android Set the address(IP address) to variable h
Sets the variable port(port number not used in other application) Accepts incoming request from client
Infinite loop
Receive sound file that carried in buffer If sound file is empty
break
Else
close connection
Play sound's file Stop camera record
End loop End loop End of code
4.5.5 Smart phone Q-python code test pseudocode:
// on smart phone
Import required python libraries like android, socket and time Set the address(IP address) to variable host
Sets the variable port(port number not used in other application) Binds the socket. Note that the input to the bind function is a tuple Determine the size of buffer as 4096
Make socket connection
Speack message ‘welcome in HomeAutomation program' Show Toast ‘Welcome ,, HomeAutomation Program' print ‘listening …'
Infinite loop
Receive connect
Open image that received from rasperry pi Android will viberate
Speack message “You have visitor in front of your home” Speack message the time of visitor is arrive
Make list consist from three options like Dispaly the imag, Record sound message and call police
If choose option 0 (Dispaly the imag)
Make socket connection include IP address, port number and open received file and read it to show image on android screen
Close connection Print ‘disconnected'
Eise if choose option 1 (Record sound message)
Input time to record sound
Show Toast ‘Start Record Sound'
Srart record sound and file format is mp3 Wait time for delay
Show Toast ‘End Record Sound'
Make connect include IP address and port not used in another application Send sound file to raspberry pi
Close connection print ‘disconnected'
Eise if choose option 2 (call police ) Put police number and call End loop End of code
Chapter 5: Validation and Discussion
The following subsections have description of the testing challenges.
5.1 Sensor test and connection
The sensor and Raspberry Pi GPIO have been connected as in figure 3.4. After connecting Raspberry Pi with electricity and run the code, the sensor was not working properly. After extensive research, we found that there are two GPIO modes:
- The GPIO.BOARD option specifies that we are referring to the pins by the number of the pin.
- The GPIO.BCM option means that we are referring to the pins by the “Broadcom SOC channel” number.
We put the output signal in the sensor test code on pin GPIO7 but after recognizing the difference between two modes, we put the output signal on pin GPIO4. It worked properly. For more details, refer to appendix page 42.
5.2 Camera test and connection
We have connected the Camera with Raspberry Pi CSI as figure 3.5. After connecting Raspberry Pi with the electricity and run the code, the sensor worked properly. The camera captures image as JPEG format and video as h264 format but we can't open h264 format. We installed vlc program but it do not work. After research we were able to open it by using terminal screen through the following command: omxplayer videoname.h264. We can close or stop the video using Ctrl+ C.
5.3 Wi-Fi test and connection
We bought ToTo Link Wi-Fi connecter and connect it with Raspberry Pi but Raspberry Pi restarted the operating system and did not return to the desktop or terminal screen. We discovered the energy from charger is sufficient so we exchange the charger to an other give little more energy. Raspberry Pi worked but Wi-Fi not worked, It needed to defied to the system. We tried to define it but we were un able to do that because some file lost so we replaced it with TP Link Wi-Fi and it worked properly. We tested the data transmission between Raspberry Pi and the smart phone by sending and receiving text messages and succeeded by using socket programming and global IP for both.
5.4 Image transfer to Raspberry Pi
The image was stored on Raspberry Pi after capture it by Pi camera. We faced some challenges in the process of sending the image, at the beginning we decided to use the Internet site broker. The internet site broker is not practical way. After searching we used socket programming to transfer it from Raspberry Pi to the home owner smart phone through python code on raspberry pi and Q-python code on home owner smart phone and it worked properly.
5.5 Sound record and transfer by home owner smart phone
We were able to record sound message as MP3 format using Q-python code on smart phone.
It reached successfully to Raspberry Pi.
5.6 Speaker and sound output test on Raspberry Pi
The voice message received successfully to Raspberry Pi but did not out on the speaker. Tried to using py media and sound libraries in python programming language and did not work. After research, the voice output on the speaker by the following code :
os.system(“cvlc audio/voice.mp3 –play-and-exit”)
but we face a problem, that our program work as a root and the previous code not. Solved the problem by the following :
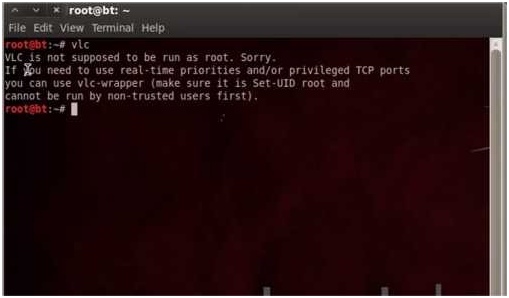
1- We need first to have vlc on our system.
2- We have to install hexa editor, we use okteta.
3- We have to edit /usr/bin/vlc.
4- We have to search for geteuid and make it to getppid.
5- The problem solved and we vlc work as root .
Chapter 6: Conclusion and future work
Our project aimed to enable the home owner to know if there is someone in front of the door with time and date, image and video for all of his actions and moves while waiting in front of the house, home owner can interact and communicate with him whether he is inside or outside the home, and he has option to call police directly if he felt that the visitor is intruder. This is achieved using many hardware and software components most importantly Raspberry pi and python language respectively.
As future work, face recognition can be added to our project. The home owner family faces cab be saved in a database to avoid sending them to home owner smart phone as visitors when the sensor detect them in front of the door. This can be applied by using Open CV in python. Open CV is the most popular library for computer vision. Originally written in C/C++, it now provides bindings for python. Open CV uses machine learning algorithms to search for faces within a picture. For something as complicated as a face, there isn’t one simple test that will tell you if it found a face or not. Instead, there are thousands of small patterns/features that must be matched. The algorithms break the task of identifying the face into thousands of smaller, bite-sized tasks, each of which is easy to solve. These tasks are also called classifiers.
Appendix A
Appendix B
1- AGP : Accelerated Graphics Port.
2- ARM : family of instruction set architectures for computer processors. 3- CPU : Central Processing Unit.
4- CSI counter : Camera Serial Interface. 5- Debian :free operating system.
6- DSP : Digital Signal Processing.
7- Fedora OS : operating system based on linux Kernal. 8- Gentoo OS : os based on linux kernel.
9- GPIO : General Purpose Input Output. 10- GPU : Graphics Processing Unit.
11- HD : High Definition video.
12- HDMI : High Definition Multimedia Interface.
13- ISO : International organization for standardization. 14- MIPI : Music Industry Processor Interface.
15- NoIR camera : No infrared camera.
16- NOOBs : New out of the Box software.
17- SDRAM : Synchronous Dynamic Random Access Memory. 18- SoC : System on Chip.
19- SD: Secure Digital.
20- USB : Universal Serial Bus.
21- V4L APIs : Video for Linux is a video capture and output device. 22- Wi-Fi : Local area wireless technology.
23- SL4A : Scripting Layer for Android.
References :
- Adafruit's Raspberry Pi Lesson 12. Sensing Movement : https://learn.adafruit.com/downloads/pdf/adafruits-raspberry-pi-lesson-12-sensing- movement.pdf.
- Auto Starting A python Program On Power Up : http://www.slideshare.net/SeggySegaran/raspberry-pi-autostarting-a-python-program.
- Camera Module : http://www.raspberrypi.org/products/camera-module.
- Computer Vision with Raspberry Pi and the Camera Pi module : http://www.open- electronics.org/computer-vision-with-raspberry-pi-and-the-camera-pi-module
- Downloads : http://www.raspberrypi.org/downloads/.
- Image Module : http://effbot.org/imagingbook/image.htm#tag-Image.Image.format.
- Learn Raspberry Pi : https://learn.adafruit.com/category/learn-raspberry-pi.
- Parent detector : http://www.raspberrypi.org/learning/parent-detector/worksheet/.
- PIR Motion Sensor Tutorial : http://www.instructables.com/id/PIR-Motion-Sensor- Tutorial.
- PIR Sensors and the Raspberry Pi : http://www.raspberrypi-spy.co.uk/2013/01/cheap-pir- sensors-and-the-raspberry-pi-part-1/.
- Playing Video On The Raspberry Pi : http://www.raspberrypi.org/documentation/usage/video/.
- Practical Raspberry Pi : http://books.google.ps/books?id=PSonZP4Nj5sC&pg=PA5&lpg=PA5&dq=what+sd+car d,mmc,sdio+on+raspberry&source=bl&ots=m nXuwrse&sig=sNbndwCeQAFC748ByI 4BMQNuB4g&hl=ar&sa=X&ei=WqQpVJCWOZLY7AbAuYCYBQ&ved=0CBsQ6AE wAA#v=onepage&q=what%20sd%20card%2Cmmc%2Csdio%20on%20raspberry&f=fal se .
- Python : http://www.raspberrypi.org/learning/python-for-vb-programmers .
- Python: Convert Image to String, Convert String to Image : http://www.programcreek.com/2013/09/convert-image-to-string-in-python/.
- Python Imaging Library : http://en.wikibooks.org/wiki/Python_Imaging_Library/Getting_PIL . http://www.geeks3d.com/20100930/tutorial-first-steps-with-pil-python-imaging-library.
- Raspberry Pi Camera Board : http://www.adafruit.com/product/1367.
- Raspberry Pi Documentation : http://www.raspberrypi.org/documentation/.
- Raspberry Pi B+ gets more USBs and microSD for the same tiny price : http://www.cnet.com/uk/products/raspberry-pi-model-b-plus/.
- Raspberry Pi gets its own sound card : http://www.engadget.com/2014/03/11/raspberry- pi-wolfson-audio-card.
- Raspberry Pi Hardware : http://www.raspberrypi.org/documentation/hardware/README.md.
- Raspberry Pi Voice Recognition Works Like Siri : http://blog.oscarliang.net/raspberry-pi- voice-recognition-works-like-siri/.
- Script Python : https://www.youtube.com/watch?v=7cUvMAMM1XU&feature=youtu.be.
- Sending a file over TCP sockets in Python :
http://stackoverflow.com/ques ons/27241804/sending-a-file-over-tcp-sockets-in- python. - SL4A : https://code.google.com/p/android-scripting: http://www.pythoncentral.io/python-for-android-the-scripting-layer-sl4a/.
- Turn a Raspberry Pi into a CCTV Security System : http://www.averagemanvsraspberrypi.com/2014/09/turn-raspberry-pi-into-cctv- security.html.
- USB Webcam : http://www.raspberrypi.org/documentation/usage/webcams/.
- What are the main differences / advantages of the various Raspberry Pi OS : http://raspberrypi.stackexchange.com/questions/19642/what-are-the-main-differences- advantages-of-the-various-raspberry-pi-oss.
- Welcome to Raspbian : http://www.raspbian.org/.
- Why Python Makes A Great First Programming Language : http://readwrite.com/2014/07/08/what-makes-python-easy-to-learn.
- Writing a simple TCP Server & Client Application in Python : https://extr3metech.wordpress.com/2012/04/28/writing-a-simple-tcp-server-client- application-in-python.