
Home automation using Raspberry Pi 3B and OpenHAB. [Optional] We will be using Google Home (or Google Assistant) to control the relays.

I wanted to completely automate my room. I had an old RPi-3 lying around. So I made it to my use and created this awesome home automation project with OpenHAB and IFTTT.
Step One : Project Planning
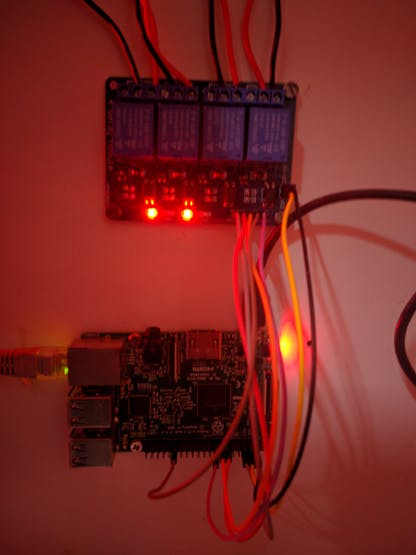
To get started with the project, you have to know how many switches you want to automate. I wanted to automate 4 switches, so I used a 4-channel relay. But the choice is upto you.
Step Two : Software
You have two of the following choices-
- Flash Raspbian and then install OpenHAB onto it. (Tiresome and not good)
- Directly flash OpenHABian onto SD card and run it directly (Damn Easy)
I used the second option and flashed OpenHABian onto a SD-card and put it into RPi. So I will be going to discuss this method. If you want to follow the first one, follow this guide, Manual Installation.
Else follow the steps below:
- Download the latest OpenHABian system image.
- Flash it onto a SD-card using Etcher.io
- After successful flashing, put the SD-card into Rpi and connect an Ethernet to the Rpi. (You may also use WiFi).
- Boot up the Rpi. You don't need a screen and/or mouse and keyboard as SSH and Samba are enabled already!
- Wait for 30-45 minutes for OpenHAB to finish its initial setup.
- After that, go to http://openhabianpi:8080, This will be the address of your Rpi from where you can access it.
That's all for the initial installation part.
Step Three : Configuring OpenHAB
After OpenHAB finishes its initial setup, go to http://openhabianpi:8080.
- There navigate to Paper UI.
- There, go to Addons>Bindings. Search GPIO in the search bar. Install GPIO binding. the navigate to MISC tab and install openHAB Cloud Connector.
Step Four : Making Items
Now we need to access our Rpi through SSH. I am going to use PuTTY. If you are on MacOS or Linux, you can use terminal.
SSH through PuTTY-
- Open PuTTY.
- Go to your router's admin page and find out the IP address. It will be named as OpenHABian.
- Copy the IP address and paste it in PuTTY and click Open.
- Now you need to login –
login as: openhabian
password: openhabian- After logging in, type in the following commands
$ cd /etc/openhab2
$ ls- Now it will show you all the available directories. We will be using – items (to create different items), rules ( to enable voice commands) and sitemaps ( to create a sitemap for navigation). We will create a sitemap as – home.sitemap. Items file would be – home.items. And rules file would be – home.rules.
$ sudo nano items/home.items
$ password: openhabian- This would open a blank document. We will here, create our items that we will be controlling through Rpi. In my case, I used 4 items. You can use as many as you want.
//Items File

Switch fan "Fan" <fan_ceiling> { gpio="pin:17 activelow:yes initialValue:low" }
Switch night_light "Night Lamp" <light> { gpio="pin:27 activelow:yes initialValue:high" }
Switch exhaust "Exhaust Fan" <fan_box> { gpio="pin:23 activelow:yes initialValue:high" }
Switch light "Light" <light> { gpio="pin:5 activelow:yes initialValue:low" }

String VoiceCommand- Here, I would explain the above with an example- Switch fan “Fan” <fan_ceiling> { gpio=”pin:17 activelow:yes initialValue:low” } What happens here is as follows-
- Switch – it is a keyword that defines that the item is a switch
- fan (generic – name it anything you want) – it is a user-defined identifier for naming different items that one wants to control.
- “Fan” (generic – name it anything you want)- it is the display name that will be displayed in the UI.
- <fan_ceiling> (icon name)- It is the name of the icon that will be displayed along with the name.
- { gpio=”pin:17 activelow:yes initialValue:low” } – here gpio is the thing that tells OpenHAB that the item is connected through gpio. pin:17 is the pin that you connect the relay to. activelow:yes(or no) – Active low means that when the switch is off there will be no voltage applied to the gpio pin and when the switch is on there will be voltage applied. initialValue:high (or low) – After that is initialValue and what this does is tell openhab what to set the initial value of the item during initialization. This one is set to high because I want the switch to be off during initialization.
- String VoiceCommand – it is the item that will be used to control other items using voice commands.
- You can create as many items as you want using this syntax-
type item-name "item-display_name" <icon-name> { gpio="pin:pin-no activelow: (yes or low) initialValue: (high or low)- After doing this, press Ctrl+X, then Y and Enter.
$ cd..Creating a Sitemap
Sitemap would be used for navigation and control of the relay switches.
- Considering you are continuing after completing above steps, type in terminal
$ sudo nano sitemaps/home.sitemap- This file would be the default sitemap for navigation. The above command will open a blank file. You need to create a sitemap as follows-
sitemap home label="Smart Home"
{
       Frame label="My Room"
       {
               Switch item=fan
               Switch item=light
               Switch item=exhaust
               Switch item=night_light
       }
}- sitemap home label=”Smart Home (generic use anything you want)” – this is the title of the homepage. You can use anything you want.
- Frame label=”My Room (generic use anything you want)” – this will be the sub-section. Its heading can be anything you want.
- Switch item=fan – this along with others will define the items you want to see and control from homepage. You have to enter the item-names we created. DO NOT ENTER THE DISPLAY NAME OF THE ITEM.
- After this press, CTRL+X, Y and Enter.
$ cd..Creating rule for VoiceCommand-
For this, you need to create a simple rule. I used reference from this guide. So for voice commands, lets create a basic rule file-
$ sudo nano rules/home.rulesThis will create a blank.rules file.
import org.openhab.model.script.actions.*
import org.openhab.core.library.types.*
import java.util.*
rule “voice”
when
Item VoiceCommand received command
then
var String command = VoiceCommand.state.toString.toLowerCase
logInfo(“Voice.Rec”,”VoiceCommand received “+command)
if (command.contains(“turn on fan”) || (command.contains(“turn on the fan”))) {
fan.sendCommand(ON)
}
else if (command.contains(“turn off fan”) || (command.contains(“turn off the fan”))) {
fan.sendCommand(OFF)
}
else if (command.contains(“turn off light”) || (command.contains(“turn off the light”))) {
light.sendCommand(OFF)
}
else if (command.contains(“turn on light”) || (command.contains(“turn on the light”))) {
light.sendCommand(ON)
}
else if (command.contains(“turn on night lamp”) || (command.contains(“turn on the night lamp”))) {
night_light.sendCommand(ON)
}
else if (command.contains(“turn off night lamp”) || (command.contains(“turn off the light lamp”))) {
night_light.sendCommand(OFF)
}
else if (command.contains(“turn on exhaust fan”) || (command.contains(“turn on the exhaust fan”))) {
exhaust.sendCommand(ON)
}
else if (command.contains(“turn off exhaust fan”) || (command.contains(“turn off the exhaust fan”))) {
exhaust.sendCommand(OFF)
}
end
Well, this is a long code with many files and commands. But you only need to consider the following to create your own set of commands.
- if (command.contains(“turn on fan”) || (command.contains(“turn on the fan”))) – here I have listed two options I can say to make the command work. What happens in actual is, when I say the reserved line, OpenHAB recognizes it and checks for the specific rule to do what occurs next.
- fan.sendCommand(ON) – When the above condition is true, this function sends a command ON to the item fan. This can be modified according to your choice.