
INTRODUCTION
The objective of our project is to develop a Home Network Protector (HNP) that prevents
against cyber intrusions. This will include network firewall, intrusion prevention system,
and a vulnerability scanner. The HNP will operate as your home router and monitor the
internet traffic in real-time to prevent unauthorized access to your home network. As a
home network can be as simple as phones and laptop connected to one house, this project
will be very beneficial the large majority. As Mirai malware attacks identifies vulnerable
IoT devices using common factory default usernames and passwords, our HNP will be
very beneficial in the industry as many small companies keep default settings on routers.
In this thesis, we describe our progress in building an IoT Security Device (HNP).
In chapter I we discussed about the security concerns such as Man in the Middle Attack
and botnets. In chapter II we propose our framework regarding hardware requirements,
MAC Address Filtering and IP Tables. Chapter III describes how we implemented our
access point, our attempt for MAC Address Filtering and IP Tables implementation.
CHAPTER I: SECURITY CONCERNS
In this increasingly connected Internet of Things ecosystem, network security has become
more important. A majority of consumers simply do not take into account the security of
their network and are unaware of the possible vectors of attack. With our project, we aim
to alleviate any security consumers may have about their home network. There are
numerous ways for an attacker to get on a protected network. Once on the network an
attacker potentially has free reign over any personal information, or devices, on the
network.
1.1 Man in the Middle Attack
In this type of attack, the malicious party interferes with the connection between the user
and the Wireless Access Point (WAP). The intruder pretends to be a legitimate user and
gains access to the home network's WAP. After gaining access to the WAP, the intruder
can get the user's MAC Address information when the user makes a connection with the
network. One the intruder has access to both the WAP and user's MAC Address
information, the intruder can pretend to be either the user or the network and send
malware to either the network or user respectively. An example of man in the middle
attack is when a hacker eavesdrops and makes separate connections with both the
genuine network and the user and makes them believe that they are communicating with
each other.
1.2 Botnets
Attackers have the capability to scan networks and fish for any unsecure IoT devices.
This allows them to hijack these devices and, using specialized software (malware), and
turn them into internet bots (et al botnets). Using command-and-control software, the
attackers take control of unsecured devices and use them to do their bidding. Attackers
can be renting out a victim's compromised devices to other malicious parties. These
attacks typically manifest to the form of distributed denial-of-service (DDoS) attacks. In
DDoS attacks, the penetrator floods the servers with overwhelming requests from
multiple botnets and makes the server unavailable. The attacked server ceases to be under
the original owner's control at this point.
There had been many notable attacks on IoT devices, including but not limited to baby
monitor attack, where the intruder gained access to baby monitor cameras by using its IP
Address, and Mirai Botnet Attack which caused a major part of internet to go down due
the overwhelming demand of requests from the botnets to the large internet servers.
CHAPTER II: PROPOSED FRAMEWORK
The primary issue we are trying to address is the botnet attacks and validating our
network to prevent Man in the Middle attacks. To do so we needed a single board
computer to build a prototype of our proposed framework with specific networking
capabilities.
2.1 Hardware Requirements:
Upon comparing our initial required specifications with the available single board
computers on the market we found the following three boards. Since these boards are
expensive compared to boards with single Ethernet port, we have decided to use a board
with single Ethernet port and add an extra Ethernet port using USB Ethernet adapter.
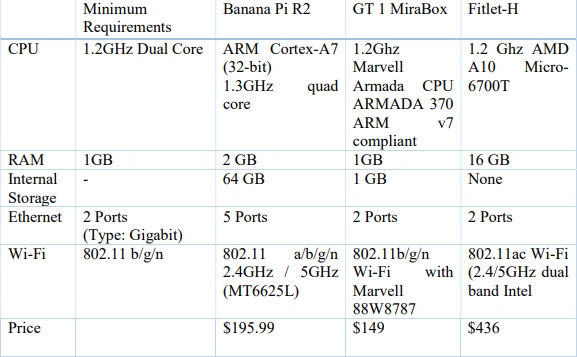
We have found three types of single board computers that meet our updated requirements and fall under our targeted price range. (< $100)
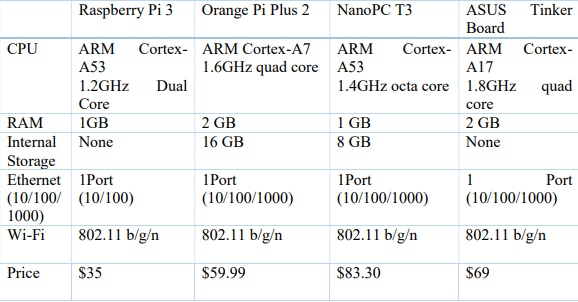
Among these four, Orange Pi Plus 2 meets all our requirements at the lowest cost. Since
it has a faster Ethernet port (10/100/1000) at the cheapest price. Therefore, we chose
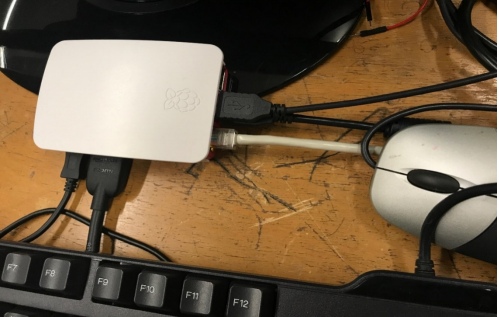
Orange Pi Plus 2 for our Home Network Protector (HNP) Project. After implementing
the access point and Ethernet bridge on Orange Pi Plus 2 with Armbian OS, the operating
system of Orange Pi was corrupted and there was less community support online, so we
have to make a design tradeoff of Ethernet port speed vs Price and Community support.
We chose to switch to raspberry pi.
2.2 MAC Address Filtering:
MAC Address filtering allows you to define lists of devices to be allowed or blocked
from connecting to the network. By using this technique, only known devices on the
home network would be allowed to connect and any other device with unknown MAC
Address would be blocked.
To implement MAC Address Filtering on our home network protector we populated the
hostapd.deny and hostapd.accept files. Accept and deny lists are read from two separate
files containing lists of MAC addresses to be accepted or denied respectively. Each line
of these files must contain only one MAC Address. To set up the MAC Address filtering
we use the following commands:
accept_mac_file = /etc/hostapd/hostapd.accept
deny_mac_file = /etc/hostapd/hostapd.deny
Usually hostapd.accept is sufficient to restrict access.
2.3 Iptables:
Iptables is a software interface to the netfilter firewall that is built-in to the Linux kernel.
Iptables provides an interface for the administrator to add, modify or remove packet
rules. [4] Iptables have policy chains which are verified whenever there is a request for
new connection. If it doesn’t find the rule in the policy chain, it chooses the default action
which can be either Deny-everything-by-default policy or Allow-everything-by-default
policy. [5] In our project we chose Allow-everything-by-default policy.This policy allows
the connection to establish if it cannot find a rule in the policy chain that blocks it. Since
we are not dealing with any sensitive information and are just trying to deny connections
to certain malware sites we chose to use accept connections by default policy. In order to
make changes to the iptables, you must first become the super user.
To update or install iptables use the following command
sudo apt-get install iptables
Types of Chains: Chains are iptable firewall rules organized in tables. The different types
of chains Iptables uses are prerouting, input, forward, output, and postrouting, which
control the behavior of the input, forwarded or output connections respectively.
Policy Chain Default Behavior: Use the following command to check what is the current
default policy chain behavior for your iptables
sudo iptables –L
Use the following command to clear all the currently configured rules
sudo iptables -F
For the system to accept connections by default use the following commands
iptables –policy INPUT ACCEPT
iptables –policy OUTPUT ACCEPT
iptables –policy FORWARD ACCEPT
To deny all connections by default use the following commands.
iptables –policy INPUT DROP
iptables –policy OUTPUT DROP
iptables –policy FORWARD DROP
Connection Specific Responses:
The previously described iptables access rules decide the action when it encounters a
connection from or to a particular port or IP Address. The most commonly used
responses are drop, accept and reject.
Accept: Allows the connection from or to a particular port or IP Address.
Drop: Drops the connection without sending any information back. By doing this the
source does not know the presence of our system.
Reject: Rejects the connection and sends an error back. The source will be aware that the
firewall has blocked the particular connection. Useful when the users are trying to access
malicious website so they know that the firewall detected it and do not try to connect to
that website again.
Specific Connection Rules:
The command iptables –A appends new rules. The rules are configured in an order and
when checking for rules, it starts at the top and goes in the order the rules were added till
it finds matching rule. To insert a rule above another, we use iptables –I [chain] [number]
Single IP Address: (Example IP Address: 8.8.8.8)
Accept Connection:
iptables -A INPUT -s 8.8.8.8 -j ACCEPT
Drop Connection:
iptables -A INPUT -s 8.8.8.8 -j DROP
Reject Connection:
iptables -A INPUT -s 8.8.8.8 -j REJECT
Range of IP Addresses: (Example IP Address Range: 8.8.8.0/22)
Accept Connection:
iptables -A INPUT -s 8.8.8.0/22 -j ACCEPT
Drop Connection:
iptables -A INPUT -s 8.8.8.0/22 -j DROP
Reject Connection:
iptables -A INPUT -s 8.8.8.0/22 -j REJECT
CHAPTER III: IMPLEMENTATION
3.1 Router and Access Point Implementation
Step 1: Installing Raspbian OS:
To install Raspbian OS, first download the image of the Raspbian OS which can be found
on the official Raspberry pi website [6].
Once the image is downloaded, follow the steps on the official installation guide located
at the Raspberry pi website to write the image to the SD card [7].
Step 2: Update Raspbian OS:
sudo apt-get update
sudo apt-get upgrade
Step 3: Installing the following required Packages:
hostapd: package that allows us to use the built in Wi-Fi as an access point
dnsmasq: DHCP and DNS server
bridge-utils: Bridges the Wi-Fi to Ethernet
vim: Command text editor
sudo apt-get install dnsmasqhostapd
sudo apt-get install bridge-utils
sudo apt-get install vim
Step 4: Configure Network settings
Turn off dnsmasq service
sudosystemctl stop dnsmasq
Turn off hostapd service
sudosystemctl stop hostapd
Step 5: Configure Static IP address
Open the dhcpd configuration file with the following command
sudo vim /etc/dhcpcd.conf
Add the following line at the bottom of the file “ denyinterfaces wlan0” and open the
interface configuration file with the following command
sudo vim /etc/network/interfaces
Add the following line at the bottom of the file:
Interface wlan0
staticip_address=192.168.4.1/24
Save file and restart dhcpcd daemon:
sudo service dhcpcd restart
Edit the wlan0 section and restart the dhcpd with the following command
sudo service dhcpcd restart
Reload the configuration for wlan0 with
sudo ifdown wlan0
sudo ifup wlan0
Step 6: Configure DHCP server
Now we have to configure the DHCP server, this service is provided by the dnsmasq
software package. To make matters easier for us, we will move the default dnsmasq.conf
file elsewhere, because it contains a lot of irrelevant information for our configuration,
and edit a new one:
sudo mv /etc/dnsmasq.conf /etc/dnsmasq.conf.orig
The above line makes a backup copy of the original dnsmasq.conf file in the same
directory.
sudo vim /etc/dnsmasq.conf
Add the following lines to the configuration file:
interface=wlan0 //this is our wireless interface for our IPv4 network
dhcp-range=192.168.4.2,192.168.4.20,255.255.255.0,24h
The above line is setting the range for the number of IP addresses to assign to the devices
on our network. For the interface wlan0 we have allocated IP addresses between
192.168.4.2 and 192.168.4.20 with a time to live (TTL) of 24 hours. You can provide
DHCP services to other network devices like eth0, if needed, by adjusting the parameters
for the DHCP range and the interface header accordingly.
Step 7: Configure hostapd
Now we need to edit the hostapd configuration file, this is where we will add all our
network parameters.
sudo vim /etc/hostapd/hostapd.conf
Add the following code to the configuration file. For more information on hostapd setups
you can check the Linux wireless website [8].
interface=wlan0 //tells hostapd what (wireless) interface to use
driver=nl80211
ssid=networkName //SSID=service set identifier
hw_mode=g //operating mode of the interface and channel
channel=7 //sets channel for hostapd to operate on
wmm_enabled=0
macaddr_acl=0 //MAC address filtering
auth_algs=1 //bit field 1=WPA , 2=WEP, 3=BOTH
ignore_broadcast_ssid=0 //hide/show SSID name
wpa=2 //bit field 1=WPA, 2=WPA2, 3=BOTH
wpa_passphrase=networkPassword
wpa_key_mgmt=WPA-PSK //key mgmt algorithm for authentication
wpa_pairwise=TKIP //controls WPA data encryption
rsn_pairwise=CCMP //controls WPA2’s data encryption
Step 8: We now need to tell the system where to find the configuration file we just made.
sudo vim /etc/default/hostapd
Uncomment the following line by deleting the “#” symbol before it.
DAEMON_CONF=”/etc/hostapd/hostapd.conf”
The hostapd daemon now knows where the configuration file is and what parameters to
initialize on start.
Step 9: Start the Service:
Now we start up the services with the following commands:
sudo service hostapd start
sudo service dnsmasq start
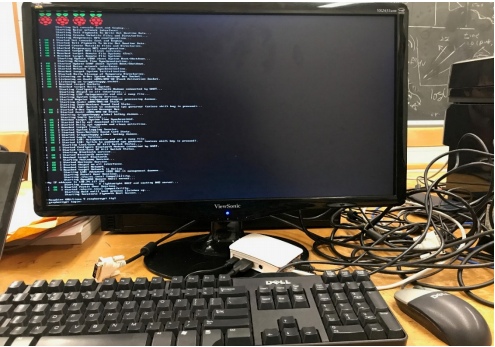
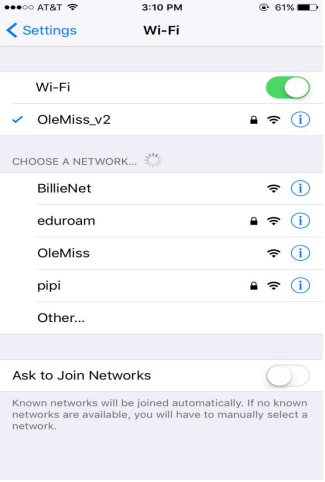
At this point, with the services booted up, your raspberry pi should be broadcasting its
SSID in your Wi-Fi menu.
Step 10: IPv4 Forwarding
We will now add routing and IP masquerading; this will allow your pi to forward IP packets. We want to edit the following sysctl.conf file sudo vim /etc/sysctl.conf Uncomment the line with the following command:
net.ipv4.ip_forward=1
Step 11: Now run the following command to add a masquerade for outbound traffic on your Ethernet eth0 interface:
sudoiptables -t nat -A POSTROUTING -o eth0 -j MASQUERADE Save the iptables rule with the command: sudosh -c “iptables-save > /etc/iptables.ipv4.nat” Now we want to invoke this ruleset on boot up so we will now edit another file: sudo vim /etc/rc.local We want to add the following line just above “exit 0” which will call the rules on boot up. iptables-restore< /etc/iptables.ipv4.nat Now reboot the device with the command: sudo reboot Using your laptop or smartphone you should now search for networks and be able to see and connect to the designated SSID of your Raspberry Pi.
Step 12:We will now bridge our Raspberry Pi to our ISP modem to pass all traffic from the modem to the Raspberry Pi. To do this we will edit a few new configuration files and modify ones we have already messed with. First thing to do is to install a new package and stop hostapd: sudo apt-get install hostapd bridge-utils sudosystemctl stop hostapd
This package enables our device to bridge IP packets coming through the Ethernet port to
pass them through any device connected to our wireless local area network (wlan).
Step 13: We want to create the bridge at this point and we do this by running the
commands:
sudo reboot
Using your laptop or smartphone you should now search for networks and be able to see
and connect to the designated SSID of your Raspberry Pi.
sudo brctladdbr br0 //brctl is used to set up an Ethernet bridge interface in the
kernel
sudobrctladdif br0 eth0 // creates an interface to bridge br0 to eth0
Step 14:Now we want to edit the interfaces configuration file, so any connecting device,
will know to accept the forwarded packets. We do this with the following command:
sudo vim /etc/network/interfaces
Now add the following lines to the end of the file:
auto br0 // starts bridge interface on bootup
iface br0 inet manual// creates the bridge interface with a manually set IP address
bridge_ports eth0 wlan0 //passes IP packets from eth0 interface to wlan0 interface
These lines are creating the bridge interface for our device.
Step 14: The final step is now update our hostapd configuration file by adding a line that
acknowledges the bridge:
sudo vim /etc/hostapd/hostapd.conf
Now add the line:
bridge=br0
You could put this underneath the wlan0 interface line for solidarity. Your hostapd
configuration file should like this
interface=wlan0 //tells hostapd what (wireless) interface to use
bridge=br0
driver=nl80211
ssid=networkName //SSID=service set identifier
hw_mode=g //operating mode of the interface and channel
channel=7 //sets channel for hostapd to operate on
wmm_enabled=0
macaddr_acl=0 //MAC address filtering
auth_algs=1 //bit field 1=WPA , 2=WEP, 3=BOTH
ignore_broadcast_ssid=0 //hide/show SSID name
wpa=2 //bit field 1=WPA, 2=WPA2, 3=BOTH
wpa_passphrase=networkPassword
wpa_key_mgmt=WPA-PSK //key mgmt algorithm for authentication
wpa_pairwise=TKIP //controls WPA data encryption
rsn_pairwise=CCMP //controls WPA2’s data encryption
Now reboot the Raspberry Pi with the command:
sudo reboot
You should now see the SSID of your device in the network discovery menu of your
device and be able to connect to it. Any device connected to the Raspberry Pi will
behave as if it is connected to the Raspberry Pi will behave as if it is connected via Ethernet.

3.2 MAC Address Filtering Implementation Challenges:
When the value macaddr_acl in the hostapd file to 0, the router is supposed to accept all
the MAC Addresses unless they are in the hostapd.deny list. When the value of
macaddr_acl is set to 1, the router should reject all the MAC Addresses except the one's
that are in the hostapd.accept list.
When we tried to implement it by using hostapd.deny list, we included the MAC
Addresses of our laptops in the Deny list and were expecting the HNP to block access to
our Wi-Fi connectivity but the Wi-Fi connectivity was unaffected. The access point was
still being broadcasted and we could connect to it. So we attempted to use hostapd.accept
list instead while changing the value of macaddr_acl to 1 and added our laptops MAC
addresses to it. This stopped the access point broadcasting all together. After trying to
debug and researching through the raspberry pi community forums [9], we concluded that
the error is due to a bug present in our Raspbian OS. Under further investigation, we also
discovered the false security MAC Address filtering supplies by being easily being
exploited by hackers. Alternatively protecting our HNP with WPA2 encryption overly
excels the limits and hindrance of MAC Address filtering in regards to Wi-Fi networks.
3.3 iptables Implementation:
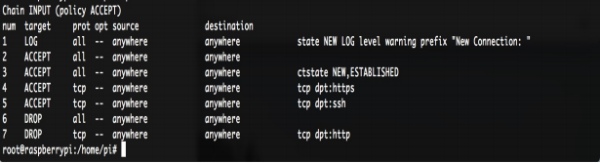

The above picture is a text file displaying the rules we implemented for our firewall.
These rules were created from iptables, a utility that allows configuration edits to the
Linux's firewall. Through iptables, we were able to edit network access confine to
specific IP Protocols, permissions given to certain users, and deny services over insecure
protocols. To do so, we first made sure iptables is installed.
sudo apt-get install iptables
For us to change the kernel's firewall, we have must have super user privilege and then
establish a new connection
sudo –s
iptables –A INPUT –m conntrack –ctstate NEW,ESTABLISHED –j ACCEPT
We then decidedly accept HTTPS protocol
iptables –A INPUT –p tcp –m tcp –dport 443 –j ACCEPT
SSH protocol is allowed to easily edit configurations remotely. However, to provide
privacy, we later allow only the MAC Addresses of our computers permission to surpass
our firewall
iptables –A INPUT –p tcp –m tcp –dport 22 –j ACCEPT
Due to HTTP possessing many security holes we deny all network broadcasts through
that protocol
iptables –A INPUT –p tcp –m tcp –dport 80 –j DENY
All of the previous iptables rules were conducted in the filter chain using input tables. As
DDoS attacks work by sending multiple packets to jam a server, to mitigate an attack, we
attempted to protect the entrances to the home network. In the case of tables, raw and
mangle are the best choices for our implementation. The prerouting chain is the first
ruleset to apply to a packet.
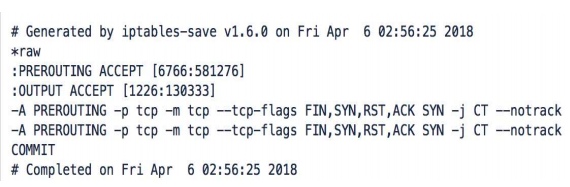
The rule set in Figure 9 excludes TCP packets from Connection Tracking (unnecessarily repeated twice in the figure). As Connection Tracking allows for specific rules based on the state the packet is within the state machine of the network. However, Connection Tracking is resource heavy, so in the case of a potential DDoS attack that sends a lot of traffic, it is best to unmark TCP packets.
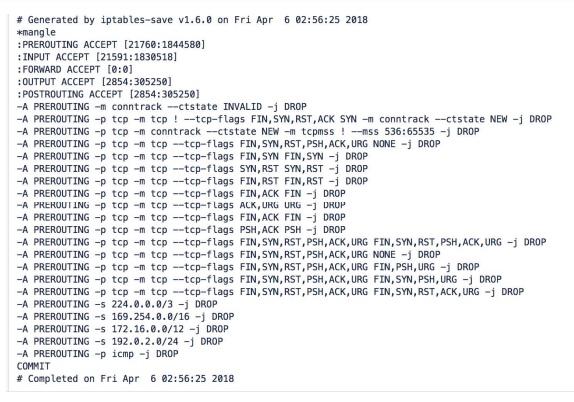
As the mangle table allows for rule modification on the basis of packet fields. We
constructed most of our DDoS protection framework within this table of the prerouting
chain. The rules here are making sure that the TCP packets that are trying to enter the
HNP network are actually valid. This is done by checking the authenticity of the packet’s
maximum segment size, TCP flags, and that the packet is not from a private subnet. The
very last rule involving ICMP hides HNP from ping tests.

As our main concern for mitigating DDoS attack before the packets actually enter a home
network, we are not compelled to construct many filter tables. Filter rules only affect the
packets that already entered the network. The first rule limits the number of connections
to HNP before rejecting users. The limit here is 80 connections. We also commit another
check of validity within the state machines.
CONCLUSION:
Throughout our research we have implemented the elementary features of our targeted
final HNP product. These features include, the design and implementation of our firewall.
We tested the firewall by sending fake IP packets to through the HNP to make sure the
firewall successfully implemented our ambitions. As for the intrusion detection system
(IDS), Rogers hopes to continue implementing such features next fall at Nokia Bell Labs.
The firewall is a key feature for the device because it handles the task blocking or
allowing incoming packets into the network according to a set of rules we will design via
a Linux kernel module. As we decidedly concluded to create our firewall in C
programming, we thoroughly researched kernel programming since the Linux kernel will
be manipulating the network packets. With the C programming we haveto consider
different bufferoverflow preventions [10].We familiarize ourselves with netfliter or
iptables, as well as command line parsing API in GNU libc, and understanding the Linux
proc file system (procfs) that allows us to communicate with the kernel space from user
space.The functionality ofnetfilter/iptables is a great boon toour device due to the layer of
security it provides and what we want our device to be.The netfilter/iptables are not only
the key factors of our firewall, but also allows us increased functionality with the use of
network address translation and port translation (NAT) and masquerading to
distributepublic IP addresses for better connectivity.It also gives us the option to
implement a transparent proxy for the network.
As for any scientific study, a reliable way to test our device is necessary. We have
decided to learn a few penetrating techniques. We used toolboxes in the Linux command
prompt such as nmap and netwox. Through nmap we aggressively sent packets to the
HNP. Netwox was used to create false packets specifically designed to emulate the
protocols our firewall was meant to block.
As earlier mentioned, Rogers hopes to implement an intrusion detection and prevention
system (IDS/IPS). We have a couple ideas here from preliminary research, the first being
a Snort-lite implementation or monitoring network traffic via Wireshark and writing
some code to dissect Wireshark filter rules that prompts and alert or triggers a quarantine
event.
Initially, we allocated a majority of our time into the building and implementing the
firewall. From our preliminary research on the topic, the amount of programming that
goes into it is extensive. Becoming well versed in each section that goes into the
construction of the firewall took majority of our time elapsed.