
Contents
hide
Abstract
Directly connect a Lego Mindstorms NXT Ultrasonic Sensor to a Raspberry Pi. A TCA9517 I2C bus buffer and an additional GPIO pin for SCL is necessary. A short C++ program to read the measured distance is provided.
Introduction
Raspberry Pi (Pi), despite some shortcomings, is definitely my favorite SBC. By far the biggest community and each and every detail is well documented.
Lego Mindstorms, on the other hand, my favorite robot construction kit. Unlike other robot kits it gives unlimited possibilities to build robots. Today a car bot, tomorrow a tracked bot and the next day a 6-axis robot arm – everything is possible. The NXT version of the kit has a powerful ARM based microcontroller at its heard, which is enough for most simple robot applications but not enough for any advanced projects like computer vision. Recently Lego published EV3, a new kit with a far more powerful brain which is, like the Raspberry Pi, driven by Linux. But still this brain is not capable of computing high resolution images at reasonable speed. Therefore I still want to combine the power of raspberry pi with the unlimited possibilities of Lego.
To the best of my knowledge there is one project achieving this, called BrickPi. Although quite successful, I think it has several shortcomings, I want to address in this and following articles.
First of all it is only compatible with the older I2C-based NXT sensors and not the new UART-based EV3 sensors. Moreover it does not directly connect the sensors to the pi, but uses two Atmega microcontrollers (Arduino compatible) to communicate with the sensors. Adding new sensors or any other change require new firmware. Furthermore the BrickPi uses L293D motor drivers which are only capable of delivering currents around 0.6 A while a Lego NXT motor consumes up to 2 A upon stalled [NXT Motor characteristics].
In this article I want to show you how to directly connect a Lego Mindstorms Ultrasonic Sensor (US sensor) to the Pi without using any additional microcontroller.
Challenges
My first attempt to connect the US sensor to the Pi was simple. Just connect both I2C signal lines using a simple level shifter with two n-fets [AppNote]. The level shifter should be necessary because the US sensor uses 5 V logic levels and the pi only 3.3 V. Then connect 5V and 9V to the sensor and start a simple test program and got – nothing. After checking wires and software twice, I hooked up the logic analyser and realized that the US sensor is unable to answer any request, not even acknowledge its own address.
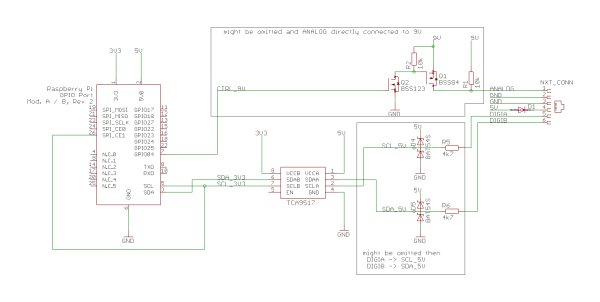
The first and major challenge is the hardware connection between the Pi and the sensor. The hardware and the software protocols are well described by Lego, including schematics [Lego HDK] and although it uses I2C, we cannot directly connect the sensor to the pi.
As you can see in Scheme 1 the sensor has very weak pullup resistors (82 k) and very strong series resistors (4.7 k) on its I2C lines. The second resistors are our main problem. As you might know, the Pi uses strong 1.8 k pullup resistors on its I2C lines. Due to the series resistor the sensor is unable to pull down any of the I2C lines and therefore is unable to answer on any requests of the I2C master.
Figure 1 shows a rough simulation of this situation. The blue line shows the data the sensor attempts to send, the green line shows the data received by the Pi. As you can see the sensor is unable to pull the simulated data line to low. You may also note, that any level shifting circuit is unnecessary at this state because, the strong pull-up resistor to 3.3 V dominates the line also at high level. The only solution for this problem, I have found so far, is using a TCA9517, a 2 channel, bidirectional buffer for I2C. Moreover this chip cares for the level shifting.
The second challenge stems from a firmware bug in the US sensor. Its described here in the mbed forums, for example.
There is also an article describing how to analyse the communication between Lego Mindstorms NXT and the US sensor using a logic analyzer (German). To sum it up, an additional clock cycle (toggle on the SCL line) is necessary between writing the register to the sensor and actually reading data from the sensor.
This is of course not compatible with any standard I2C hardware or software implementation. You may write a special software I2C implementation using any pair GPIOs but it is simpler to just connect another GPIO from the Pi to the SCL line and toggle it between writing the register to the sensor and reading the registers contents.
Hardware
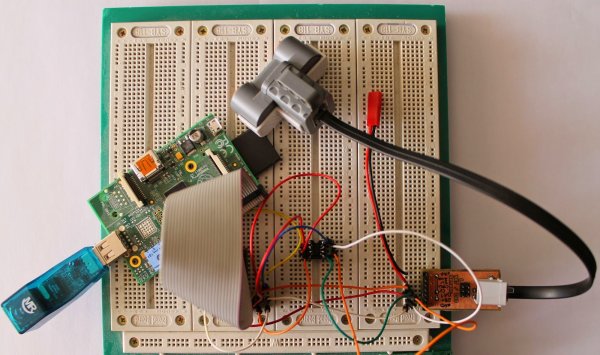
Necessary hardware for a simple prototype:
- Lego Mindstorms NXT Ultrasonic Sensor
- Mindstorms cable + socket / cut Mindstorms cable
- TCA9517 and a DIP 8 socket or any other SO8 → DIP8 adapter and some basic SMD soldering skills
- Raspberry Pi (I was using Raspberry Pi A ) with the usual accessories
- Bread board and cables
For this prototype I used a bread board with a small custom made, Lego Mindstorms sensor breakout board. This board mimics the 9V control and sensor port protection from the Lego Mindstorms NXT [Lego HDK]. For a simple prototype you do not need the 9V switching circuit (the two fets) or the additional series resistors an the diodes on the I2C lines. You can just connect 9V to pin 1 of cable, GND to pin 2 and 3, 5 V to pin 4 (omitting diode D1), SCL_5V to pin 5 and SDA_5V to pin 6.