
Introducing the “Pi Capsule.” It's currently the only Apple Time Capsule you can plug into your TV…,does this make it an Apple TV? 😉
Ok, ok, let's say you have an old Apple Time Capsule laying around that doesn't work anymore… (there's quite a few of these out there now as the first generation Apple Time Capsules have been dying now for some time due to failed hard drives or power supplies.)
Maybe you want more out of your dead Apple carcass. After all, after spending $500+ dollars on your luxury Apple backup device why not squeeze some more use out if it.
This hack will show you how to repurpose (recycle) an Apple Time Capsule with a ($35) Raspberry Pi computer motherboard.
Take note, this hack will also work even if you do not have a Time Capsule. Simply replace the Time Capsule with a suitable replacement worthy of housing your Raspberry Pi. This Instructable provides you all the basics for recycling something to build a Raspberry Pi case and automatically backup your Mac with Time Machine.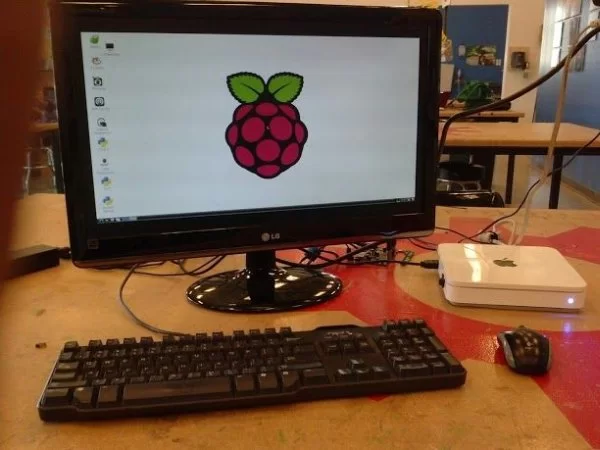
Table of Contents
1. Introduction – How To Hack An Apple Time Capsule With A Raspberry Pi
2. Why Hack the Time Capsule?
3. What Is An Apple Time Capsule?
4. Disassembling The Apple Time Capsule
5. What is a Raspberry Pi?
6. Build A New Power Circuit For The Pi Capsule & Do Some Testing
7. Laser Cut Some Acrylic To Retrofit The Apple Time Capsule Case & Build A Pi Capsule
8. Change out the Green LED on the Time Capsule for a Blue LED
9. Install Raspbian onto an SD Card and Boot the Raspberry Pi
10. Connect your Hard Drive or SSD to the Raspberry Pi
11. Configure A Hard Drive To Serve As Time Capsule
12. The Finished Product – “Pi Capsule”
13. How well did it work?
Step 1: Introduction – How To Hack An Apple Time Capsule With A Raspberry Pi
Once outfitted with the Raspberry Pi, your “Time Capsule” (will be a “Pi Capsule”) and will allow you to keep backing up your computer using Apple's software called Time Machine.
In addition, you can run Pandora, watch movies, setup a surveillance system you can view on your iPhone or Android phone, and more! There are many instructables that will show you what you can do with your Raspberry Pi, this Instructable will focus only on setting the Time Capsule up to be a reliable case for our Raspberry Pi.
The requirements or wish list that I had for this project are as follows:
1. Make a cool Raspberry Pi case and disguise my Apple Time Capsule.
2. Allow the use of 120v AC or 12v DC (through a toggle switch.) Having 12v DC capability allows me to easily make this a portable device.
3. Change the Green LED on the front of the Time Capsule to Blue.
4. Allow for future upgrades (e.g. an Arduino Pro Mini to do some automation, check the temperature, or do some fancy LED work.)
5. A nifty platform for practicing Python. 😉
This is a “Green Design” and is eco-friendly, it uses more than 75% recycled parts (and by making it capable to run on 12v DC only we can easily make it solar powered without an inverter.)
Step 2: Why Hack the Time Capsule?
Well, here is my hack to guide you through breaking it open and giving it lots of more useful life. In this Instructable, I show you how to repurpose the Apple Time Capsule with recycled components. ( If you really wanted a nice Raspberry Pi Case you could buy one from me for $10 or make one on your own using the Epilog Laser Cutter at Techshop (http://www.techshop.ws), then you can also say “I made it at TechShop.” But this is a proof of concept on how we can make useful things out of something some people might consider garbage or recyclable material.
This hack also actually ended up being very useful, practical, and purposeful. I decided to call this one finished when I met the following criteria:
1. Do something more than just be an “Apple Time Capsule”
2. Made it better (with Time Machine, Airplay, Media Center…)
3. Made it behave like an XBMC Media Center.
4. Provided a safe Raspberry Pi enclosure for AC (household electrical) or DC (mobile) operation.
5. Created a “Green Design” by using recycled materials (the case, the power supply, the hard drive, and components are all from recycled components found at the TechShop.)
I could have done a lot more with this project, but I have custom cases to make and this project allowed me to gain some experience in the design, prototyping, manufacturing, and assembly of a consumer electronics device for home or mobile use.
I had to just be happy with what I learned and move on to the next phase of my product development.
During this process I learned the folllowing:
– Applied DC electronics theory and practiced prototyping small form factor electronics for consumer use
– Applied Linux knowledge to install and configure the Raspberry Pi and Debian Linux based Raspbian operating system
– Learned to make prototypes with little or no money (by recycling)
– Found out what kind of product I could package into a small space, looks good, and will last through vigorous movement (consumers like to move their tech gear around without much care for what's inside…)
NOTE: The photo in this step is what the insides of a normal Time Capsule look like.
Step 3: What Is An Apple Time Capsule?
I'm always happily surprised when people at the TechShop see my hacked Time Capsule and they say “Oh Wow Cool!” But then I ask them if they really know what a Time Capsule is and quite frankly many do not actually know what it does. They've heard of it and pretend to know what it does, but in most cases in my experience they did not know.
So, let me explain. Apple's combination of hardware (Time Capsule) and software (Time Machine) allows you to back up everything on your Mac, all day everyday. That's the simple explanation.
It's Apple's solution to Automatic backups, and let me tell you there is nothing like it in the Windows world.
This is Apple's official link: http://www.apple.com/timecapsule/
So, I'll leave the explanation at that, if you have more questions please comment.
Also, many have mentioned the Time Capsule is slow, this is true especially if you are backing up over wireless. I generally use my Pi Capsule over wired Ethernet (the frist time) and I used an SSD for the hard drive so performance can be improved with these methods.
Keep in mind that the first time you backup a Mac with Time Machine it will take the longest, don't interrupt the first backup (or it may never finish!) And, try to do the first backup over wired (versus wireless.)
Also, on an Enterprise Note, recently with some of the OSX 10.8.x updates Apple has claimed to have added the capability to monitor Time Machine backups from an Apple OSX Server (the Server even sends me e-mails… as in the picture in this step), well… it still doesn't report properly (so I write scripts and use Rsync for Enterprise backups…) but let's not get off topic.
Step 4: Disassembling The Apple Time Capsule
The first thing to do is take apart the Apple Time Capsule. We are going to need the following tools:
1. A heat gun
2. Small Phillips “00” screwdriver
3. Pliers (in case you have to pull at the bottom rubber piece)
4. Dremel tool
I actually followed a step by step guide to disassemble the Time Capsule at ifixit.com the link is here: http://www.ifixit.com/Guide/Disassembling+Apple+Time+Capsule+Lower+Case/3216/1
(Note: I will be adding a nice HD video on how I took it apart to this Instructable soon.)
Once the Time Capsule was taken apart I used the Dremel tool to cut some holes on the case of the Time Capsule.
Step 5: What is a Raspberry Pi?
The Raspberry Pi is a ($35) electronic main board that can function as a full Linux computer that connects to any modern TV or display through HDMI, or even older style TVs with only RCA (composite connectors.) The Raspberry Pi also has a “GPU” that allows you to playback HD video.
The Pi was invented in the U.K. as a platform for kids to learn programming. It was released in the U.S. in February 2013.
If you ask me what a Raspberry Pi is, I would respond with “quite simply an amazing little device that is the essence of how far we have come with technology in this day and age (2013.”)
Step 6: Build A New Power Circuit For The Pi Capsule & Do Some Testing
Once I gutted out all the insides of the Time Capsule I needed a new way to power the Raspberry Pi.
In this step you will need the following tools:
1. Wire Strippers
2. Soldering Iron
3. Solder
4. Heat Shrink
5. Heat gun
6. Vise
7. Small Hammer
8. Channel grip pliers
Next thing to do was install a proper power supply for the Raspberry “Pi Capsule.” (The Raspberry Pi by itself with networking requires at least 5v DC with a minimum of 700mA of current capability from your power supply.) I was fortunate to find a very nice 5 volt power supply with a 2 Amp current capability in our “Bin Wall” at the TechShop in San Jose, so my new power supply had plenty of power to spare for some LEDs and maybe an Arduino.
By the way, the Time Capsule I used for this project was my customer's and had a failed power supply…My customer wanted the backed up files even thought the Time Capsule had failed.
I recovered the data from the Time Capsule after I opened it and removed the hard drive. I connected this drive up to my Mac with a “USB to SATA Adapter cable.” Then I copied the backed up files using the OSX Finder.
TIP: You don't need to be a TechShop member to find power supplies like this, as a Maker, you can make it a habit to save old power supplies from old electronics. Ask people to give you their old electronics and salvage the power supplies for projects like this. In the picture labeled 4381 in this step you can see an example of a plug in (“Wall Wart” https://en.wikipedia.org/wiki/AC_adapter) that is 5v 700mA. It's not as big as the one I chose but this would be the minimum if you wanted to just power up the Raspberry Pi, plug in the Ethernet cable, and a USB mouse.
I disassembled the new found power supply and cut the power cable too size after I had the Time Capsule carcass disassembled.
Remember if you want to connect 5VDC power directly to your Raspberry Pi use the built in test leads “T1” (Positive 5v) & “T2” (Negative/Ground) respectively.
Since I wanted to test my Pi Capsule with an HDMI display I retrofitted the Time Capsule case with some holes to expose the HDMI connector on the Raspberry Pi.
Keep in mind that with this hack, you will want to connect the SSD Hard Drive using a SATA to Mini-USB cable and then use an external “Powered” USB Hub. The SSD should be connected to the Hub and the Hub should be connected to the Raspberry Pi. I try and make it a habit to only connect a powered USB hub and Wireless mouse directly to the Raspberry Pi. Everything else like the Wireless card, SSD, Keyboard should go through the powered USB hub.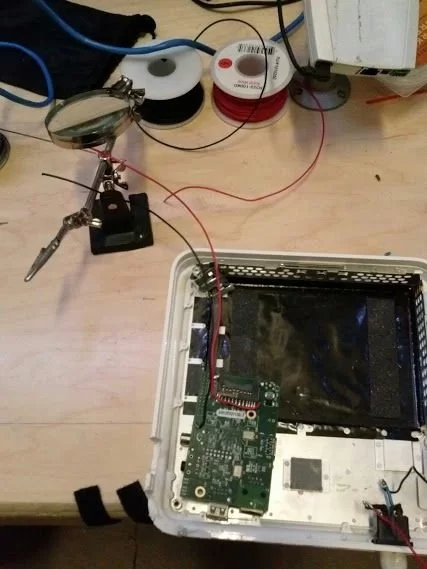
Step 7: Laser Cut Some Acrylic To Retrofit The Apple Time Capsule Case & Build A Pi Capsule
I took some measurements and created a file in Corel Draw to allow me to cut some clean looking pieces of clear acrylic to attach to the Time Capsule retrofit. The pieces are to dress up the holes i cut out, and to make a base plate for the Raspberry Pi and secure it.
I used the Epilog Laser Cutter at TechShop San Jose to cut the acrylic. I made sure to use a “hairline” to allow the Epilog laser cutter to know I wanted to cut (versus etch.)
The Epilog Laser Cutter is a great way to clean up a retrofit project, but it takes longer this way. In the long run I am able to make much nicer cases from scratch with this wonderful laser cutter (as in the photo attached to this step with my custom laser cut Raspberry Pi case.) The thing that I love the most about the Epilog laser cutter is that it allows me to prototype very quickly.
Once I cut the acrylic, I used a # 4-40 Tap Set to make threads to attach the acrylic to the base of the Raspberry Pi holder. I used #4-40 screws since the acrylic I used was 1/8″. In addition, the #4-40 screws fit in the mounting holes for the Raspberry Pi.
For more detail: How To Hack An Apple Time Capsule With A Raspberry Pi