
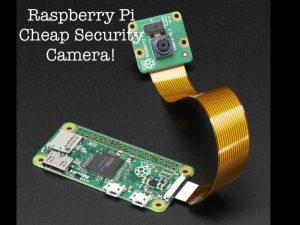
This project is an effective way of getting a security camera up and running that you can view over the network and also have it motion activated. With all the Security cameras you can buy, you can make one for more than half the price!
Remember the Raspberry Pi isn’t a so powerful, so the performance will degrade if you add really high definition cameras.
With that said, it’s still an excellent way of building your own affordable camera network. So let’s get to it!
Supplies
- Any type of Raspberry Pi (Even the Pi Zero W works!) $10
- Micro Sd card (~$5)
- Ethernet Cable or Wi-Fi (I am going to use wifi) $0-15
- Raspberry Pi Power Supply ~$10
- Raspberry Pi Camera (I am going to use the plain one) $9-35
- Raspberry Pi Case (Optional) ~$5
Step 1: Installing the Raspberry Pi Camera
First, we need to have a Raspberry Pi camera before we do anything. You can buy a cheap Raspberry Pi camera here, a night vision camera here, or a high-resolution camera here.
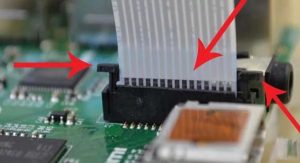
Second, we will need to install the camera. To do this, go to the ribbon slot and using two fingers to pull up on both sides of the connector gently.
Now the connector is open. Insert the ribbon cable with the metal leads facing away from the Ethernet port. Make sure it's lined up, then gently press down on the connector. The cable should be locked in place, and we can now move on to the software.
On a side note, if you want to install this into a more secure enclosure, you can buy some great equipment or even design to do this. However, to keep this tutorial pretty basic, I will not go into a heavily customized camera enclosure.
Step 2: Installing MotionEye OS
1. Download the MotionEye OS SD Card Image: MotionEye OS GitHub repository.
2. Follow the instructions to install the formatting software.
3. Insert your SD card into the computer and check the drive letter allocated to it, e.g., G:/
4. In SD Formatter, select the drive letter for your SD card (e.g., G:/) and format
Install the MotionEye OS Image onto the SD Card
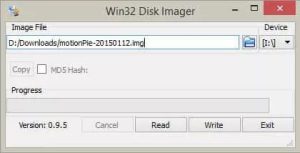
1. Download the Win32DiskImager.
2. Now, unzip the MotionEye OS img file so you can install it onto the Pi safely.
3. Select the MotionEye OS img file and the drive letter your SD card is assigned (Eg. G:/)
4. Confirm you have the correct details and click on Write.
5. Once done, you can safely remove your SD card from the computer.
Step 3: Booting & Setting Up MotionEye OS
Now we’re ready for boot up, so insert the SD Card, an Ethernet cord, and the power cord.
We will need to communicate to the Pi over the network rather than directly as I have done in most of the previous tutorials.
So now go ahead and boot the Pi up and then we can move onto getting it set up correctly.
Setting up the Raspberry Pi Security Camera
Once the Pi has booted you will need to do the following:
1. First, we will need the IP or hostname, so we’re able to connect to the Pi.
- If you’re using Windows, then simply go to network on the right-hand side in the File Explorer.
- You should see a computer names something like MP-E28D9CE5
- Go to your browser and add this to your browser bar e.g. http://MP-E28D9CE5
- You should now have the MotionEye OS interface up.
2. Alternatively, you can find out the IP of the Pi by going to your router.
Since all routers are different, I will not go into how to do this. Please refer to your manufacturer’s manual.
3. To log in as the admin go to the key symbol in the upper-left corner.
The username is admin and the password is blank (Don’t enter any password), this can be changed later.
4. You can access all the setting for the camera stream here. If you’re interested in altering these settings, keep reading as I explain them as much as possible below.
Now we should have a working security hub that we can configure!
Require the security camera to be wireless? No problem! Require to alert you with an email? No problem! Read more to find out what the settings do in MotionEye OS.
Step 4: How to Set Up Multiple Network Raspberry Pi Security Cameras
If you want to run more than one Pi cameras, it is pretty easy to set this up, so you have all the streams under in one window.
1. First, click on the three lines with dots on them in the upper left-hand corner.
2. Now up in the upper-left hand corner and click on the drop-down box and select add camera.
3. In here you have four settings to set up.
- Device: This allows you to select where the camera is located(network/local) and type. (Eg. MotionEye, MJPEG camera)
- URL: This is the URL to the other network camera. Eg. http://othercamera:8080
- Username: This is the username of the camera device. (If no username/password is required, then leave the fields blank)
- Password: This is the password for the username chosen above.
- Camera: Select the camera you wish to add.
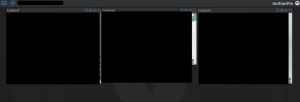
In the example below camera1 (Pi Camera) and camera2 (USB WebCam) are connected to the Pi running MotionEye OS. While camera3 is coming from a different Pi that was set up using the webcam server tutorial.
This method is a great way to set up a strong Raspberry Pi security camera network.
Step 5: Connecting to the Surveillance Outside Your Network
Now that you have your Raspberry Pi security cameras setup it might be worth considering allowing access to the central Pi so you can monitor your cameras elsewhere.
To do this just head over to my guide on how to setup port forwarding and also how to setup dynamic DNS, you can find the guide at Raspberry Pi Dynamic DNS & Port Forwarding.
A few important bits of information you will need for the setting up the port forwarding.
- The IP of your Raspberry Pi for example mine is 192.168.1.108
- Internal port is 80.
Ensure you also have set up passwords on both the admin and the surveillance user to help avoid unwanted visitors.
Once set up, you should now be able to connect using your external IP address such as XX.XXX.XXX.XXX:80 (80 should be changed to something else, I would recommend changing it to avoid easy access for unwanted visitors)
Step 6: Configuring the Settings in MotionEye OS
Surveillance username and password can also be set in here this can be used to just to access the camera interface.
To view all the settings available to set turn the show advanced settings to on.
Wireless NetworkTurn this on if you plan on connecting to the network via a wireless dongle. There are two things you will need to fill in here.
- Network Name: Enter the network name/SSID you wish to connect to in here.
- Network Key: Enter the network password/network key in here for the network you’re connecting to.
Once done you should be able to disconnect the Ethernet cord and remain connected to the network.
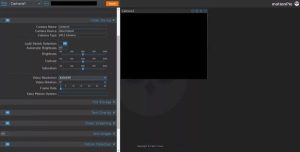
Video DeviceUnder this menu, you’re able to set certain settings regarding the Raspberry Pi camera device.
- Camera Name: Set this to whatever you would like the camera to be named. For example, the name kitchen would work well for a camera in a kitchen.
- Camera Device: You’re unable to edit this one, but this is the device name of the camera.
- Light Switch Detection: Enable this if you want sudden changes such as a light being switched on not to be treated as a motion. (This will help prevent false positives)
- Automatic Brightness: This will enable automatic software brightness, this means the camera software will make adjustments for the brightness. You don’t need to activate this if your camera already handles this. In here you change the brightness, contrast, and saturation of the video of the camera.
- Video Resolution: Here you can set the video resolution of the camera. The higher the resolution, the more room it will take up and the more bandwidth it will need to use to stream the footage. I set mine to 1280×800, and that seems to work perfectly fine.
- Video Rotation: You can rotate your video from the Raspberry Pi security if you’re finding that it is looking the wrong way.
- Frame Rate: This sets the number of frames that will be sent be every second. The higher this is, the smoother the video, but again this will increase the storage used and bandwidth.
File StorageUnder this menu, you can specify where you would like the files stored for the Raspberry Pi security camera.
This location can be a custom path on the Pi, the predetermined path or the network path.
Text OverlayIn here you can set the text overlay on the output of the camera.
By default, the left text reads the camera name and the right read the time stamp (Today’s date and current time).
Video StreamingThis menu you’re able to set the video streaming options, this is the video you see in the browser.
- Streaming Frame Rate: This is the same as mentioned above under video device.
- Streaming Quality: You can reduce the video streaming quality. This setting is good to reduce if you need to access the camera on a low bandwidth device often.
- Streaming Image Resizing: Enable this if you want MotionEye OS to resize the images before being sent to a browser. (Not recommended on a Pi)
- Streaming Port: This is the port that the device will listen to for connections looking to view the stream. Eg. http://motionpie:8081
- Motion Optimization: This will reduce the frame rate whenever no motion is detected. This setting will save you bandwidth.
You can also see three URLs that can be used to access different footage.
These URLs are very important if you have multiple cameras per Pi as each camera will have a unique port that you listen to the stream.
Still ImagesHere you can set the Raspberry Pi security camera to take still images whenever motion is triggered, during specific intervals or all the time.
Motion DetectionIn here you can activate the Raspberry Pi security camera motion detection that is included in the software.
You can make adjustments to the settings here so that you can get better motion detection.
Motion MoviesIn here you can set the Pi to record movies whenever motion is detected.
Motion NotificationsYou’re able to set up email notifications, webhook notifications or even run a command whenever motion is detected.
This option will allow you to be notified whenever activity is detected on the cameras, perfect if they are monitoring areas with low traffic.
Working ScheduleHere you can set the days, and the hours of operation you would like the system to be monitoring (If you leave this off then it is 24/7).
This option is perfect if you only need it running during specific hours.
Step 7: Summary
The Raspberry Pi security camera system is a great way to have multiple cameras hooked up both locally and over a network.
All the extra setting MotionEye OS provides allows you to have a strong functioning security hub for your home, office or wherever you’re setting this up.
I hope this tutorial has helped you in creating a fantastic Raspberry Pi security camera network!
Source: How to Make a Raspberry Pi Security Camera Under $35!