
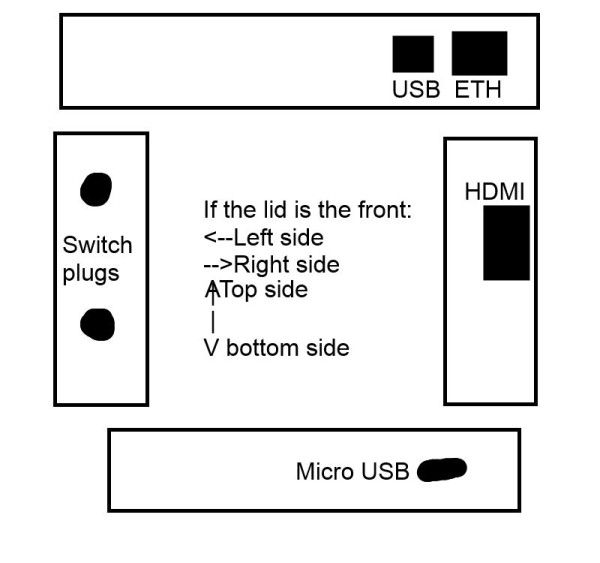
This tutorial show you how to make your own portable rapsberry pi, with a screen, access to USB, Ethernet and HDMI ports open to access on the side of the case. This is by no means a good tutorial, it is simply a way of documenting how I built mine, in case your'e interested. With the exception of the case and the piece of wood, all of the components can be salvaged for other purposes if you so desire. Below are a couple pictures of it.
Step 1: Required parts/tools
Tools that you will need:
– Screwdriver
– Saw (preferably a maneuverable one)
– Assorted drill bits (a small 2.5mm or less one, and a big 10mm – 15mm one)
– Either a soldering setup or lots of tape/glue (non conductive tape and glue)
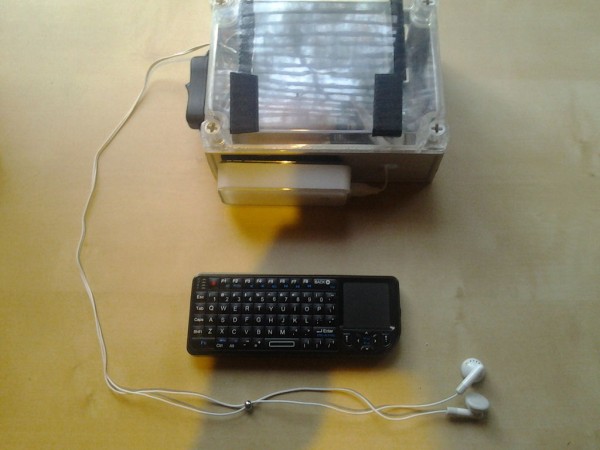
ALL PARTS SHOWN IN FIGURE 1.1
Parts that can be ordered off of Adafruit.com:
– NTSC/PAL (Television) TFT Display – 4.3″ Diagonal[ID:946] = $49.95
– RCA coupler – Male to Male[ID:951] = $1.50
– Miniature Wireless USB Keyboard with Touch-pad[ID:922] = $49.95 *
– Large Plastic Project Enclosure – Weatherproof with Clear Top[ID:905] =$19.95
– USB Battery Pack for Raspberry Pi – 4400mAh – 5V @ 1A[ID:1565] = $24.95
– USB Audio Adapter – Works with Raspberry Pi[ID:1475] = $4.95
– Adafruit USB Power Gauge Mini-Kit[ID:1549] = $9.95 *
– In-line power switch for 2.1mm barrel jack[ID:1125] = $2.50
^The keyboard mouse should be bought cheaper elsewhere, and both of these parts are optional.
Random parts that you need:
– A peice of wood that can be cut to fit inside the case
– A 9V connector as seen in figure 1.2
– if not using the big 9V batteries (like the one in the remote controls for remote control helicopters), the battery pack in fig 1.3
– otherwise, a 9V battery like described above
– double sided sticky Velcro. It is Velcro with adhesive on each side, and can be bought at hobby shops and a couple other places.
– Some screws, small ones, like in figure 1.4
– Some old headphones, with a 3.5mm connector (iPod and mp3 player earphones)
Step 2: Preparing the pi, the screen and the wood
Take your random piece of wood and make sure it fits flat inside the case, and is covering the 2 screw mounts on the case shown in figure 2.1. Make sure it also covers most of the other side of the case as well. Once you have the wood ready, drill some holes and screw it into the case. Next, you need to fix the Pi to the wood. Make sure the edge of the Pi's PCB (the green board thingy) is aligned with the edge of the wood, with the USB ports and Ethernet sticking out the top and power and the SD card slot facing towards the bottom, like in figure 2.2. Then, mark and drill some holes and use some more of your small screws to fix the pi to the piece of wood. In order to keep the pi off of the wood, use either some small washers, or if you're ghetto like me (or just lazy!), fold some paper to the appropriate thickness, and drill some holes in it. (Yes, it actually does work! I couldn't believe it myself either! See figure 2.3)
To prepare the screen, first remove the little stand using a screwdriver. Save it for later, just in case we need it again for another project. Then attach the 9V connector to the power connector included with the screen, using tape and glue, or using solder. Make sure the connection works, and won't fall apart!
For more detail: How to make your own portable Raspberry pi