
This page aims to summarise the steps required to install a webserver with PHP support onto your Raspberry Pi. This will allow the Pi to server HTML and PHP pages to users on the same network. This is a useful mechanism to view images and/or data on the Pi from another device, whether that is a PC, laptop, tablet or mobile phone.
Note : Before experimenting with network enabled features you should really make sure you have changed your Pi password from the “raspberry” default.
Step 1 – Install Lighttpd
Lighttpd is a lightweight web server application that works well on the Pi. It can be installed using the following commands :
sudo apt-get update
sudo apt-get -y install lighttpd
Step 2 – Install PHP
Next we need to install PHP. The order in which php5-common, php5-cgi and php5 are installed is important so don’t change their ordering in the line below :
sudo apt-get -y install php5-common php5-cgi php5
Then enable the Fastcgi module which will handle the PHP pages :
sudo lighty-enable-mod fastcgi-php
Once these packages are installed we can restart the Lighttpd service to pick up the changes :
sudo service lighttpd force-reload
Step 3 – Testing
In order to test your new webserver you need to know the IP address your Pi has on your network. To do this run this command :
sudo ip addr show
You will see a bloc
k of infor
m
ation similar to this :
1: lo: <LOOPB
ACK,UP,LOWER_UP> mtu 16436 qdisc noqueue state UNKNOWN
    link/loopback 00:00:00:00:00:00 brd 00:00:00:00:00:00
    inet 127.0.0.1/8 scope host lo
2: eth0: <BROADCAST,MULTICAST,UP,LOWER_UP> mtu 1500 qdisc pfifo_fast
    state UP qlen 1000
    link/ether b1:11:ab:42:24:2c brd ff:ff:ff:ff:ff:ff
    inet 192.168.0.45/24 brd 192.168.0.255 scope global eth0
The IP address in this example is 192.168.0.45. Take this IP address and enter it into the address bar of a web browser on another device.
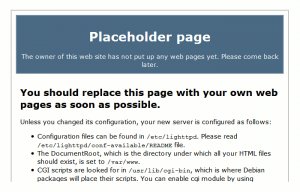
If everything has worked you should see the default Lighttpd “Placeholder” web page. It’s not very exciting but it is easy to replace with your own page.
For more detail: How To Setup A Web Server On Your Raspberry Pi