
Goal
Installing RetroPie through Raspberry Pi's OS (Raspbian) and also enabling Playstation 1 Emulator in RetroPie. I'll also teach you how to write images on your Mac or Windows PC as well (no worries :D).
This tutorial is for Raspberry Pi 2 B+ Models. Any Raspberry Pi before this is a lot easier to just download the ROM from the official site and skip step 3.
Introduction
Hey guys! This is my first Instructable, so any constructive feedback would be great! I've recently gotten my Raspberry Pi and decided to document all my projects and such as well as my experiences. If you would like to follow up on my projects please check out my website. It's still a work in progress, but I'll be documenting a lot of my DIY projects and technology interests there as well.
Also, if you've just gotten your Pi, you might be interested in some of the things I bought for the Pi and why I bought them. I discuss a lot about the items I bought for my Raspberry Pi. If you're interested, you can click here. It's good to have these things if you want to be able to overclock without any worried as well.
Click here to visit my website
Click here to visit my post on equipment I bought
The Learning Experience
I hope you guys learn a lot from what I have to teach. I'll also be explaining a lot of the commands and such so you'll learn some basic commands along the way. I'm not going to just tell you what to type most of the time. I'll try to fill you in on some basic background knowledge on how everything works so you might be able to apply it somewhere else (or for other Pi projects)! These guides are also ran through thoroughly so I'll be able to document any errors I experience for you guys as well.
Here's What You'll Need
- Raspberry Pi (Obviously)
- Video Cable (Preferably an HDMI for sound, but HDMI to VGA/DVI if you really need to, but you'll need speakers for the audio jack)
- Micro SD Card (Preferably 8gb or more, but 32gb sells cheap, and Samsung read speeds are the fastest)
- Power Supply (Micro USB Cable and Power Brick)
- USB Keyboard
- SD Card Reader
Here's Some Optional Stuff (but highly recommended)
- Heatsinks/Ventilation
- Game Control Pads
Heatsinks and Ventilation will really help you out since you're gaming and video output takes a lot on chips. Also game pads will help better your experience with emulators for that classic controller feel 😀
Are You Ready?
Now, time to set up your SD card with Raspbian OS.
Step 1: Setting Up the Raspbian OS and your Pi
What is Raspbian OS?
Raspbian is Raspberry Pi's Linux OS. At this current time of writing, it's called Wheezy. You should start downloading this right now since it's going to take a while (the site has slow download speeds, unless you torrent). After that, extract the .zip file and you should get an image. Next, we're going to have to mount the image onto your SD card. Please refer to either the Windows or OSX guides depending on what OS you're running.
In English, we're basically downloading Raspberry Pi's program (the image file, hence .img) and writing it to the card for use.
Click here to download the Raspbian Debian
Writing Raspbian to SD Card (Windows)
We're going to be using Win32DiskImager. Click here to download. This program is really easy to use, but just follow along anyway.
- After downloading, extract the program. and run the .exe
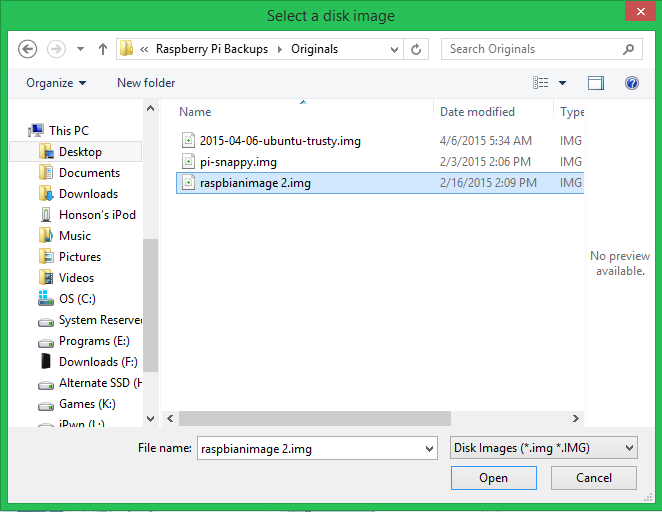
- Click the blue folder near the top right to browse for the image. Select the extracted .img Raspbian OS file you just downloaded.
- Plug your SD card in with your SD Card reader.
- Go to file explorer to check what drive letter your SD card slot is under.
- Select the drive letter your SD card is on (located right next to the blue folder).
- Press write and wait for it to say write complete.
Write Raspbian to SD Card (OSX)
I did this the painful way and did it through terminal, but follow this guide for the easy way out.
Plugging Everything In
Take your SD Card out, plug it into your Pi, and plug all the cables in (ethernet, keyboard, HDMI). Finally, plug in the power and proceed to the next step.
Step 2: Configuring Raspi-Config
What is Raspi-Config?
Basically, Raspi-Config is Raspberry's Pi's BIOS. This is where you'll be configuring all of Raspberry Pi's settings. From here you enable overclocking, video ram increases, and much more.
Time to Configure Settings
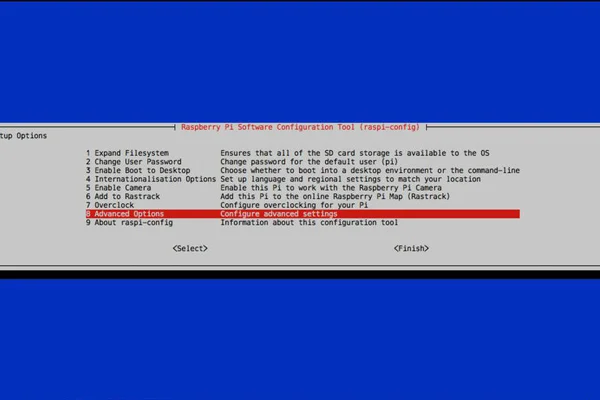
Now that your Pi is booted, you should be greeted with a blue screen with a bunch of options in the middle.
- Select the first option: “expand filesystem” and then press enter (This is going to take a couple seconds). You're going to be presented with the message: “partition will be resized on your next reboot”. Don't restart yet, just press enter.
- Go to “advanced options” and then press enter.
- Go to “A3 Memory Split” and press enter.
- Change the number to 512 and press enter.
- Next, go back into the “advanced options” tab (if it booted you back into the first set of options) and go to “Overclock”. Set it to “Pi2”. DO NOT SET IT TO TURBO. IT WILL JAM YOUR OS. IT'S TEMPTING. I KNOW.
- Now that you're back at the main Raspi-config menu, press right arrow on your keyboard twice to select okay and then press enter.
- Your Pi should not be rebooting. Proceed to the next step when you're done.
Note: You might have noticed you can change your password into the login for your Pi. You can if you want to. The default password for the Pi is raspberry. However, if you're going to change it, just remember that the password you set is going to be what you're using for the remainder of the tutorial.
Explanation of What's Going On
We're essentially expanding the file system in make it accessible to the entire OS (giving it root access). We're also increasing the video RAM from whatever it was (default is 64mb I believe) to 512mb. By increasing the VRAM, we'll be able to play more graphics intense games (such as the Playstation 1 ROMs) without any video lag. Also, overclocking will really help with the speed and responsiveness of your Pi as well. Just make sure you have sufficient cooling and ventilation for it (as explained on my blog post). Again, do not set it to turbo. It'll crash, and you'll have to re-wipe and restart this whole Instructable all over again.
Step 3: Finally Installing RetroPie/EmulationStation!
Let Me Make This Clear…
This section is only for the Raspberry Pi 2 B+ Model. Older versions of the Pi don't need these extra steps. You can simply download the image from the website depending on your model. Then, you can skip to step 4
Click here to download if you have an older Pi
Using apt-get on Linux
We're going to be using the apt-get tool found in Linux. APT stands for Advanced Packaging Tool, and it's a really simple yet powerful command to download/upgrade anything (even the OS itself). You're going to be using this for a lot of the projects on the Pi or on Linux in the future as well. We're going to be upgrading the git feature to clone the git repository of RetroPie.
In other words, using the apt-get command, we're going to drag the stuff from a website and install it into our Pi.
Updating and Downloading RetroPie
When following these commands, make sure to follow these simple rules. Input the next command only when it says pi@raspberrypi ~ $ and also whenever a command is in a new line, make sure to please press enter and wait if necessary.
First thing's first, let's get an update check on all of our packages.
sudo apt-get update
Wait a couple minutes, and then once you return back to pi@raspberrypi ~ $, input this to upgrade git
sudo apt-get upgrade -y git
Wait.
sudo apt-get install -y git dialog
Wait, and now time to copy the git repository.
cd<br>git clone --depth=0 git://github.com/petrockblog/RetroPie-Setup.git
Now, time to launch the setup that we downloaded/copied.
cd RetroPie-Setup<br>chmod +x retropie_setup.sh
sudo ./retropie_setup.sh
Installing RetroPie
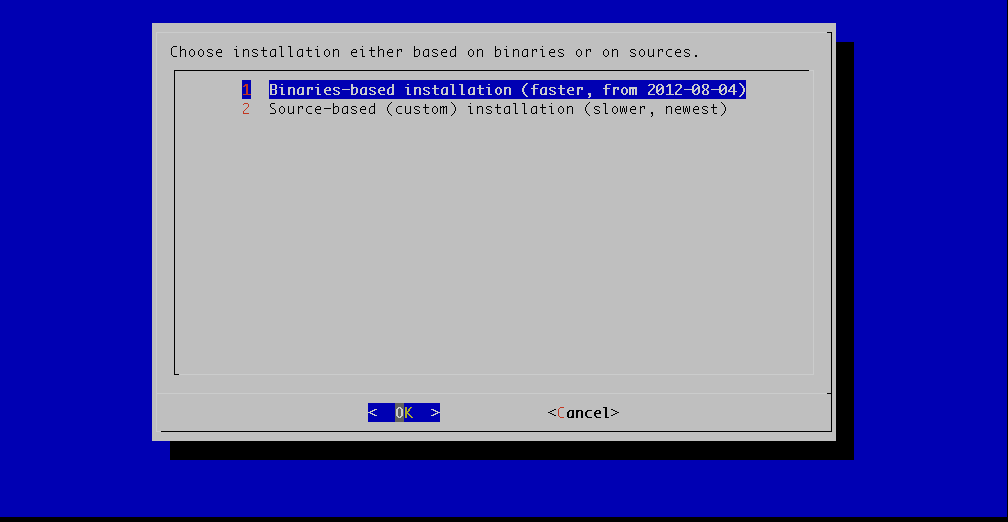
- Now you should hit a blue screen with two options. Make sure you select Option 1 (Binaries Based Installation) and then press enter.
- Now you're going to be presented with a bunch of options to customize RetroPie. Just press enter and proceed. No need to customize it. Just run with the defaults.
RetroPie is now installing. Using the second option to install is usually faster on the newer Pi models and you end up with the same stuff, but I trust Option 1 and I'll be using Option 1. The installation should take about 15 minutes.
After Installation
- Now you're going to be presented with a bunch of windows telling you where to store your ROMs. It's really easy. They're basically just telling you that if you downloaded an SNES ROM to put it into the SNES folder in RetroPie. I'll explain the specific directory later. Press enter a couple times until you hit RetroPie's setup screen.
- Select “Setup (only if you already have run one of the installations above)”. It should be the 3rd option, somewhere around there.
- Time to make EmulationStation boot without a keyboard. Select the second option ‘Auto-Start EmulationStation” and press enter.
- Then, select “Start EmulationStation at boot” and press enter. Press it again to confirm at the next prompt.
- Now, use the arrow keys to close out of the settings by pressing OK (or whatever it is that seems like it'll close it out, use your head :D).
You should be back at the terminal. Proceed to the next step.
Step 4: Setting up FTP (File Transfer Protocol)
Essentially, FTP, also known as File Transfer Protocol, is a standard network protocol to transfer files from one computer/host to another through a network. In this case, it's your LAN (Local Area Network). We're going to need to find out the IP address of your Pi. Then we can tap into it using WinSCP.
Finding Out Your IP Address
Type this into the Terminal
ifconfig
Now just look where inet addr: is. Your IP should be 192.168.1.xx (xx meaning a random number depending on your network).
Allowing Access to RetroPie's System Files
We're going to need this in the next step, so might as well do it now since you're still on your Pi. This basically claims ownership of folders using the chown command. This will make it easier for us to write files with the correct permissions. If there's any other folders that give you permission errors, just use the following command below, and change the directory accordingly.
sudo chown -R pi:pi /home/pi/RetroPie

sudo chown -R pi:pi /etc/EmulationStation
Downloading and Using WinSCP
- Download WinSCP (I recommend using the Installation Package)
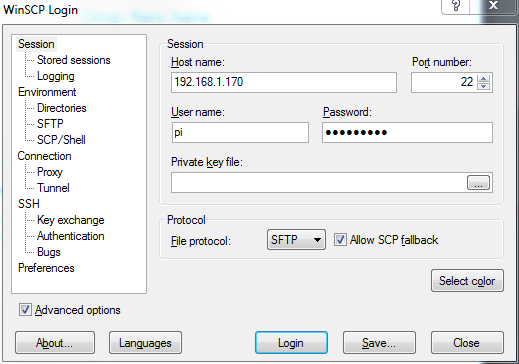
- Launch WinSCP. You should see a prompt asking you for information for your first connection. Put this stuff in:
- File Protocol: SCP
- Host name: Your Pi's IP Address (192.168.1.xx)
- Username: pi
- Password: Whatever you set it to, or the default: raspberry
- You can save the connection for future connections. Press login.
Proceed to the next step to enable the PSX Emulator.
Step 5: Installing PSX Emulation
Downloading and Installing SCPH1001.bin
This is basically the BIOS for Playstation 1. It makes sense to download the code for Playstation 1 to run Playstation 1 ROMs.
- Download SCPH1001.bin (If this link is broken, you can always Google it and download)
- Extract the .zip so you get the .bin file
- Using WinSCP, put it into this directory: /home/pi/RetroPie/BIOS
Configuring/Optimizing Settings
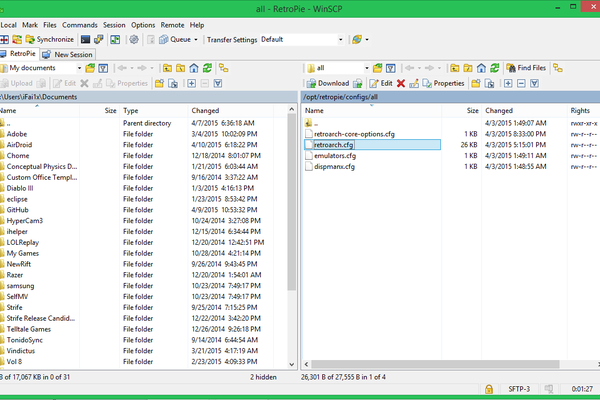
Next (still using WinSCP) navigate to /opt/RetroPie/configs/all/retroarch.cfg
Double click retroarch.cfg to open up the text editor. Change these settings to the code below. MAKE SURE TO DELETE THE HASHTAG IN FRONT OF THE LINE. #s are basically there to disable that part of the setting/code int he config file.
input_menu_toggle = f1

video_smooth = true
Next, navigate to /etc/EmulationStation/es_systems.cfg and open it up again with the text editor. Scroll down to Sony Playstation or Playstation and change this code:
runcommand.sh 2
Also, between and make sure you just leave it looking like this:
<extension>.bin .cue .BIN .CUE</extension>
Time to finally insert ROMs now!
Step 6: Putting in ROMs (Finally!)
Installing ROMs
- Go download ROMs (please tell me you know where to get them..)
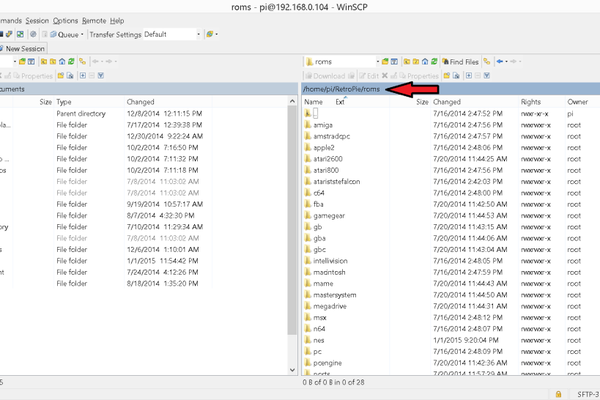
- navigate to /home/pi/RetroPie/roms
- Whatever ROM you downloaded, please put it in the matching system console folder.
- Note: All the ROMs can be placed in there as .zips and will still be able to read, unless you want to extract them. For Playstation ROMs, you're going to need to extract the file and make sure you just place all the files in the PSX folder with no other folder to it (as shown in the picture)
Probably the easiest step there is. Now time to configure our controls!
Step 7: Gamepad Configuration
Restarting Your Pi
First off, shut down your Pi, and then plug in your gamepad. Type this command to shutdown
sudo shutdown -h now
Launching the Configuration Script
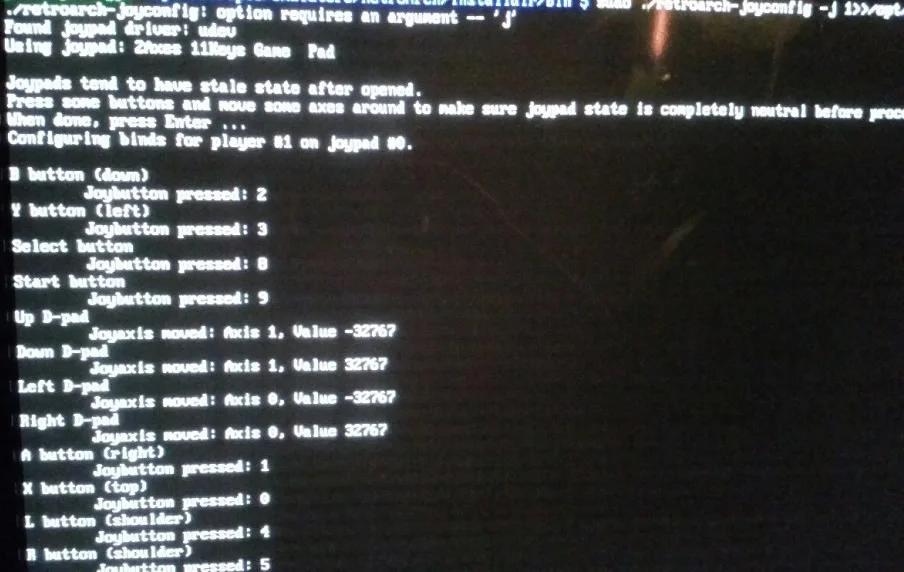
After plugging your controller in (one at a time if you have more than 1), boot up your Pi. Once it's ready to receive your command, punch this in:
cd /opt/retropie/emulators/retroarch/
sudo ./retroarch-joyconfig -j 0 >> /opt/retropie/configs/all/retroarch.cfg
This should launch a command and now asks you to start pressing keys to how you want them keyed in when you play on the ROM.
Note: If you get an error saying “Couldn't open joystick #0”, just replace that number with a 1 or a 2.
Start Inputting Your Keys
Press whatever key you want to output that command when it asks. Simple.
Note: If your controller has less buttons than the config tries to setup (SNES controllers lack the R2/L2, R3/L3, and Joysticks), then you need to select a dummy button (I used left trigger) for the buttons you don’t have. We will edit those out later. Once this is done, it will bring you back to the terminal.
Reboot Your Pi
Now that you're done figuring, reboot.
sudo reboot
Going Back to WinSCP
- Connect back to your Pi.
- Navigate to /opt/retropie/configs/all and open the retroarch.cfg file.
- Note: Alternatively, you could have opened the folder/config for a specific Emulator. This could be useful for making configuration settings specific for each console. Let’s say you want the controller mappings for NES to be different than what you have setup for SNES. You could go into the NES folder under “configs” and edit the retroarch.cfg to your likings, and do the same for the retroarch.cfg file inside of the SNES folder. The code written in the folders for the specific emulator will override the code written in the “all” folder/config.
Editting Retroarch.cfg
input_player1_l2_btn = "8"
input_player1_r2_btn = "8"
input_player1_l3_btn = "8"
input_player1_r3_btn = "8"
I am deleting these because I have no L2 or R2 buttons on the controller, and I also have no L3 or R3 buttons.
Further down in the .cfg file, I am also going to delete the Joystick configurations, because the controllers I have, use only a D-Pad. So delete all the line: “input_player1_l_x_plus_btn = “x”” and all of the lines under it.
Now the only things you should have left, are the buttons that exist on an SNES controller (A, B, Y, X, L, R, Start, Select, Up, Down, Left, Right), and one line at the top defining the first controller plugged in as “Player 1″
If You Have Another Controller…
If you have another controller that's a different kind, run the configuration command again after rebooting and pluggin out your old controller and plugging the new one in. Run through those and edit the Retroarch.cfg accordingly.
However, if you have a controller of the same kind just copy and paste all the code start from input_player1_joypad_index = “0” and down again and change the index to “1”. Then, change all of the player1 lines of the code under index 1 to player2.
Hotkey the Exit/Load Games and Saves (Optional)
You can setup an “exit emulator” button combination that will bring you back to the emulator/game selection screen. When you do this, it will dump the ROM and keep any save files that you have. Only do this if you have spare buttons on your controller that you won't be using. Otherwise, just use a keyboard for the time being.
Deleting the Conflicting Config Files
Configuration is the most annoying in RetroPie. There's different configs that always override others.
Navigate to /opt/retropie/emulators/retroarch/configs/ and delete all the .cfg files in there.
Then, shutdown
sudo shutdown -h now
Proceed to the next step!
Step 8: Changing Gaming/TV Resolution

Forcing the Resolution
Using WinSCP, Navigate to /opt/RetroPie/configs/all/retroarch.cfgagain. Scroll all the way down and find this:
video_aspect_ratio = x.xx
Now, just paste this as a replacement for reference, and just put the number of what resolution you want next to the = sign. Since I have an HDTV, I put in 1.77, like this:
video_aspect_ratio =
#1.333333 (4:3) Traditional SDTV
#1.56 (14:9) 4:3/16:9 Compromise aspect ratio
#1.6667 (5:3 Super 16mm)
#1.77 (16:9) HDTV US standard
#1.78 (16:9) HDTV US standard alternate
#1.6 (16:10) Common computer screen ratio
#1.6667 (5:3) Common European widescreen standard
#1.85 Common US widescreen cinema
#2.39 Current widescreen cinema alternate
#2.40 Current widescreen cinema alternate
Don't worry about the extra code, the hashtags cancel it out. It's just there for reference. Just save the file now and reboot if you want to see the changes.
sudo reboot
Step 9: Making Your ROMs Look Pretty
Scraping for Metadata
We're going to be downloading titles and info for each game now.
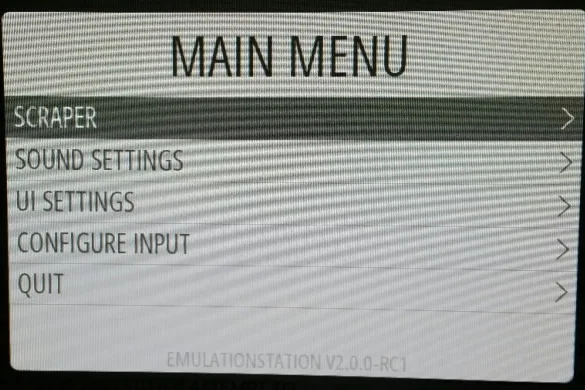
- Press the Start button on your controller to access the main menu.
- Press “a” on your controller for the Scraper
- TheGamesDB is a good place to get data from. Leave it there, and then press “a” on your controller.
- Leave the filter on “Only missing image” and then select what systems you want to scrape.
- Before scraping, you can let it automatically scrape and not decide on conflicts when there's more than one search result. To do this, turn off “user decides conflicts” off.
Step 10: FINALLLLYYYYYYYYY :D!!
Congratulations!
You have finally finished! Took a while didn't it? Now with all the software-end of the project finished, you can expand this a lot more. Here are some suggestions below. Anyway, I hope you learned a lot today and enjoyed making the RetroPie as much as I loved writing about it. I tried to make this guide as complete as I can after reading many other guides. Hope you enjoy! Make sure to check out my site for more projects!
Click here to visit my website
OwnCloud Integration
You can actually make your own personal cloud server and download/upload ROMs through the cloud. Neat huh? I'll have a tutorial soon on it!
RetroPie GPIO
This is to have a button to turn the system on and off to make it seem more of a console. Check it out!
Click here to check out the GPIO Adapter
Make a Case for it!
If you look around, there should be a bunch of cases for the RetroPie that people have made to make it seem more Retro so to speak. Check them out!
Source: Installing RetroPie/EmulationStation onto Raspberry Pi 2 Model B+ (Playstation 1 Emulator Included!)