
When I was new to IOT (Internet Of Things), I saw that there were hardly any tutorials which were simple enough for a beginner to understand and try out. There was either to much technical jargon, or the hardware was too complex.
So now that I’ve played around with IOT a bit, I decided to make a 10 step tutorial on controlling an LED over a Local Area Network (LAN).
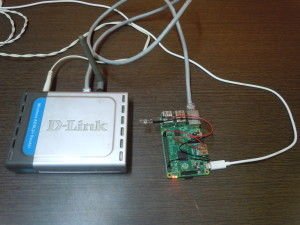
In this tutorial, we’ll be using an LED, a Raspberry Pi, a Wireless ADSL Router with internet connection and a device with a web browser. (Smartphone, Laptop, Computer, PSP, etc.)
On the software side, we’ll be using Apache2, MySQL and PHP.
If you’re new to the Raspberry Pi, you might want to have a look at Getting started with Raspberry Pi before trying out this project.
(Note: This project only uses an internet connection for software installation. After the installation a
nd coding is done, the internet connection is not required. For more info on making the project available on the internet, check port forwarding)
Step 1: Gather the components
- Raspberry Pi (I've used a Raspberry Pi 2 model B, but any model will suffice)
- ADSL Wireless Router
- Power adaptor for the router
- Computer monitor / TV screen which has an HDMI/VGA port (If you're using a VGA port then you will have to use a VGA-HDMI converter)
- Ethernet/LAN cable
- 2 Female-Female jumper wires
- Small LED
- USB Keyboard and Mouse
- A computer/laptop connected to the same modem as the Raspberry Pi (This will just be for the final test so even a smartphone is ok)
Step 2: Hardware setup
Step 3: Creating a website for the Raspberry Pi
Step 1:
Start your Raspberry Pi and open the Graphical User Interface (GUI) with the command:
startx
Step 2:
Once the interface is active, open the terminal and type the following commands:
sudo apt-get install apache2 -y
An IOT webpage will require a web server. This command will install a web server called Apache2.
Step 3:
To test the web server, you will need to know your Raspberry Pi’s IP address. Enter the command:
hostname -I
A number will be displayed. Start your Pi’s web browser and enter this number in the search engine. You should see something like this:
Congratulations! Your Apache server is up and running!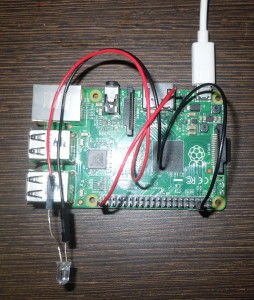
Step 4:
This is a default webpage which is stored in the ‘/var/www’ directory. To make changes to it and customise it, you need to enter this command:
sudo nano /var/www/index.html
Whenever you’re modifying a file, don’t forget to add ‘sudo’ at the beginning.
This indicates that you are modifying it as a superuser. Press Ctrl + X and hit enter to exit the file.
Step 5:
You will also need a preprocessor called PHP. Install it with the following command:
sudo apt-get install php5 libapache2-mod-php5 -y
Step 6:
Now enter the following commands:
cd /var/www sudo rm index.html sudo nano index.php
For more detail: Internet Of Things with Raspberry Pi – 1