
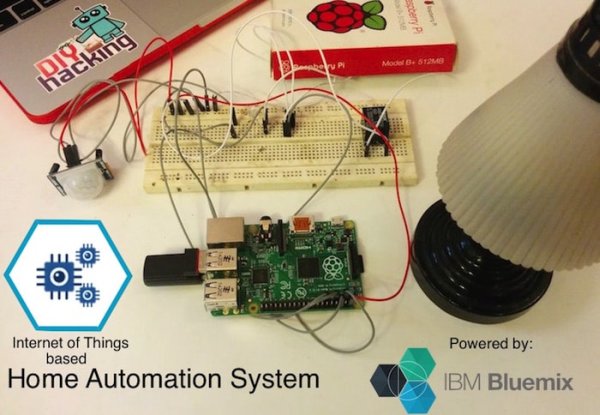
We all have at some point of life desired to control everything at the click of a button. May it be turning off unnecessary lights when you are not at home to detecting intruders when you are not around. This tutorial will guide you to build a simple raspberry pi home automation system that will allow you to control appliances in your home from anywhere in the world. And it will also allow you to view data from the PIR motion sensor via the internet to detect intruders. This project will be using platforms like the Raspberry Pi, IBM’s IoTF (Internet of Things Foundation) and Bluemix packages. And can be used as a perfect project to get into the world of Internet of Things. So lets get started!
What are the stuff required to do this project?
Hardware:
- Raspberry Pi 2 / B+.
- USB wifi dongle.
- USB keyboard and mouse.
- HDMI monitor and cable.
- Micro USB power adapter (smartphone charger).
- PIR motion sensor.
- Male-female and male-male jumpers.
- Breadboard.
- BC547 transistor.
- 5V SPDT relay and 1n4001 diode.
- LED and 220Ohm resistor.
Software:
Raspbian OS
How does it work?
If you are a beginner to Raspberry Pi, you can always use our free eBook to learn how to setup the pi and Raspbian OS. The Raspberry Pi home automation system uses client and server side python scripts. These can communicate with each other through IBM’s IoTF platform. This whole Internet of Things project can be divided into two parts:
1. Sending commands to the Raspberry Pi
The server side script running on our laptop or on a web server takes input commands from the user and correspondingly sends it to the client (Raspberry Pi). Here, we will be using commands to turn a light ON/OFF. When we pass the command to turn ON a light through the server side script, the information is relayed to the Raspberry Pi and it’s GPIO pin turns ON a relay. The system also sends status updates to the server on whether the light is ON/OFF.
2. Receiving data from the Raspberry Pi
In case of sending data from the PIR motion sensor connected to the Raspberry Pi, we run a script which reads the sensor through a GPIO pin and broadcasts the data through the IoTF platform. This can then be viewed through the IoTF console or through a custom web application designed using the platform.
A few quick reads that will help you before you get started:
- The concepts of using IBM IoTF https://docs.internetofthings.ibmcloud.com/reference/concepts.html
- Creating applications using bluemix: documentation.
- Interfacing Raspberry Pi with an accelerometer sensor: IBM blog.
Step 1: Testing IBM IoTF using a simulator
First you need to sign up for a one month free trial account from IBM: https://quickstart.internetofthings.ibmcloud.com/#/. You can do that by going here. Next you need to log into: IBM IoTF page with the credentials you just created. And then you need to click on “Quickstart” from the above menu. Next, click on: “Find out more” from the “Don’t have a device?” section:
Then from the new window that pops up, follow the instructions to setup the simulator or just click this link: “http://quickstart.internetofthings.ibmcloud.com/iotsensor“.
This simulator acts like the data coming from your Raspberry Pi or any other connected device, it simulates data like: temperature, humidity, etc. The simulator open up in a new tab and looks like a smartphone application:
Next, copy the MAC address from the top right corner of the simulator. Here, in this example it is: DD:2D:36:E1:C0:17. Now, paste this MAC address on the IoTF quickstart page: https://quickstart.internetofthings.ibmcloud.com/#/ or just click on the MAC address itself. You can see the data coming from the simulator in this new tab in the form of a graph. Now go back to the simulator and click on the UP/DOWN arrows on it to increase/decrease the value of temperature. And you will get to see that the graph on the quickstart page updates accordingly, and at the bottom of the page you will see the current value of temperature you have set.
Step 2: Adding the Raspberry Pi to IBM IoTF
The next step is to add our Raspberry Pi device to IBM IoTF platform, so that it can recognise it. In order to do this, you need to create a device ID for the pi. To do that, check the instructions on this page under the heading: “Connect (Quickstart)“: https://developer.ibm.com/iotfoundation/recipes/raspberry-pi/. After installing the packages using the commands on the instructions page, find the device ID of your pi using this command in the terminal:
“service iot getdeviceid”. Note down the device ID.
Next log into the Bluemix console: https://console.ng.bluemix.net/ and then click on “Add Service” or “Use Service”.
FYI – From next time onwards, you can just log into the IoTF page and click on the top right account section. A dropdown will come up, from there you will see “My organizations”. Click on the that,which will take you to a new page.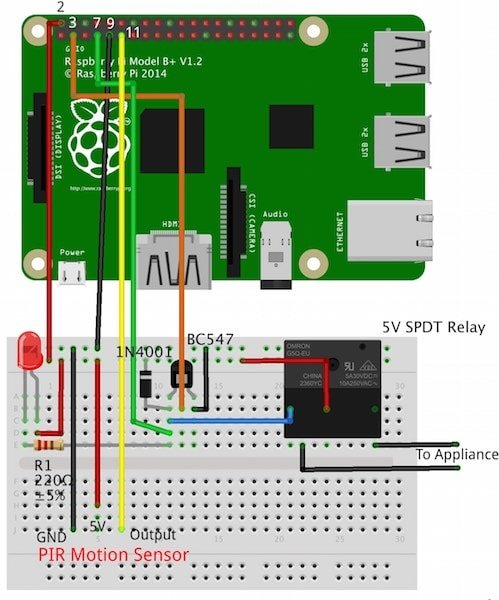
Now, after launching the dashboard, select “Devices” from the above tabs. Then click on “+Add Device” from the page. Fill in the name of your device (anything that you want to name it) and then enter the device ID you got from the earlier steps. After doing this, you will get a Token id, please note it down or take a screenshot of the window. You will be using this Token id to create a configuration file.
Now, you can view the data coming from your pi (CPU temperature, etc) when you enter the device ID of your pi on the quickstart page. And you can also see it from the “Devices” section on your account page. Just click on the “+” symbol in the “Last Event” column to view the incoming data. Click on each of them, to see the data in detail:
Next you have to follow the steps listed under the heading: “Connect (Registered)” on this page: https://developer.ibm.com/iotfoundation/recipes/raspberry-pi/. This will initialise your Raspberry Pi with details like Organization id, Device id, Token, etc so that we can communicate with it through other applications.
Step 3: Get the API key
Now you need to create an API key for the Raspberry Pi, so that we can read data from it through other external applications. Click on the “API Keys” tab on your organisation page and click on “New API Key”. Note down the key and authentication token that is generated, this will be shown only one time, so note it down or take a picture.
For more detail: IoT based Raspberry Pi home automation using IBM Bluemix