
This instructable uses circuit knitting and is written specifically for knitters.
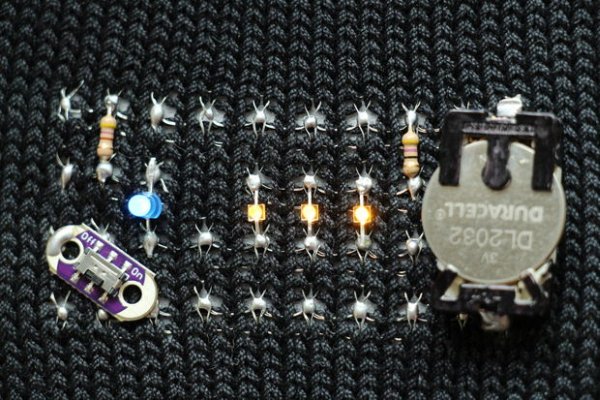
We'll cover how to create a circuit that uses blue and yellow LEDs, with instructions for hand and machine knitting.
Electronic machine users can download the pattern file below to CNC print the knitting.
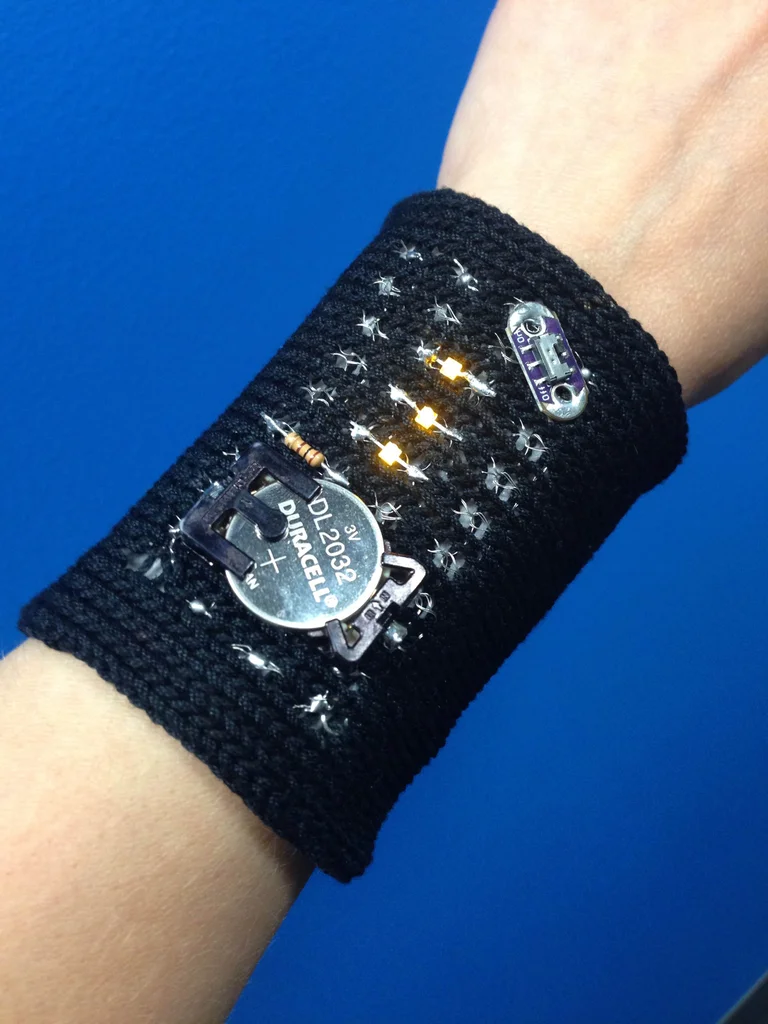
(“Rose the Riveter” self-portrait with cuff by Angeleah Daidone. copyright Angeleah Daidone. All other images: Jesse Seay: cc by-nc-sa)
Materials:
Fingering-weight mercerized cotton yarn (I use Yeoman Cannele. Linen or silk yarns will also work.)
2 strands 34 AWG bus wire
470 ohm resistor
47 ohm resistor
Coin cell battery and case
Solder
iron-on backing
fastening of choice (i.e. velcro, snaps)
Tools:
Tools for circuit knitting – outlined in the instructable
Tools for knitting — Instructions are for standard gauge (4.5mm) Japanese machines.
diagonal cutters
pliers (needle nose are good)
iron & board (for iron-on backing)
soldering set up: soldering iron, safety goggles, fume extractor, etc.
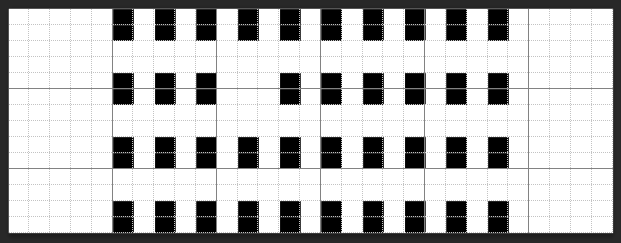
Bitmap File for CNC Knitting the Circuit
Step 1: Knitting Instructions
Gauge is not important. As long as the finished piece will fit your arm, you're ok.
Hand knitters:
Cast on 29 stitches in cotton yarn, whatever method you prefer.
Knit 31 rows in stockinette stitch.
Knit pattern. The black squares are two strands of wire held together. The white squares are cotton yarn.
Knit 31 more rows of stockinette.
Bind off, method of your choice.
Machine Knitters:
I've developed this as a CNC method for knitting e-textiles. With a hacked Brother electronic machine, download the bitmap file for the pattern and load it directly onto your machine.
The file is 14 x 29 pixels/stitches.
I use free img2track software to do this
Img2Track settings:
Vertical stretch 1.0
Maximum width: 29
Set up the wire as described here.
Tension dial 6.
Waste Yarn. Cast on 29 stitches. Knit 10 rows.
Switch to ravel cord. Knit 1 row.
COL. RC000
Switch to Main Yarn.
RC031
Carriage on Left. Set dial to KCII. Program pattern as single motif.
Knit 1 row to set the needles.
COR. Feed bus wire into B slot. Set carriage to MC.
**Knit pattern.**
COR. Remove wire from carriage. Set carriage to normal knitting, no patterning.
RC000
Knit 31 rows.
Switch to ravel cord. Knit 1 row.
Switch to waste yarn. Knit 10 rows.
Remove knitting from machine.
Bind off method of your choice. (I suggest an e-wrap cast on, right after knitting the first ravel cord. Then do a back stitch bind off, after you remove the knitting from the machine.)
**Visit the last step of this instructable for notes on machine knitting with wire.
Step 2: Tin the stitches, cut the floats, add backing
Once you've bound off the stitches, block the piece like you normally would.
Time to solder!
- If you don't know how to solder, it's very easy to learn. (Here's a comic book guide.)
- Spend at least $50 and get a good variable-temperature soldering iron. A good soldering iron makes soldering much easier.
- Use a brass tip cleaner instead of a wet sponge. Works way better.
- Wear safety goggles.
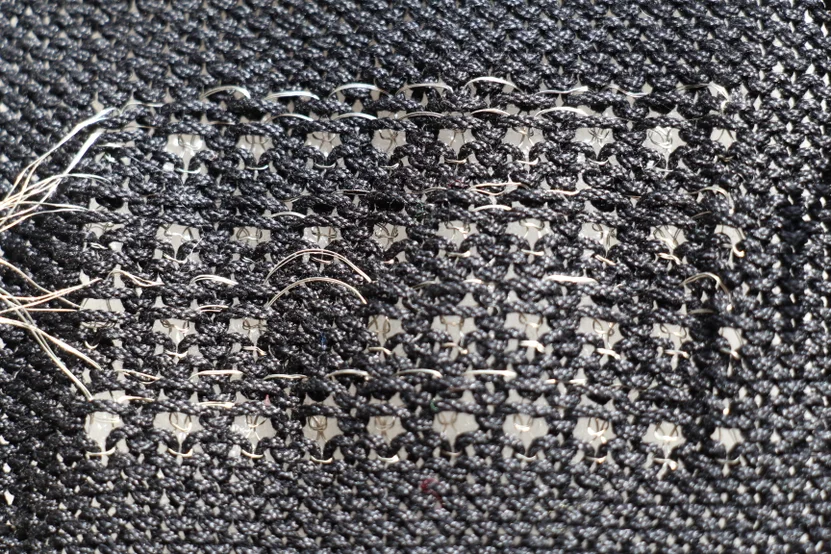
Tin the stitches on the ends of each row (and the two stitches on either side of the gap).
Flip the piece over and, using a diagonal cutter, cut the long wire floats that run between pairs of wire rows. Also cut the floats that run across the gap.
Remove all the stray wire. Make sure the wires are cut short — no tails that could touch another row. Check with the continuity setting of a multimeter to make sure.
Add the backing to protect your skin from solder. I use an iron-on backing:
- Cut a piece 3.5″ by 4.5″ and center it on the backside of the bracelet.
- Dry iron only — no steam.
- Avoid ironing tinned stitches.
- If you sew on a backing instead of ironing, you could probably do that after you build the circuit.
- Lead solder is toxic. Make sure the backing is thick enough to protect your skin. Also, no sweating on the circuit! If this might be a problem, use a backing that's sweatproof.
- Lead-free solder is also an option. It generally requires a hotter iron than lead solder.
Step 3: Solder Components

In the diagram above, the rectangles represent the wire stitches, and the horizontal lines between them indicate how the knitting pattern connects them (the “floats”, in knitting parlance).
Resistor 1 = 470 ohm
Resistor 2 = 47 ohm
LED1 = Blue 3mm radial LED
LEDs 2-4 = Yellow 2mm smd LED with axial leads
Tin all the stitches that have components going onto them. (For aesthetics, I like to tin all of them.)
When soldering circuits, it's a good idea to solder by height: start with your shortest components and work up.
Cut the long leads of each component to length before you solder. (A lead forming tool is great for this. Or bend the leads around a popsicle stick.)
Hold the component in place with pliers. Wet your iron tip and gently heat up the wire lead. It should melt the solder underneath it and stick. If it pulls up when you remove the iron, hold it in place with pliers (a steel dental pick works great for this).
Resistors: Solder these first. Both ends are identical; it's impossible to put a resistor in “backwards”.
LEDs: LEDs are polarized: like a battery, there is a positive side and a negative side. When you place these components, the positive lead of every LED needs to be on the 2nd row from the top. The negative lead must connect to the third row. Step 5 of the circuit knitting instructable includes details on soldering LEDs.
How to tell the positive side of the LED from the negative side:
T1 (3mm) and T 1 3/4 (5mm) LEDs : The longer lead is positive, the shorter lead is negative. Also, the round plastic “bulb” is usually slightly flattened on the side with the negative lead. You can see the flattened side indicated in the circuit diagram. Before you cut the LED leads, take a sharpie and mark the base of the longer (positive) lead of each LED.
2mm Axial LEDs :
Battery holder: tin both sides of each tab before laying it on the stitches. Make sure the positive lead is soldered to the top row, and the negative lead is soldered to the bottom row. Use a sharpie marker to color it.
Switch: Tin back side. Lay it on the stitches, and sneak the iron underneath to heat up the solder. Push down on it with a tool while you do this.
After all components are soldered, cut any leads that extend past the stitches.
Step 4: Show Off Your Fancy New Wrist Wear.
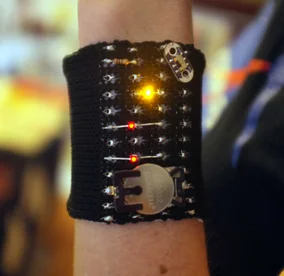
Once you've finished soldering…
Insert your coin cell battery.
Add your choice of fastening. I suggest snaps or velcro.
Now go show off your new cuff!
*** I designed this project for a workshop series I run in Chicago. I knitted the cuffs for the participants on my machine before the workshop. During the workshop, we learned about electronics and circuit design, then the participants soldered their choice of LEDs onto the bracelets.
Step 5: Notes on Machine Knitting With Wire
Disclaimer: Knitting with wire is not for novices. Know your machine by heart before you try this.
***The carriage may not un-spool the wire. If so, you'll need to pull it out by hand between each carriage pass.
Grab the bus wire above the carriage and gently pull it out so the tension mast takes up as much slack as possible. Keep your eye on this; otherwise the carriage will “jam” when it runs out of wire. You'll find a rhythm for doing this. For cotton yarn, run the yarn under a wax spool mounted on your tension mast.
For rows with no wire stitches, under the carriage pull the wire down and hold it out of the carriage's way. Or (slower method) take the wire out of the carriage for those rows. If the wire breaks while knitting the cotton rows, don't worry about it. You'll be snipping the floats between cotton rows anyway.
Keep in mind that wire stitches need weight to knit off. I recommend triangle combs.
*** I'm still experimenting with methods for machine knitting wire. Here's another approach I've developed for knitting circuits. This method is faster but does create more waste wire.
- When starting the pattern, pull one extra needle into work on each side.
- Set carriage to KCI. The wire will now knit to the ends on all rows.
- Once the pattern is complete, drop these end stitches off the needles and return the two needles to A (non-working) position.
- In the next step, once you've tinned the end stitches of the pattern, cut these outside stitches off with the rest of the waste wire.
***Many fiber artists have used machine knitting for wire, usually with magnet wire aka “craft wire”. Like bus wire, magnet wire is a thin copper wire used for electronics. Unlike bus wire, it has a thin coating of enamel that must be removed if you want to create electric connections. Wire purchased as “craft wire” usually has a wider range of enamel color options than “magnet wire”.
Source: http://www.instructables.com/id/Knit-an-LED-Cuff/?ALLSTEPS