
Contents
hide
Wire setup
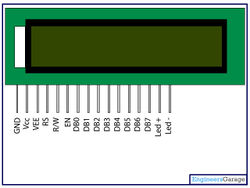
1. Solder the 0.1″ header strip into the 16 pins of the LCD screen's board
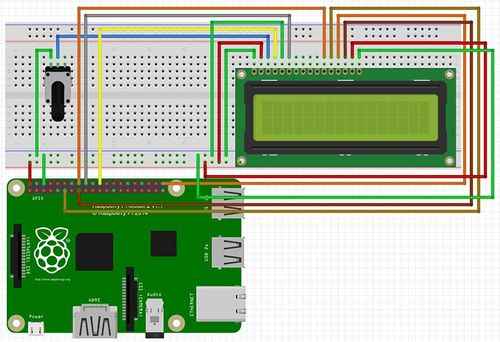
2. Connect the wires as shown above
- Pin 2 (VCC) and 6 (Ground) on raspberry pi to power and ground respectively
- On LCD pin 1 to ground, pin 2 to power, pin 3 to center of potentiometer, pin 4 to GPIO 25, pin 5 to ground, pin 6 to GPIO 24, pin 11 to GPIO 23, pin 12 to GPIO 17, pin 13 to GPIO 21, pin 14 to GPIO 22, pin 15 to power, pin 16 to ground
Software
1. Choose a folder to have all files saved in for example /home/pi/Desktop/Projects/LCDTests 2.Download git to clone libraries
pi@raspberrypi $ sudo apt get updatepi@raspberrypi $ sudo apt-get upgradepi@raspberrypi $ sudo apt-get install -y git dialog
3. Clone Adafruit's Char_LCD library
pi@raspberrypi $ git clone https://github.com/adafruit/Adafruit_Python_CharLCD
3. Navigate into directory
pi@raspberrypi $ cd /home/pi/Desktop/Projects/LCDTests
5. Copy the Adafruit_CharLCD.py file into directory
pi@raspberrypi ~/home/pi/Desktop/Projects/LCDTests $ cp Adafruit-Raspberry-Pi-Python-Code/Adafruit_CharLCD/Adafruit_CharLCD.py .
6. Edit the file char_lcd.py found inside the examples folder of the Adafruit_CharLCD folder
- Make sure your GPIO pins match how they are defined in lines 9-15 of the code
- Make any necessary changes on the code, referring to connectivity of the LCD pinout and where they are connected on the pi
7. To test the display, open up the examples folder in the Adafruit_CharLCD folder and run the program char_lcd.py
pi@raspberrypi ~/home/pi/Desktop/Projects/LCdTests/Adafruit_Python_CharLCD/examples $ sudo python char_lcd.py
TroubleShooting
- In the terminal, if you get an error saying you do not have permission to access that file use:
pi@raspberrypi $ sudo "rest of your command here"
- If an error appears saying file not found, make sure you are in the correct directory where the file is saved, writing the exact path on how to navigate to that directory
- For example if the file is saved in the LCDTests folder, which is inside the Projects folder, which is saved on the Desktop type
pi@raspberrypi $ cd /home/pi/Desktop/Projects/LCDTests
- For example if the file is saved in the LCDTests folder, which is inside the Projects folder, which is saved on the Desktop type
- To run the desired program, make sure you are in the correct directory
pi@raspberrypi /home/pi/Desktop/Projects/LCDTests $ sudo python LCD_test.py
- If using a differently dimensioned LCD display such as a 20×4
- Change lines 27 and 28 of the char_lcd.py code to
lcd_columns=20 #or your column dimensionlcd_rows=4 #your row dimension
Source: LCD display + Raspberry Pi