
Before getting my Raspberry Pi B model in the mail I made up my mind to make a case for it (pretty much a necessity). After looking at many very cool designs, I discovered a girl named Biz over at raspberrypi.org had made a case out of Lego and had the proper x & y dimensions, 9 x 13. So I ran the “Lego Digital Design” (LDD) software I had installed quite awhile ago, and plugged away.
LDD is essential a CAD program from Lego that uses the Lego pieces in a virtual build area, it is free and very easy to use. It contains almost all the pieces EVER made by Lego, in ALL the colours available though some recent ones are not in the database. i.e. some new Star Wars cockpits.
So after you have finished what ever you design virtually you can then order the pieces to build from Lego itself (most older pieces are not available) or from a site such as Bricklink.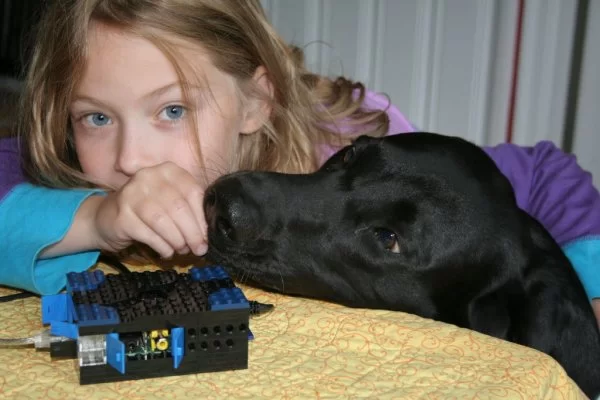
Bricklink is basically a Lego version of ebay. There are 222,835 registered members from 144 countries currently registered on BrickLink. It has thousands of Local and World Wide online stores with their own inventories that let you browse, shop or request pieces and then order the pieces you need and then they are mailed to you. What more could you ask for.
I am sure there are other sites like Bricklink, but I have found it has some online stores near my house that have all I could want in Lego at great prices and delivery rates. I have even started shopping for harder to find pieces from a shop in the Czech Republic that is great. Anyway… the case.
Instead of trying to describe each step I just took screenshots of the build in LDD.
I will also include the .lxf file so you can download it and run it in the LDD program so you can change things or design your own. Enjoy.
Step 1: Complete Parts List
Amount – Description Part #
2 – 1×1 Brick #3005 (Clear)
2 – 1×2 Brick #3004 (Clear)
1 – 1×1 Round Plate #6141
3 – 1×1 Plate #3024
7 – 1×2 Plates #3023
4 – 1×3 Plates #3623
9 – 1×4 Plates #3710
10 – 1×8 Plates #3460
1 – 1×12 Plate #60479
8 – 3×3 Plates, ¼ Circle #30357
4 – 4×6 Plates #3032
7 – 4×8 Plates #3035
4 – 6×6 Plates w/ Bow #6003
3 – 1×1 Technic Brick #6541
9 – 1×2 Technic Brick #32000
(The Technic Brick #3700 has 1 hole instead of 2 if you like)
1 – 1×8 Technic Brick #3702
1 – 1×10 Technic Brick #2730
2 – 1x3x2 Left Doors #3189
1 – 1x3x2 Right Door #3188
2 – 1×3 Right Doors #3821
1 – Megaphone #4349
A couple of optional parts used in Step 7
1 – 1×2 Flat Plate #3069 (Clear)
or 2×2 Flat Plate #3068 (Clear)
Step 2:
Step 3: The Base
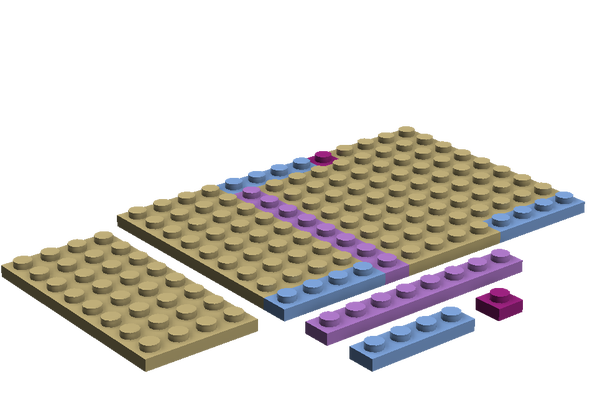
Lego Raspberry Pi Case.
(All Parts Black unless noted).
Update: I have changed the LDD files to another site as Minus is not cooperating.
Lego Digital Design .lxf file of the project and 4 other Cases I was working on. Stored on uploaded.net.
I have colour coded the parts that are being used in each Level,
they will be changed to the cases final colour (mostly Black) as the build progresses.
Each Level builds on the Previous Level.
Sorry for the Black backgrounds in the pictures, they were grey until I uploaded to my library.
Level 1: Base Lego Part # (if you are looking on Bricklink they come in VERY handy.
3 – 4×8 Plates #3035
3 – 1×4 Plates #3710
1 – 1×8 Plate #3460
1 – 1×1 Plate #3024
Level 2: Base 2
4 – 4×6 Plates #3032
2 – 1×4 Plates #3710
1 – 1×12 Plate #60479
1 – 1×1 Plate #3024
The Footer was originally so the RaspPi board had enough clearance for cord endings on the HDMI and Audio/Video area. I originally had different coloured small round nub pieces that sat under each plug, but when I lowered the board they just interfered. On the Ethernet plug I have found that it is VERY hard to get a cat 5 plug out if it has one of those covered ends. The kind that has sort of a rubber/silicone holder instead of just a bare plug. I have considered removing part of the Footer below it ( a 1×2 sized area) but I just cut of the rubber cover instead.
Level 3: Footer
3 – 1×8 Plates #3460
1 – 1×4 Plate #3710
4 – 1×2 Plates #3023
Ignore the 1×3 Plate in the image for Level 3 please.
Level 4: Footer 2
2 – 1×8 Plates #3460
1 – 1×4 Plate #3710
2 – 1×3 Plates #3623
2 – 1×2 Plates #3023
1 – 1×1 Plate #3024
Step 5: The Walls and Doors
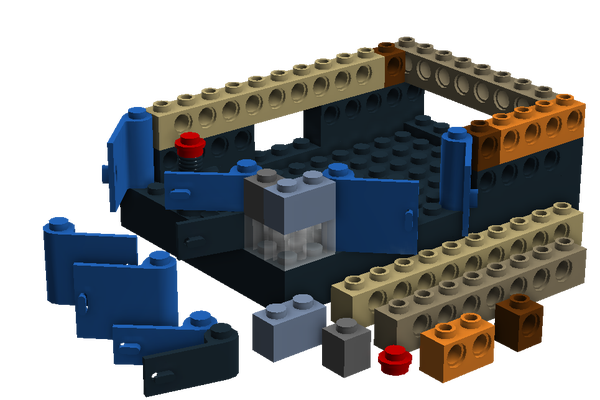
The walls were originally clear, in fact most of the case was until I discovered how hard it was to find clear pieces anymore.
It looked really cool in LDD.
Level 5: Wall
7 – 1×2 Technic Brick #32000
(The Technic Brick #3700 has 1 hole instead of 2 if you like)
1 – 1×1 Technic Brick #6541
1 – 1×2 Brick #3004 Clear
1 – 1×1 Brick #3005 Clear
1 – Megaphone #4349
Level 6: Wall 2
1 – 1×10 Technic Brick #2730
1 – 1×8 Technic Brick #3702
2 – 1×2 Technic Brick #32000
2 – 1×1 Technic Brick #6541
1 – 1×2 Brick #3004 Clear
1 – 1×1 Brick #3005 Clear
1 – 1×1 Round Plate #6141
2 – 1x3x2 Left Doors #3189 Blue
1 – 1x3x2 Right Door #3188 Blue
2 – 1×3 Right Doors #3821 1 Black, 1 Blue
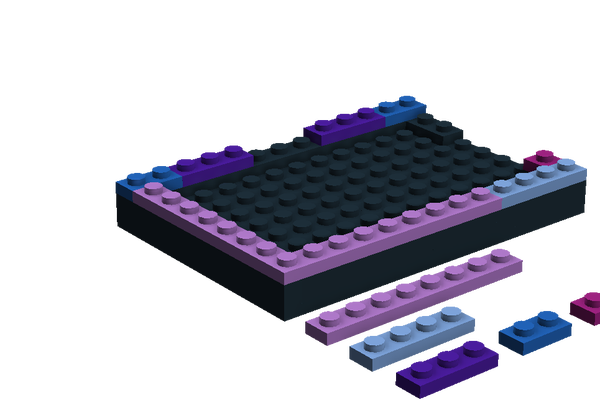
Step 6: Header
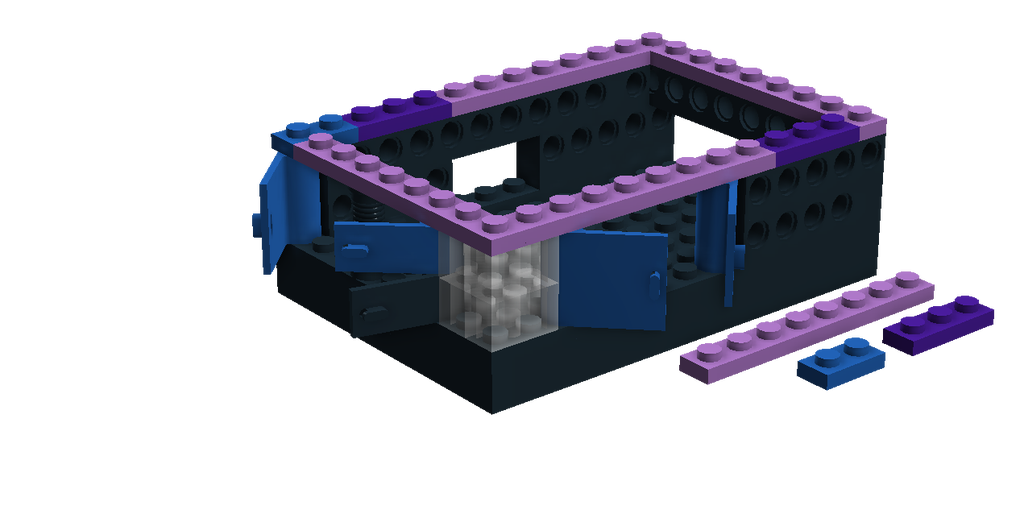
The Header ties it all together, and makes it quite strong.
Level 7: Header
4 – 1×8 Plates #3460
2 – 1×3 Plates #3623
1 – 1×2 Plate #3023
Step 7: The Roof
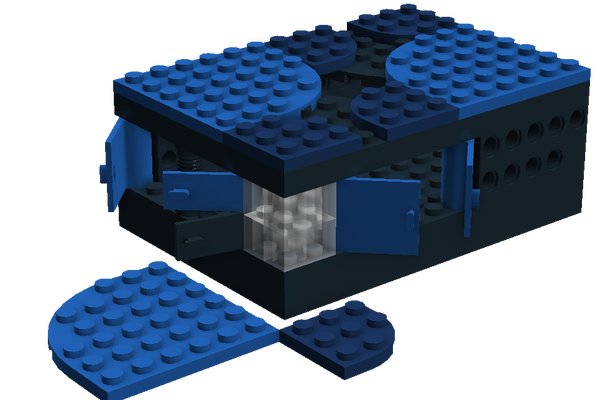
Because of the odd 9×13 layout I was not sure how to close up the case. I wanted to put in a fan… just in case, and that's when I switched to the Technic Bricks with their holes. I also considered hinges and trap doors but it all did not work. When I found the round corners I knew I had a roof, I loved the roundness of it. I also had round corners in the Technic wall level but it interfered with the Board fitting, which sucked as I again liked the roundness of it. The Roof back corner above the GPIO is easily removable and there is lots of room (I hope) in the back for a header to come out obove the SD card.
Level 8: Roof
2 – 1×4 Plates #3710
2 – 6×6 Plates w/ Bow #6003
2 – 3×3 Plates, ¼ Circle #30357
Level 9: Roof Trim
2 – 6×6 Plates w/ Bow #6003
6 – 3×3 Plates, ¼ Circle #30357 4 Dark Blue, 2 Black
Step 8: Finished Product and Observations
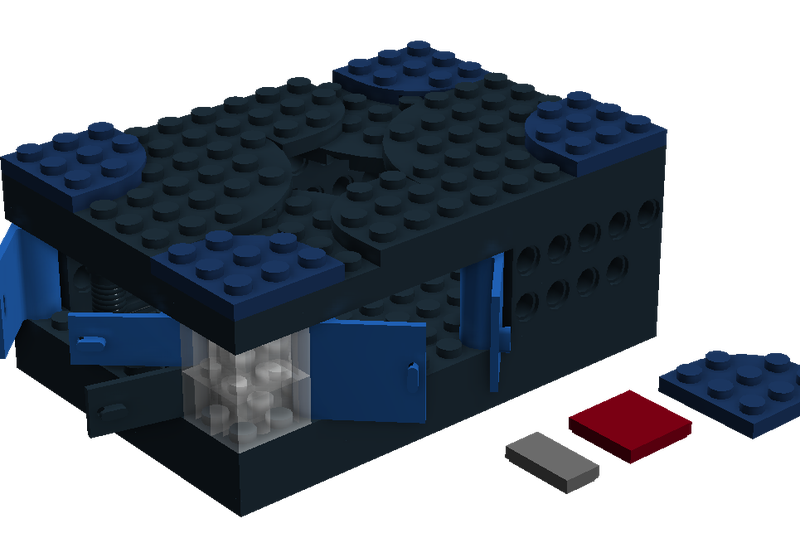
So it turns out that the Raspberry Pi Type B board was not designed with Lego in mind from what I can tell. 😉
Most Lego pieces are based on even numbers (at least the ones I wanted). The fact the outline was 9×13 in Lego profile made it hard to get a strong base which is why there are so many Plate levels.
You may find your RaspPi board fits tighter or more loose than mine. I put a flat 2×2 clear Plate* (see below) up on edge in the corner were the clear pieces are, squished between the wall and the board to stop the board moving when I put the SD card in or removed it. That is also the reason I used the Megaphone, to separate the USB ports and Ethernet port and hold the board in place. I had also had small 1×1 Plate pieces underneath to hold Board off the base but discovered they were not needed.
*1 – 1×2 Flat Plate #3069 Clear
or 2×2 Flat Plate #3068 Clear
Update: I have changed the LDD files to another site as Minus is not cooperating.
Lego Digital Design .lxf file of the project and 4 other Cases I was working on. Stored on uploaded.net.
Really put a lot of time in this and am really looking forward to using my Raspberry Pi. Hope this is useful.
Thanks to Acacia and Sprocket for their help.