
In 2019 LEGO introduced the Powered Up system with which their Technic models can be controlled with an app. With which the associated Technic Hubs are controlled by Bluetooth. As a result, each LEGO Technic model can be controlled in it's own unique way.

The Rubik's Cube Machine in this Instructable is made from a single LEGO set: The 42129 LEGO Technic 4×4 Mercedes-Benz Zetros Trial Truck. The truck can be operated with an app (Control+) in which all functions and controls are already programmed. Thanks to the smart Technic Hub it's also possible to ‘program' the truck using a scratch-like programming environment (PoweredUp). This Technic Hub is in fact a ‘light' version of the LEGO Education Spike Prime/Mindstorms Hub. This makes it possible to create programmable models and robots with all new LEGO Technic Powered Up sets.
There are some limitations compared to the more expensive Spike Prime/Mindstorms Hub. Only 4 ports are available (instead of 6) and the program must be transferred by Bluetooth. The Technic motors are also less advanced than the Spike Prime/Mindstorms motors. They have a relative rotation sensor instead of an absolute rotation sensor. You can have them make a certain angular rotation, but they don't have a zero/start position.
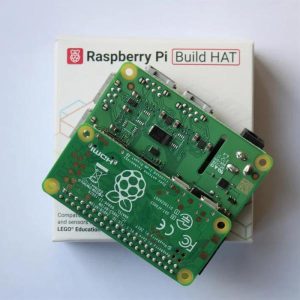
Last year the Raspberry Pi Foundation and LEGO Education introduced the Build HAT. This is a breakout board to connect LEGO motors and sensors with the Raspberry Pi. And it can be used to replace the Technic Hub which comes with the LEGO Powered Up sets.
In this instructable I describe 3 ways to program with the LEGO Powered Up motors and sensors:
- Scratch like environment
- Micropython
- Python
The first 2 methods use a Lego Technic Hub, which comes with the 42129 LEGO set. The last method requires a Raspberry Pi and the Build Hat.
The necessary code can be downloaded for both Python versions.
Supplies
The following items are used in this Instructable:
- 42129 LEGO Technic 4×4 Mercedes-Benz Zetros Trial Truck
- Speedcube (Magnetic or Stickerless, 56 x 56 x 56 mm, 2.2 x 2.2 x 2.2 inch)
- Raspberry Pi (3, 4, Zero 2 W)
- Raspberry Build Hat
- Raspberry Build Hat Power Supply
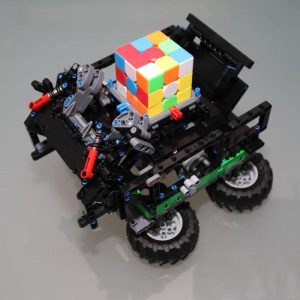
This Cube Robot can be build and programmed in Micropython with the Lego 42129 set. You can build your own version with other Lego Technic sets. As long as you have two Lego Technic motors (Large, Angular or XL) and one Technic Hub.
The Raspbery Pi (with WiFi) and Build Hat is required to program the Cube Robot with Python (I've used a Raspberry Pi version 3 model B+).
Use a stickerless speedcube with low resistance for this project. And the cube size must be 2.2 inch/56 mm (7 Lego studs/bricks). I started with a regular (cheap) speedcube and switched to a magnetic (more expensive) speedcube when writing this Instructable. The machine works with both types of cubes, but a magnetic version reduces the chance of errors. Because of the automatic alignment of the faces after turning.
Step 1: Build the Rubik's Cube Robot
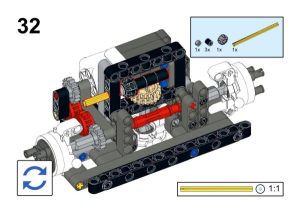
The pdf instructions can be downloaded for free from Rebrickable.com (the file is too large to be uploaded on Instructables, about 50Mb). It contains about 200 steps to build the Rubik's Cube Machine.
You don't have to own this LEGO set to start building a Cube Solver. You can get started with your own Lego Technic sets, and make your own machine. As long as you have at least 2 motors and one Technic Hub.
Step 2: Powered Up App
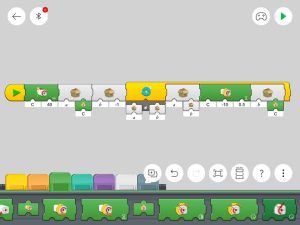
The official method to program a LEGO Technic Hub is by using the PoweredUp app (Android/iOS). The app offers a visual programming environment like Scratch. It uses building “blocks” which are commands with different functions. Each type of function has a different color:
- Yellow – Flow Blocks – control the flow of your commands.
- Orange – Sensors – trigger an actions when a sensor detects something.
- Green – Motors – control motors for movement.
- Purple – Sound & Light – play sounds through your device’s speakers or control the attached lights.
- Blue – Action Blocks – complex actions, these blocks are all model-specific.
- Turquoise – Interaction Blocks – Can be used to interact with your creations.
- White – Math blocks – complex programming using data operations with variables.
Unfortunately, it isn't possible to save an application on external storage. Therefore, this environment is not really useful for making large programs. The app can be used as a remote control or for simple programs. But for complex programs it's better to use a different programming environment/language.
The image above shows a short program to initialize a motor attached to port ‘C'. The motor moves counterclockwise until it can't move any further.
More information about coding with the app can be found at:
- Guide to LEGO BOOST programming blocks.
- LEGO BOOST coding blocks (pdf).
- LEGO Powered Up simple code block guide.
- LEGO Powered Up extended code block guide.
Step 3: Micropython
The lego Technic Powered Up HUB is a so called ‘smart' device. It contains an Arm Based M4 microcontroller which is capable of running Micropython. Just like the Adafruit Micropython board which has a similar processor. Unfortunately the Lego hub doesn't have an USB interface to upload Micropython programs.
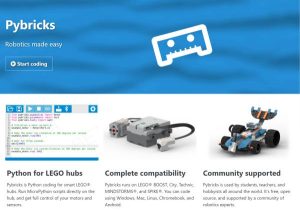
The Pybricks website offers a Micropython coding environment for LEGO hubs. You can create a program on their website and run the Micropython program directly on the hub. This requires a special firmware to transfer the program over Bluetooth. The advantage of loading the program onto the Hub is that the code runs faster. I've also noticed that the motors make less noise using Micropython/Python compared to using the app.
The programming environment is easy to use and the python classes are well documented. And there are plenty of examples to get you started. The following example initializes a motor on port A and has some motor movement-examples:
from pybricks.pupdevices import Motor
from pybricks.parameters import Port
from pybricks.tools import wait

# Initialize a motor on port A.
example_motor = Motor(Port.A)

# Run at 500 deg/s for two seconds.
example_motor.run_time(500, 2000)
wait(1500)

# Run at 500 deg/s for 90 degrees.
example_motor.run_angle(500, 90)
wait(1500)

# Run at 500 deg/s back to the 0 angle
example_motor.run_target(500, 0)
wait(1500)

# Run at 500 deg/s back to the -90 angle
example_motor.run_target(500, -90)
wait(1500)

# Run at 500 deg/s until the motor stalls
example_motor.run_until_stalled(500)
print("Done")
wait(1500)
One disadvantage is that it's a web based environment, it only works from their website. An internet connection is required to program your Hub. And the size of the program and the use of external libraries is limited.
If you already own a Technic Hub, this is the way to get started. The software is free to use, and you get results pretty quickly.
Step 4: Python
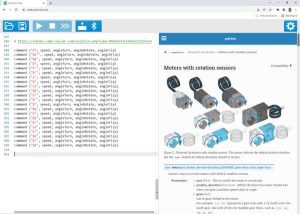
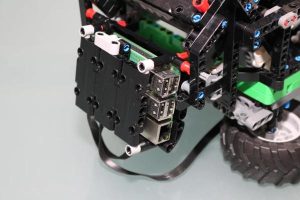
The Build HAT supports motors and sensors from the LEGO Mindstorms Robot Inventor kit, as well as most other LEGO devices that use an LPF2 connector. Since all Powered Up motors have an LPF2 connector, they all can be connected with the Build HAT.
The Python3 source code is available on Github and contains a list of compatible parts in the devices.py file.
class Device:
    """Creates a single instance of the buildhat for all devices to use"""
    _instance = None
    _started = 0
    _device_names = {  2: "PassiveMotor",        # LEGO Train Motor  (88011)
                       8: "Light",               # LED (88005)
                      34: "TiltSensor",          # Wedo 2.0 Tilt Sensor (20841)
                      35: "MotionSensor",        # Wedo 2.0 Infrared Sensor (20844)
                      37: "ColorDistanceSensor", # BOOST Color Distance Sensor (88007, bb0891c01)
                      61: "ColorSensor",         # SPIKE Color Sensor (45605, 37308c01)
                      62: "DistanceSensor",      # SPIKE Ultrasonic Sensor (45604, 37316c01)
                      63: "ForceSensor",         # SPIKE Force Sensor (45606, 37312c01)
                      64: "Matrix",              # 3 X 3 Color Light Matrix (45608, 45608c01)
                      38: "Motor",               # Medium Linear Motor (88008)
                      46: "Motor",               # Technic Large Powered Up (88013, bb0959c01)
                      47: "Motor",               # Technic XL Powered Up (88014, bb0960c01)
                      48: "Motor",               # Spike Prime Medium Angular (45603, 54696c01)
                      49: "Motor",               # Spike Prime Large Angular (45602, 54675c01)
                      65: "Motor",               # Spike Prime Small Angular (45607c01)
                      75: "Motor",               # Mindstorms Medium Angular (54696c01)
                      76: "Motor"                # Technic Large Angular Powered Up (54675c02)
                    }
The firmware is in active development and is subject to change. And the documentation doesn't always keep up with the firmware. At the moment of writing this Instructable the Technic motors are listed as “Other motors without encoders” while the get_position-function can be used, and the TiltSensor isn't documented at all.
The Getting Started Guide provides all information to configure and install the required soft- and hardware. It also contains a full list of compatible devices, with some examples. The HAT's firmware is uploaded each first time the Python library is used. So it takes a little longer to start up for the first time.
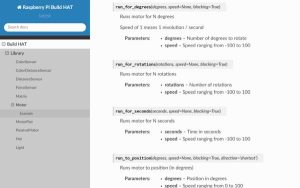
The classes are well documented (with some delay) and contain examples to get you started. The following example creates a motor on port A and has some motor movements-examples:
from signal import pause
from buildhat import Motor
import time

motor = Motor('A')
motor.set_default_speed(50)

print("Run for degrees 360")
motor.run_for_degrees(360)
time.sleep(3)

print("Run for degrees -360")
motor.run_for_degrees(-360)
time.sleep(3)

print("Start motor")
motor.start()
time.sleep(3)

print("Stop motor")
motor.stop()
time.sleep(1)
An external power supply is required to run the attached motors (and sensors). This also powers the attached Raspberry Pi using the GPIO pins.
Step 5: Solving a Rubik's Cube
There are many sites with guides for the Rubik's Cube. And there is a good pdf solution guide available at Rubiks.com.
This guide describes 8 steps to solve the Rubik's Cube layer by layer:
- TOP layer: Step 1 – Create a Daisy
- TOP layer: Step 2 – Make a WHITE Cross with matched edges and center pieces
- TOP layer: Step 3 – Solve the WHITE Corners
- MIDDLE layer: Place Edges in the MIDDLE layer
- BOTTOM layer: Step 1 – Make a YELLOW Cross
- BOTTOM layer: Step 2 – Orient the Corners
- BOTTOM layer: Step 3 – Position the YELLOW Corners
- BOTTOM layer: Step 4 – Position the YELLOW Edges
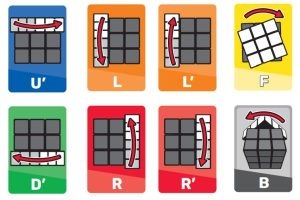
The method used at the Rubiks.com website isn't the fastest method, but it's easy to learn. And the naming conventions (or algorithm keys) in this guide are used in almost all cube solving methods:
Each face of the cube is represented by a letter:
- U = Up Face
- D = Down Face
- L = Left Face
- R = Right Face
- F = Front Face
- B = Back Face
The default rotation is always clockwise for 1/4th turn (90 degrees). If there is a 2 after the letter then the rotation is a half turn (180 degrees). And an apostrophe (‘) after the letter means counterclockwise for 1/4th turn (-90 degrees).
The Rubik's Cube Solver website calculates the steps to solve a scrambled cube. It finds a solution with at most 20 rotations to solve the cube.
This website doesn't have an API which can be called from a (Micro)Python program. The URL required to solve the cube is easy to decode, but it returns a HTML-page and not a text-string. Fortunately, there are also Python libraries available, which can be used after adding a color sensor.
Step 6: Movement and Functions
This Cube solver is made with regular LEGO Technic motors. These feature an integrated rotation sensor and absolute positioning for speed and position control. The main difference between Technic and Spike/Mindstorms motors in that the Technic motors don't have a fixed zero position. You can rotate the motor by a number of degrees, but 0-degrees isn't at a fixed point. This means that you have to initialize the motors and define this initial position/angle to zero.
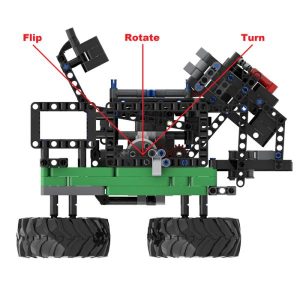
Solving a Rubik's Cube with a robot requires minimal 3 basic functions:
- Flip the cube.
- Turn the cube (clockwise/counterclockwise).
- Rotate one row of the cube (clockwise/counterclockwise).
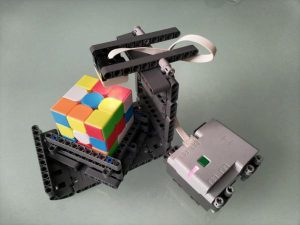
This cube robot has only 2 motors. One is used to turn or rotate the cube. This one is called the rotate-motor in the python code. The other motor is used to flip the cube. And to place the cube in right position to turn the entire cube, or to rotate a single (the lower) row. It's called the position-motor in the code.
There are four low level functions in the code:
- init (reset angles and place the cube in the rotate-position)
- flip (from turn position to flip position and back to turn position)
- select turn or rotate function
- clockwise/counterclockwise (turn the entire cube or rotate a single row)
All 18 movement codes (6 faces x 3 movements) are translated to the 3 basic functions. Where each movement is made up of a (Python) list of multiple basic functions:
def command (command):

    moves = {"F":  ['T', 'F', 'CW', 'F' ,'F' ,'F', 'R']
            ,"F2": ['T', 'F', 'CC', 'CC' ,'F' ,'F' ,'F' , 'R']
            ,"F'": ['T', 'F', 'CC' ,'F' ,'F' ,'F', 'R']
            ,"B":  ['T', 'F', 'F', 'F', 'CW', 'F', 'R']
            ,"B2": ['T', 'F', 'F', 'F', 'CC', 'CC', 'F', 'R']
            ,"B'": ['T', 'F', 'F', 'F', 'CC','F', 'R']
            ,"U":  ['T', 'F', 'F', 'CW', 'F', 'F' ,'R']
            ,"U2": ['T', 'F', 'F', 'CC', 'CC', 'F' ,'F', 'R']
            ,"U'": ['T', 'F', 'F', 'CC', 'F', 'F', 'R']
            ,"D":  ['T', 'CW', 'R']
            ,"D2": ['T', 'CC', 'CC', 'R']
            ,"D'": ['T', 'CC', 'R']
            ,"L":  ['R', 'CW', 'T', 'F', 'CW', 'F' ,'F' ,'F', 'R', 'CC']
            ,"L2": ['R', 'CW', 'T', 'F', 'CW', 'CW' ,'F' ,'F' ,'F' , 'R', 'CC']
            ,"L'": ['R', 'CW', 'T', 'F', 'CC' ,'F' ,'F' ,'F', 'R', 'CC']
            ,"R":  ['R', 'CC', 'T', 'F', 'CW', 'F' ,'F' ,'F', 'R', 'CW']
            ,"R2": ['R', 'CC', 'T', 'F', 'CW', 'CW' ,'F' ,'F' ,'F', 'R', 'CW']
            ,"R'": ['R', 'CC', 'T', 'F', 'CC' ,'F' ,'F' ,'F', 'R', 'CW']
            }

    movelist = moves[command]
    for move in movelist:
        if move == 'F':
            flip()
        elif move == 'R' :
            rotateposition()
        elif move == 'T' :
            turnposition()
        elif move == 'CC' :
            clockwise()
        elif move == 'CW' :
            counterclockwise()
The cube can be solved by calling the command function using the movements from the Rubik's Solver website. If the website's solution is “D”, “L” and “F”, then it's translated to: T, CW, R, R, CW, T, F, CW, F ,F ,F, R, CC, T, F, CW, F ,F ,F, R. This solution is processed step by step, and the cube is placed in the start-position after each step.
Every cube can be solved in 20 movements. This will take about 150 basic steps with this Rubik's Cube machine. This can be optimized. For example: “U'”, “B2” results in T, F, F, CC, F, F, R, T, F, F, F, CC, CC, F, R. The entire middle part contains 5 flips, and can be replaced by a single flip. This optimisation isn't part of the code at the moment of writing this Instructable.
Step 7: Micropython Cube Machine
Download the code and open/copy it in the Pybrikcs Code editor and change the solve-algorithm. Pair the Technic Hub (custom firmware is required) and run the program.
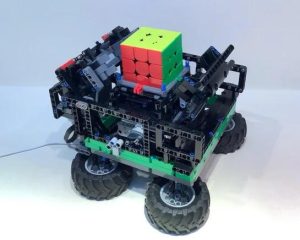
The main program imports the required Pybricks-libraries and defines both motors. Then the init-function is called. This function returns the 3 angles which are used for the turn/rotate/flip-positions. After a 90 degrees clockwise turn the machine is ready for the cube to be placed (green label at the front). It waits for 5 seconds and starts executing the command-functions to solve the cube.
from pybricks.pupdevices import Motor
from pybricks.parameters import Port, Direction, Stop
from pybricks.tools import wait

motorFlip = Motor(Port.C, Direction.COUNTERCLOCKWISE, [5,27], True)
motorTurn = Motor(Port.A, Direction.COUNTERCLOCKWISE, [[5,27],[12,20]], True)

# ---------------------------------------------------------------------------
# all functions
# ---------------------------------------------------------------------------

angleTurn, angleRotate, angleFlip = init(speed/3)
clockwise(speed, angleTurn, angleRotate)
wait (5000)

for c in ["L'","B'","D","U","R","U'","R'","D2","R2","D","L","D'","L'","R'","F","U"]:
   command(c,speed,angleTurn,angleRotate,angleFlip)
The [5,27] and [12,20] values in the motor class are gear-ratios. These values are used to translate rotations to angular movement in degrees. The [5,27] is the gear ratio of the planetary hub. And 5.4 full rotations of the motor are equal to 360 degrees (1 rotation).
It takes up to 150 steps to solve a cube. And the angular displacements of the LEGO motors aren't always 100% correct. After a while the angles are off by a few degrees. To prevent this, the initial angles are regularly reset. E.g. the run_until_stalled function is used in the flip-function. And afterwards the reset_angle function is called to reset the angle of the motor:
def flip(speed, angleTurn, angleRotate, angleFlip):

    flipPosition = motorFlip.angle()

    if flipPosition > angleRotate/2:
        # Rotateposition -> First to turn position
        motorFlip.run_until_stalled(-speed, duty_limit=50)

    # move from turn-position to flip position and then back to turn-postition flips the cube.
    motorFlip.run_until_stalled (speed * 5, duty_limit=50)
    motorFlip.run_until_stalled (-speed, duty_limit=50)
    motorFlip.reset_angle(0) # relative position reset

    # move back to initial position (if needed)
    if flipPosition > angleRotate/2:
        motorFlip.run_target (speed, angleRotate)
Similar code is used in the clockwise/counterclockwise functions. Turning from 90 degrees to 0 degrees will also reset the angle. The platform cannot move further clockwise after this reset. The next clockwise movement then becomes 3 times counterclockwise (270 degrees in the last elif statement):
def clockwise(speed, angleTurn, angleRotate):

    margin, offset = 15, 5
    startAngle = motorTurn.angle()

    if   (startAngle > 270 - margin):
        motorTurn.run_target        (-speed,  180)
    elif (startAngle > 180 - margin):
        motorTurn.run_target        (-speed,   90)
    elif (startAngle >  90 - margin):
        motorTurn.run_target        (-speed,    0 + offset)
        # relative position reset
        motorTurn.run_until_stalled( -speed/3, duty_limit=30)
        motorTurn.reset_angle(0)
        motorTurn.run_target        ( speed, 10) # release stress
        motorTurn.reset_angle(0)
    elif (startAngle >   0 - margin):
        motorTurn.run_target        (-speed,  270 + offset)
    else:
        print ('wrong angle')
The last lines of the code contain the algorithm to solve the Rubik's Cube.
for c in ["L'","B'","D","U","R","U'","R'","D2","R2","D","L","D'","L'","R'","F","U"]:
   command(c,speed,angleTurn,angleRotate,angleFlip)
These lines must be altered with the algorithm given by the Rubik's Cube Solver website.
Step 8: Detecting Colors
The LEGO Technic set used to build the Cube Robot doesn't include a colors sensor. All required steps/movements required to solve a Rubik's Cube have to be entered. There are also two LEGO color sensors available which can be used with Powered Up: A brick version (item 88007) and a Technic version (item 37308c01).
The following Micropython code for Pybricks reads the color sensor and changes the LED color on the Technic Hub:
from pybricks.hubs import TechnicHub
from pybricks.parameters import Color
from pybricks.pupdevices import ColorSensor
from pybricks.parameters import Port
from pybricks.tools import wait

hub    = TechnicHub()
sensor = ColorSensor(Port.A)

for i in range(100):
    color      = sensor.color()
    reflection = sensor.reflection()
    ambient    = sensor.ambient()
    print(color, reflection, ambient)
    hub.light.on(color)

    wait(500)
There are some problems with this code:
- White gives the color ‘none'.
- Yellow becomes white when the sensor is very close to the cube.
- Not all colors are defined in the ColorSensor library. Orange and red are both detected as Red.
This can be solved by defining custom colors. Each color has a distinct hue, saturation and brightness. And these are measured with the sensor.hsv function. The following program can be used to detect all 6 colors from the cube.
from pybricks.hubs import TechnicHub
from pybricks.parameters import Color
from pybricks.pupdevices import ColorSensor
from pybricks.parameters import Port
from pybricks.tools import wait

hub    = TechnicHub()
sensor = ColorSensor(Port.A)

Color.RED    = Color(h=351, s=87, v=57)
Color.ORANGE = Color(h=  0, s=85, v=80)
Color.GREEN  = Color(h=140, s=76, v=67)
Color.BLUE   = Color(h=206, s=85, v=45)
Color.WHITE  = Color(h=200, s=13, v=75)
Color.YELLOW = Color(h= 46, s=59, v=75)

myColors = (Color.RED, Color.ORANGE, Color.GREEN, Color.BLUE, Color.WHITE, Color.YELLOW)
sensor.detectable_colors(myColors)

for i in range(100):
    hvs = sensor.hsv(surface=True)
    color = sensor.color()
    print(hvs, color)
    hub.light.on(color)

    wait(500)
The sensor.color function measures the hue, saturation and brightness and rounds these to the nearest color from the detectable colors. Using another brand Rubik's Cube might require other values for each color.
The Pybricks Micropython code is launched on the Technic Hub. And it is not possible to use external libraries. The Techic Hub also has no Internet connection (only Bluetooth). This makes it impossible to use the color sensor with the Rubik's Cube Machine using Micropython. For this, the entire scan and solve code must be written in Micropython. With the limited amount of memory of the Technic Hub, I did not start on this.
Step 9: Python Cube Machine
The Micropython code is easy to change to Python code using the Build Hat classes. I've used procedural programming in Micropython because it's easy to read. But I wrote a rubiksCube-class for the Raspberry Pi. It's still easy to read, because I didn't fully optimize the number of movements to solve the cube.
The class starts with an init-function. It resets all angles and places the machine in the rotate-position (see Movements and Functions):
class rubiksCube:

   def __init__(self, motorFunction, motorRotate):
      self.motorFunction = motorFunction
      self.motorRotate = motorRotate

      self.gearsFunction = 1/(5/27)           # 5.4
      self.gearsRotate = 1/((5/27) * (12/20)) # 9.0

      self.function = -1
      self.position = -1

      rubiksCube.initFunction(self)
      rubiksCube.rotatePosition(self)
      rubiksCube.initRotateClockWise(self)
There are 2 variables which contain the function and position. The functions are:
- 0: turn-position
- 1: rotate-position
- 2: flip-position
And the positions are between 0 (full clockwise) and 3 (full counterclockwise) in steps of 90 degrees.
One improvement to reduce the number of movements is to remember the start-function variable before flipping the cube. This means that the cube doesn't always return to the rotate-position between each step.
   def flipcube(self):
      oldfunction = self.function
      rubiksCube.turnPosition(self)

      degrees1 = 90 * gearsFunction
      degrees2 = 92 * gearsFunction
      motorFunction.run_for_degrees(degrees1, speed=-30, blocking=True)
      motorFunction.run_for_degrees(degrees2, speed=+30, blocking=True)

      newfunction = self.function
      if oldfunction != newfunction:
         rubiksCube.rotatePosition(self)
Flipping the cube always starts at the turn-position. The cube is moved to the flip position (a movement of -90 degrees), and back tot the turn-position (about +92 degrees). This movement makes the whole cube rotate/flip 90 degrees. The extra 2 degrees compensate for the inaccuracy of the motors.
The number of degrees required to rotate the cube is stored in a list of 16 values. The index-value is calculated using the start- and end-position. For example: Moving from 0 (full clockwise ) to 3 (full counterclockwise) gives an index value of 3 (0 x 4 + 3). The value of -3 gives a rotation of -279 degrees (-3 x 93).
   def rotateTo (self, toPosition):
      oldfunction = self.function
      rubiksCube.rotatePosition(self)

      moves = [[ 0], [-1],    [-2],    [-3],
               [ 1], [ 0],    [-2, 1], [-2],
               [ 2], [ 2,-1], [ 0],    [-1],
               [ 3], [ 2],    [ 1],    [ 0]]

      fromPosition = self.position
      index = fromPosition * 4 + toPosition
      for move in moves[index]:
         degrees = move * 93 * gearsRotate
         motorRotate.run_for_degrees(degrees, speed=30, blocking=True)
      self.position = toPosition
The movements are optimized to compensate for the lack of absolute position of the motors. Moving from 90 to 180 degrees is done by +186 degrees and -93 degrees. The 186 degrees movement resets the motor-position, and the -93 degrees gives the correct position. Each movement in this function contains an angle reset (This is mainly done for non-magnetic cubes).
Each cube algorithm is defined as a function. These functions aren't optimized to reduce the number of movements. The F-function (Front) flips the cube once, turns the lower row, and flips the cube 3 times. This causes the cube to start from the same starting position each step.
#  turntype: 0 clockwise
#            1 counterclockwise
#            2 halfturn

   def F(self, turntype):
      oldfunction = self.function

      rubiksCube.flipcube(self)
      rubiksCube.turn(self, turntype)
      rubiksCube.flipcube(self)
      rubiksCube.flipcube(self)
      rubiksCube.flipcube(self)

      newfunction = self.function
      if oldfunction != newfunction:
         rubiksCube.rotatePosition(self)
The main program initializes the motors, the cube machine and places the green ‘label' at front.
motorFunction = Motor('C') # function motor
motorFunction.plimit(0.7)

motorRotate = Motor('D')   # rotate motor
motorRotate.plimit(0.7)

# init and green at front
cube=rubiksCube(motorFunction, motorRotate)
cube.rotateTo(1)

cube.runList (["R2","D","B","U2","F'","L'","B","L2","D2","R'","L2","U","F2","D","L2","U2","F2","L2","B2","U2"])
Finally, the runList-method steps through the solving algoritm. This part must be modified using the algorithm given by the Rubik's Cube Solver website.
Step 10: Python Interactive Prompt
The python3 code can be started from an interactive prompt. This is especially useful for testing and debugging the Python code.
Open “python3” from the unix prompt:
python3
Load and run the testCube.py file (or the rubiksCube.py file) which contains the cube-class. Define both motors and init the cube class.
exec(open('testCube.py').read())

motorFunction = Motor('C') # function motor
motorFunction.plimit(0.7)

motorRotate = Motor('D') # rotate motor
motorRotate.plimit(0.7)

# init and green label at front
cube=rubiksCube(motorFunction, motorRotate)
cube.rotateTo(1)
Call one of the functions to test the class. For example:
cube.runList (["D","L","R","U","B","F","F'","B'","U'","R'","L'","D'"])

cube.flipcube(flipspeed = 40, flipangle = 100)

cube.rotateTo(3)
Exit the interactive shell after testing.
exit()
Remember to reload the cube-class after changing the testCube.py-file.
Step 11: Final Words
It's relatively easy to get started with Micropython programs on the LEGO Technic Hub. Which can be done with any of the LEGO Technic Powered UP sets. All required documentation is available at Pybricks. The program size is somehow limited, but it doesn't require any additional hardware.
Using a Raspberry Pi and the Build HAT gives more possibilities. In addition to programming the LEGO motors and sensors, additional GPIO ports are available for other hardware. The ‘stop until stalled' can be replaced with microswitches. And a webcam can be used to read the initial cube's colors.
I've limited myself to parts of the Zetros Truck in this Instructable. But I definitely plan to use the color sensor in one of the next versions as well.