
So here's a problem that we all have sometimes while working with 3.7V Li-ion Cells.
“How to boost its voltage from 3.7V to Stable 5V 2A so it could power a Raspberry Pi for example?”
The Obvious answer would be to use a Boost module or Boost IC right?

But which one?
An ideal Boost module should boost the voltage and provide stable filtered noiseless output so the load would work properly without any malfunction, it should also contain features like thermal shutdown and power cut-off when cells get too close to its low discharge voltage.
In this Instructables, let me help you out by providing a simple yet powerful solution to this Boost Module problem. Let's get started
Supplies
Here's the stuff i used in this built-
- Custom PCBs
- IP5306 IC
- Raspberry Pi Model 3B+ (for testing)
- Multimeter (for testing)
- 10uf 1206 Package Capacitor x8
- 2R 0805 Package x1
- 1K 0603 Package x2
- 10uH Inductor x1
- SMD Button x1
- Indicator LEDs x4
- THT USB Micro Port x1
- 18650 Dual Li-ion Cells holder x1
- Li-ion Cells 3.7V 2600mah x2
- Female Header pins Con40 x1
Step 1: Boost Module Working in General
What exactly are Boost Modules? and where we should use one.
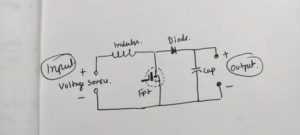
A Boost Module is basically a circuit that increases the voltage fed to it through its input side and outputs an increased voltage which is being boosted by an onboard inductor, a semiconductor switch, capacitor, and a diode.
We need to use Boost modules in situations where the source is 3.3V but we need to feed the device 5V.
By using a Boost module, we can easily step up this 3.3V into 5V so the device can run without any issue.
Here's a wonderful article written on this topic which you can check out to know more about the working of boost module. https://components101.com/articles/boost-converter…
What I'm gonna use is a powerful Boost module circuit which is based around IP5306 which is a Power Management IC generally used in Powerbanks and mobile devices.
Step 2: IP5306 IC
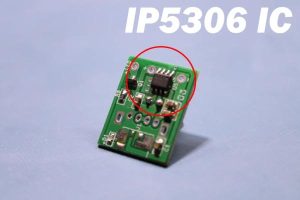
IP5306 is a fully-integrated multi-function power management that comes in the SoC package.
It has an internal Boost Converter setup along with a proper Li-ion Battery charge management setup that has a low discharge and high charge cut feature which is a must-have function when working with Li-ion cells.
Li-ion cells are dangerous if overcharged so we generally use a BMS Module to cut off its voltage when attached to any charging source, IP5306 has this function which means we dont have to attach any Battery protection setup with it.
Also, we get battery status LED Indication feature.
It can boost the Voltage of any cell from 2.8V ~ 3.7V to 5V 2A.
checkout its datasheet from here- http://www.injoinic.com/wwwroot/uploads/files/2020…
Where did I find this IC?
This one time, I open up a small single cell power bank which I got from a local seller for very cheap.
I examined its circuit and found this IC, I searched it on the internet and found out about this IC. I ordered a few of them and prepared my first Boost module circuit by using the Schematic given in the datasheet.
I prepared a makeshift setup that I etched and then soldered in-house as a test.
After making sure that it's giving 5V Output, I used this setup in my RPI Based game controller project which was this- https://www.instructables.com/PALPi-Version-2-Fina…
Step 3: Where to Get IP5306 Along With Other Things From?
Now, here's a super important question.
Where to get this “IP5306” IC? Well, you could use ALLCHIPS Service for getting this Power Management IC for cheap. ALLCHIPS is a well-known Platform For Electronic Components Supply, they have everything that you need for any type of project. They are an all-in-one procurement department of hardware manufacturers as all components I used in this project were provided by ALLCHIPS which was a cool and helpful thing!
Also, they have this BOM IN ONE BOX thing which is such a helpful thing, we provide them a BOM List and they procure all the components and deliver them “IN ONE BOX” which is an efficient way of purchasing components for any project! Check out ALLCHIPS for more info.
Step 4: Implementation in Past Projects

By following the previous Diagram and editing it for my project, I prepared the above Circuit board which was basically a power shield that boosts two Li-ion cells 3.7V to 5V for Raspberry Pi to work.
It had IP5306 Setup in one corner, Raspberry Pi header Pins in one, and Indicator LEDs in the uppermost corner.
I've added a Bi Lithium Cell SMD holder to this board and No BMS or PCM Module has been added in this setup for Cells protection.
Step 5: Working Preview/ Testing
First, I tested the voltage across the output of IP5306 IC which is around 5.1V, enough for powering an RPI properly, also this is constant 5V which means as the battery voltage level gets down, it won't affect the RPI at all but only at a certain threshold which is around 2.5V, as soon as the battery reaches 2.5V, the system will shutdown.
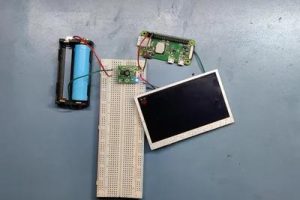
I then I've connected the RPi Zero with my PALPI 3 Board and a TV for outputting RPi Video out.
According to my calculations and testing, these two cells last about 10 hours of continuous work which is really great for a portable project.
Step 6: Conclusion

Here's what I've learned so far by using this IP5306 IC in my projects.
- Its minimal and require fewer components to setup
- Inbuilt Power cutoff and battery low and high cut so we dont have to add any BMS circuit
- Cost-effective, cost less than a dollar
- high efficiency, doesn't heat much
- LED IndicationConstant Output
The only con of this IC would be its availability issue, it's kinda hard to find.
But anyway, I hope this Instructables might help you in this “battery Voltage stepping up problem”. DM me if you need any help regarding this post. Thanks for reading and ill be back with a new project soon!