Line follower robots were one of the earliest automatic guided robots. They are able to follow a line marked on a contrasting background, usually a black line on a white surface or a white line on a black surface. Usually the line follower robot works on a closed loop feedback algorithm where the feedback from the line sensor is used by the controller for correcting the path of the robot. The sensors are usually LED/LDR, LED/Photodiode or LED/Phototransistor pairs and the controller is an electronic circuit which executes the desired feedback algorithm. Gear motors are used for driving the robotic wheels.
Note:- If you are interested in Arduino based development, we have created this same line-follower-robot-using-arduino as well. You may try the arduino based circuit as well to see how same project is developed using different controllers.

Sensor.
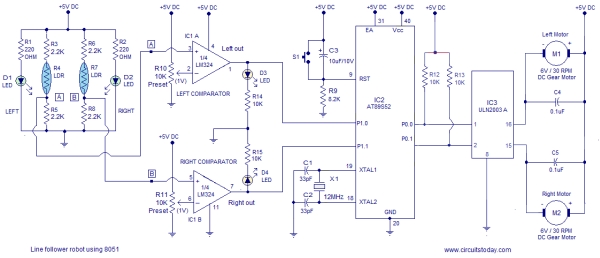
The sensor part consists of a set of LED / LDR pairs for the left side and right sides. These LED / LDR pairs detect the black line on the white surface on which the robot is supposed to roam. The LDR has an inverse relationship between its resistance and the light falling on it. When a particular LED / LDR pair is above the white surface the reflected light falls on the LDR and its resistance drops, conversely when the LED / LDR pair is above the black line, its resistance rises. This variation in resistance of the LDRs are used to asses the orientation of the line follower robot in the X-Y plane. The figure shown below depicts the sensor circuit.
In the circuit, resistors R1 and R2 limits the current through the illuminating LEDs D1 and D2. Resistors R3, R5 and R6, R8 forms a voltage divider network together with the corresponding LDRs. The output of the sensor circuit is taken from the points labelled A and B in the circuit diagram.The table below shows the voltage at nodes A and B for the possible orientations of the sensor module.
Comparator circuit
The job of the comparator circuit is to convert analog voltage output of the sensor into a digital format for the microcontroller to read. The comparator circuit is built around opamp IC LM324 (IC1). LM324 is a general purpose quad opamp which can be operated from a single supply. Out of the four comparators inside LM324, only two are used here. One for the left side and the other for the right side. Circuit diagram of the comparator section is shown in the figure below.
Preset resistor R10 and R11 are used to set the 1V reference for the left and right comparators respectively. Output from the left and right sensors (node A and B) are connected to the non inverting input on the left and right comparators. Output of the left comparator is connected to P1.o of the microcontroller and output of the right comparator is connected to P1.1 of the microcontroller. Both comparators are wired in non inverting mode and the table given below shows their output voltage with respect to the possible input voltage combinations.
Microcontroller (AT89S52).
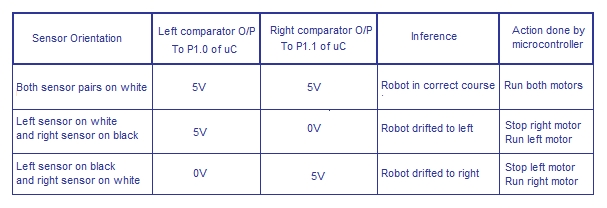
The task of the microcontroller here is to control the left and right motors according to the feedback signals from the left and right comparators so that the robot remains on the correct path (the black line). The logic executed by the microcontroller for keeping the robot in track is illustrated in the table below.
Motor driver circuit.
The job of the motor driver circuit is to drive the motors according to the output signals from the microcontroller. The motor driver circuit is based on ULN2003A IC. ULN2003A is a high current (500mA), high voltage (50V) darlington array consisting of seven darlington pairs with common emitter and open collector. Out of the seven channels available in the IC,only two are used here. One for the left channel and one for the right channel. Schematic of the motor driver circuit is shown in the figure below. The operation of ULN2003 is very simple to explain. When a particular input line (say pin 1) is made high the corresponding output line (pin 16 goes low) and vice versa.
For more detail: Line follower robot using 8051.


