Description
Do you want to get started with LoRaWAN, but don't have a gateway near you?
These instructions help you turn a $10 LoRa module and a Raspberry Pi into a single channel LoRaWAN gateway to experiment with LoRaWAN.
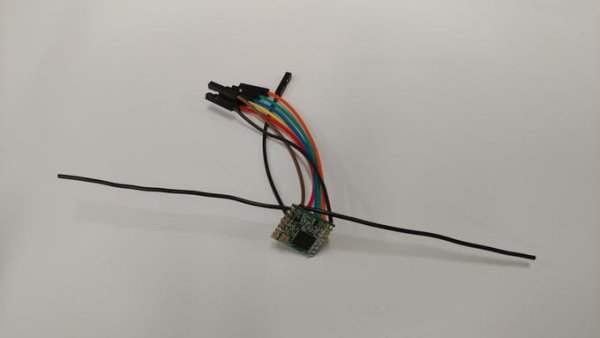
Prepare your RFM95W
1) Prepare your female-to-female leads for the RFM95W by cutting them 4 of them in half. You should now have 8 wires – each one has a female connector at one end.
2) Strip an 1/8 inch of the insulation from each cut end.
3) Solder the cut end of the wires to the following spots on the RFM95W (one wire per spot):
- DI00
- 3.3V
- MISO
- MOSI
- SCK
- RESET
- NSS
- The GND pin next to the MISO pin
4) Cut 2 pieces of 18 ga solid core wire 83mm in length.
5) Strip 2mm of insulation from one end of each of those wires.
6) Solder the stripped end of one of the wires to the ANT spot.
7) Solder the stripped end of one of the wires to the GND spot which is next to the ANT spot. – You have just made dipole antenna.
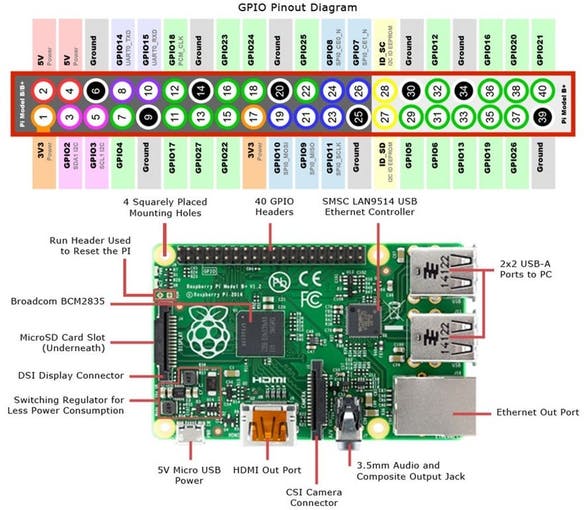
Connect the RFM95W and Raspberry Pi
Setup the Raspberry Pi Software
* These instructions assume that you are running Raspbian on the Raspberry Pi *
Run these commands in the Raspberry Pi:
1) Login to Raspberry Pi as the Pi user
2) Clone the repo found at https://github.com/tftelkamp/single_chan_pkt_fwd
git clone https://github.com/tftelkamp/single_chan_pkt_fwd
3) Use raspi-config to enable SPI:
sudo raspi-config
- Select 5 Interfacing Options:
- Select P4 SPI:
- Select Yes
- Reboot:
sudo shutdown -r now3) Install
wiringPi:sudo apt-get install wiringpi4) Configure the single channel gateway code:
cd ~/single_chan_pkt_fwd
nano main.cpp
If you are in the USA, you will need to set several things:
- Find the line:
#define SERVER1 "54.72.145.119" // The Things Network: croft.thethings.girovito.nl- Replace with:
#define SERVER1 "13.66.213.36" //router.us.thethings.network- Find the line:
uint32_t freq = 868100000; // in Mhz! (868.1)- Replace with:
uint32_t freq = 902300000; // in Mhz! (902.3)You can also set the Informal Status Fields and location if you want to.
5) Compile the single channel gateway code:
make6) Test run the gateway:
sudo /home/pi/single_chan_pkt_fwd/single_chan_pkt_fwdCrtl+C to kill it. Be sure to copy down the gateway ID found:
7) Configure a gateway on The Things Network
- Login to console.thethingsnetwork.org (it is free and easy to create an account if you don't already have one)
- Select ‘Gateways' at the top of the page
- Select + register gateway
Read More: LoRa – Raspberry Pi – Single Channel Gateway – Cheap!


