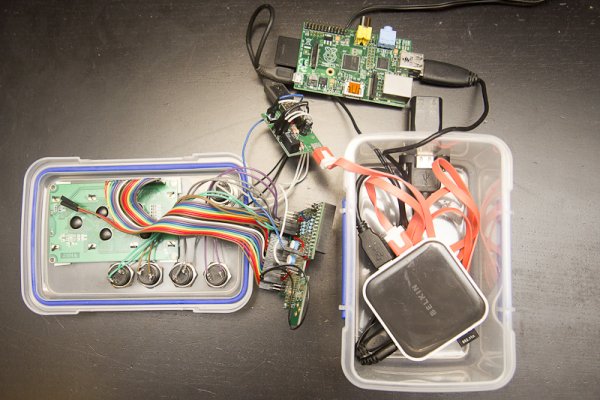
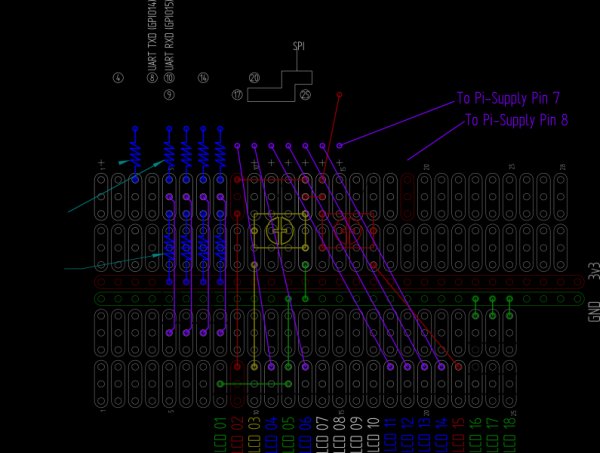
What I've made is a radio with 6 buttons and a 20×4 LCD screen. There is an “ON” button, and “OFF”, “BACK”, “PLAY”, “STOP” and “NEXT”. It is connected to the internet via WiFi, and it powered by a USB hub connected through a Pi-Supply (http://www.pi-supply.com/product/pi-supply-raspberry-pi-power-switch/) so I get a proper shut down. And I use a USB sound card, as the quality of the on board is low at best. I run it through my home stereo, and the USB sound card pumps out a much better line volume, so when I am switching from CD to the Raspberry Pi, I don't get big volume changes. I don't change the volume on the Raspberry Pi itself.
Most of this work is based on bits and pieces from other people. The biggest influence is Meistervision (http://www.youtube.com/watch?v=KM4n2OtwGl0) who did a really great video of how to build a radio. My wiring is different, my switching method is different, so please don't try to follow both guides for the one project.

-
- * Raspberry Pi (Model B rev 2)
-
- * A powered USB hub
-
- * USB sound card
-
- * WiFi Dongle
-
- * An SD Card, at least 4gb.
-
- * 1k Resistors
-
- * 10k Resistors
-
- * 20×4 LCD with a Hitachi HD44780 chip.
-
- * 6x momentary switches
-
- * 2 variable resistors. This is for contrast and backlight adjustment.
-
- * Wires, usb cables, etc.
-
- * A lunch box
-
- * A Humble Pi (
http://shop.ciseco.co.uk/k001-humble-pi/
Raspberry Pi Setup
First I installed Raspbian (Wheezy). Downloaded from http://www.raspberrypi.org/downloads, and installed by following this procedure http://elinux.org/RPi_Easy_SD_Card_Setup#Copying_the_image_to_an_SD_card_on_Windows
I then installed PuTTY (http://portableapps.com/apps/internet/putty_portable). I connected my raspberry pi via ethernet, turned it on, used my router to find the IP address of the Raspberry Pi, and then used PuTTY to log in via SSH. All this info is in just about any beginers guide you will find. But a tip. Don't plug in your wi-fi dongle yet, as it might try to use that instead of the ethernet.
I ran “raspi-config” (http://elinux.org/RPi_raspi-config), and expanded the card, and made sure it didn't boot to desktop.
Then I ran
sudo apt-get update
to update the list of all the programs I can download.
Then to upgrade all the installed software to the latest version. Type in;
sudo apt-get upgrade
Now I add the MPD to play music, MPC to control the music player, and python to do the programing
sudo apt-get install python mpd mpc
The next step is to set up the wi-fi and fix the IP address. To load up the editor to the correct file type in
sudo nano /etc/network/interfaces
- Code: Select all
auto lo

iface lo inet loopback
iface eth0 inet dhcp
allow-hotplug wlan0
iface wlan0 inet static
address 192.168.0.60
netmask 255.255.255.0
gateway 192.168.0.1
wpa-ssid NameOfYourWiFi
wpa-psk YourWiFiPassword
To exit hit ctrl-x, then press y for yes, then hit enter to keep the same name.
Then type in
sudo shutdown -h now to turn off the Raspberry Pi. It doesn't actually turn off. Wait until the lights stop flashing (give it a minute or two), then turn off the power. Unplug the ethernet, and plug in your wi-fi. Now turn it back on. You can then check it's all worked by using PuTTY to log back on, with the new address you have assigned.
By default the RPi wants to use it's own sound card. So we need to change this.
used the text editor again.
sudo nano /etc/modprobe.d/alsa-base.conf
My alsa-base.conf file looks like this
- Code: Select all
# autoloader aliases

install sound-slot-0 /sbin/modprobe snd-card-0

install sound-slot-1 /sbin/modprobe snd-card-1

install sound-slot-2 /sbin/modprobe snd-card-2

install sound-slot-3 /sbin/modprobe snd-card-3

install sound-slot-4 /sbin/modprobe snd-card-4

install sound-slot-5 /sbin/modprobe snd-card-5

install sound-slot-6 /sbin/modprobe snd-card-6

install sound-slot-7 /sbin/modprobe snd-card-7

# Cause optional modules to be loaded above generic modules

install snd /sbin/modprobe --ignore-install snd && { /sbin/modprobe --quiet snd-ioctl32 ; /sbin/modprobe --quiet snd-seq ; : ; }

install snd-rawmidi /sbin/modprobe --ignore-install snd-rawmidi && { /sbin/modprobe --quiet snd-seq-midi ; : ; }

install snd-emu10k1 /sbin/modprobe --ignore-install snd-emu10k1 && { /sbin/modprobe --quiet snd-emu10k1-synth ; : ; }

# Keep snd-pcsp from beeing loaded as first soundcard

options snd-pcsp index=-2

# Keep snd-usb-audio from beeing loaded as first soundcard

# options snd-usb-audio index=-2

# Prevent abnormal drivers from grabbing index 0

options bt87x index=-2

options cx88_alsa index=-2

options snd-atiixp-modem index=-2

options snd-intel8x0m index=-2

options snd-via82xx-modem index=-2
We need a playlist started.
mpc add http://7659.live.streamtheworld.com:80/977_80AAC_SC
mpc add http://www.bbc.co.uk/worldservice/meta/ … _au_nb.asx
mpc add http://www.bbc.co.uk/worldservice/meta/ … _au_nb.asx
So we have three radio streams in our playlist now. You can add more if you want.
If you want to delete a stream you use
MPC delete 3
I've just used these streams as an example. You can come back anytime and add or take streams.
So now lets listen to something.
mpc play
To go to the next track the command is
mpc next
and to go back it is
mpc prev
to stop then go
mpc stop
if you want to play a specific track then you can use
mpc play 1
For more detail: Lunchbox Internet Radio Guide


