
Yes, this is yet another alarm clock! But I feel like I'm not the only one deisiring a nice and simple object like this one to keep on the bedside table.
It comes with useful features like a soft wake up (with chirping birds from a little bluetooth speaker), changing set of information and luminosity for day and night, weather, news. WiFi is turned off during sleep time. All very customizable!
It is mainly based on the beautiful MagicMirror project, but in this case we use it with a little screen to display information we need, without hiding everything behind a mirror.
If you know MagicMirror a little, you know that there are different modules to install, to provide different kinds of functionality. For my project I used:
- Clock (the default one)
- MMM-AlarmClock (we want an alarm clock, right?)
- CurrentWeather (default module)
- WeatherForecast (also default)
- NewsFeed (default)
- MMM-Online-State (to check wether WiFi is on or off)
- MMM-Tado (well, if you have a smart thermostat, you can display ambient info)
- MMM-ModuleScheduler (optional, to switch modules displayed)
Then I thought cron is the easy and right tool to program some events during the day(s). I'll show my crontab below.
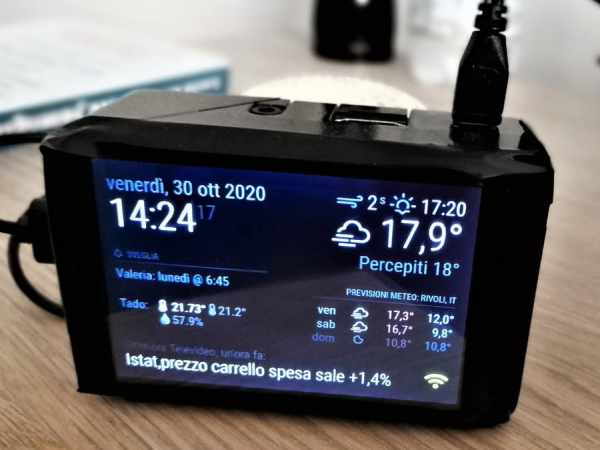
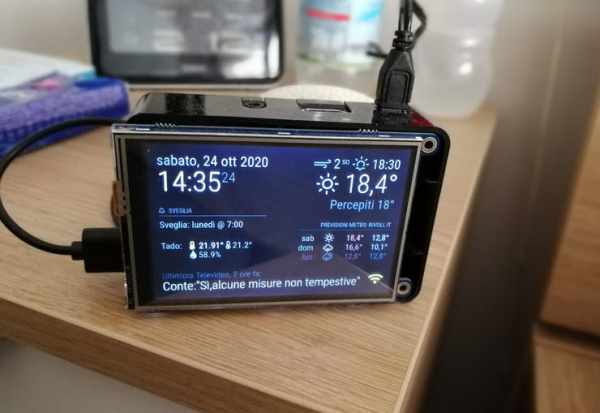
Let's take a peek at my screen now (day version):
And now let's have a look at the night version:
Seen the difference? I don't need much information if I wake up at 3 a.m.: the clock is sufficient! And also the indication that the WiFi is turned on/off is ok (for example I set the on sign to yellow and off sign to blue).
So, if you like it, let's do it!
Hardware setup
The setup is so simple:1) first, if you have a case, insert your Raspberry Pi (version 2, 3, or 4 will work) with the microSD card into it (make sure the relevant pins/connector can still be accessed to connect the screen);
2) then just connect the screen (whichever you want to use) to the Raspberry Pi; I would recommend a small one (like the 3.5″ in the list), but you could also use the official Raspberry Pi Touch Display, or another one; the touch function will be useful (but not 100% necessary) to turn off the alarm clock;
3) then, if you are using a bluetooth speaker, it may be practical to power/recharge it directly from the Raspberry Pi USB, so just connect it to any USB port;
4) finally connect the power plug. Done!
Software installation
Now time to go to the SW installation:1) I assume you have a standard Raspberry Pi OS installation, with desktop, on a (small capacity, e.g. 8GB) microSD card.
2)MagicMirror installation: the so called “manual installation” is as easy as a copy and paste of a few commands, so I would recommend it.
3) MagicMirror (additional, 3rd party) Modules. For each of the following modules there's a separate installation, it's quick and easy (simple copy and paste again), just follow the links for instructions: first MMM-AlarmClock, we will use this to play music or nature sounds in the morning; MMM-Online-State, I find this useful to make sure WiFi is turned off during the night; optional, if you have a Tado thermostat, MMM-Tado, to show current and set temperature, humidity, etc.; the equivalent module for Netatmo is also available: MMM-Netatmo. I recently decided to try MMM-ModuleScheduler and never got back! It's easy to schedule the displaying of different modules at different times of the day/night.
4) The other modules we will use are default modules, so no further installation is required.
Configuration
There is one main configuration file to edit, plus you may want or need to tweak some other files, to optimize visualization and get the best result possible.
Let's start from the MagicMirror configuration file: you will find a sample file in your MagicMirror/config folder. I also provide my configuration file which you may use as a starting point. Find it below.
If you would like to have a day and night configuration, I suggest you create a config_day.js and config_night.js, as I did. Then we will switch them with a cron command (here at 11pm and 6am):
> crontab -e# For more information see the manual pages of crontab(5) and cron(8)# m h dom mon dow command01 23 * * * cp /home/pi/MagicMirror/config/config_night.js /home/pi/MagicMirror/config/config.js00 06 * * * cp /home/pi/MagicMirror/config/config_day.js /home/pi/MagicMirror/config/config.jsAlternatively, you could use the MMM-ModuleScheduler, which allows to show or hide different modules at different times, quite brilliant! You'll find my configuration file using the ModuleScheduler below.
Finally you may want or need to check the Raspberry Specific configurations, linked at the top of the configuration page. Especially to enable auto-startup and mouse pointer auto-hide.
Screen luminosity
This is an important topic, as we know how disturbing a bright screen can be while we are trying to sleep. And on the other hand we want a clearly readable screen in day light conditions. For some displays you can control the backlight illumination, this is true for the PiTFT screen I have. I made a little script to change luminosity with cron commands (again):
const raspi = require('raspi');const pwm = require('raspi-pwm');var myArgs = process.argv.slice(2);var lumi = myArgs[0]/1000.0raspi.init(() => { const led = new pwm.PWM('GPIO18'); led.write(lumi); // 1-1000 duty Cycle, aka brightness});This will be executed by the following commands:
> sudo crontab -e# For more information see the manual pages of crontab(5) and cron(8)# m h dom mon dow command@reboot /bin/sh -c 'echo "0" > /sys/class/backlight/soc\:backlight/brightness'@reboot /usr/bin/node /home/pi/screen_lumi.js 50000 23 * * * /usr/bin/node /home/pi/screen_lumi.js 100 07 * * * /usr/bin/node /home/pi/screen_lumi.js 10000 08 * * * /usr/bin/node /home/pi/screen_lumi.js 100000 19 * * * /usr/bin/node /home/pi/screen_lumi.js 800The screen_lumi.js script must be run with root privileges, so the screen luminosity will be handled by the root crontab.
Wi-Fi (radiation!) switch
This feature will let you sleep better, I believe. I prefer not to have Wi-Fi devices continuously radiating with wireless signals every night at a few centimeters from my head. So I introduce the Wi-Fi switch, thanks to the rfkill command run again by cron:
> crontab -e# For more information see the manual pages of crontab(5) and cron(8)# m h dom mon dow command@reboot /usr/sbin/rfkill unblock wlan00 23 * * * /usr/sbin/rfkill block wlan00 7 * * * /usr/sbin/rfkill unblock wlanThis will turn Wi-Fi off during the night and on again in the morning (when you are supposed to get up!). The same command could also turn Bluetooth off, but I found that some Bluetooth speakers may not like it and have difficulties reconnecting timely for the morning alarm. Also Bluetooth radiated power is quite lower than Wi-Fi and it's not a continuous transmission.Final remark, make sure you are not configuring your Alarm Clock through Wi-Fi when testing the “block wlan” command!
Speaker
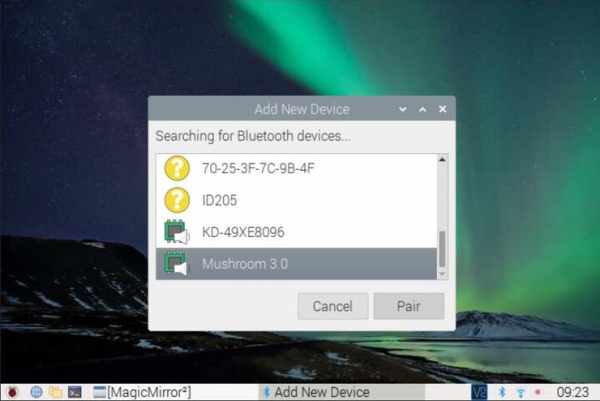
In my project I used a Bluetooth speaker (powered/recharged from the Raspberry Pi USB port). This can be easily configured in the Raspbian UI: first you need to find and pair the speaker from the Bluetooth menu, then you can select the speaker as an audio output device from the audio menu (see steps below). Of course, alternatively you could simply plug a 3.5″ jack speaker.
ake up sounds
Just a quick check on how we want to wake up: in my example below, the alarm clock will play an mp3 file I like, for 3 minutes, at 7am, every week day. Make sure you choose a soft nice sound, like the chirping birds in the forest! This is my preferred one (free to download): Birds in the forest.
{ module: 'MMM-AlarmClock', position: 'top_left', config: { alarms: [ {time: "7:00", days: [1,2,3,4,5], title: "Wake-up!", message: "It is 7.00am!", sound: "birds-in-the-forest.mp3"}, ], format: 'dddd @ H:mm', touch: 'true', volume: 0.50, timer: 180 * 1000 }},And from here you are free to experiment, tweak, improve, and adapt this project to your personal preferences!
Code
/* Magic Mirror Config Sample
 *
 * By Michael Teeuw https://michaelteeuw.nl
 * MIT Licensed.
 *
 * For more information on how you can configure this file
 * See https://github.com/MichMich/MagicMirror#configuration
 *
 */

var config = {
        address: "0.0.0.0",     // Address to listen on, can be:
                                // - "localhost", "127.0.0.1", "::1" to listen on loopback interface
                                // - another specific IPv4/6 to listen on a specific interface
                                // - "0.0.0.0", "::" to listen on any interface
                                // Default, when address config is left out or empty, is "localhost"
        port: 8080,
        basePath: "/",  // The URL path where MagicMirror is hosted. If you are using a Reverse proxy
                        // you must set the sub path here. basePath must end with a /
        ipWhitelist: ["127.0.0.1", "192.168.1.0/24", "::ffff:127.0.0.1", "::1"],       // Set [] to allow all IP addresses
                                                                                        // or add a specific IPv4 of 192.168.1.5 :
                                                                                        // ["127.0.0.1", "::ffff:127.0.0.1", "::1", "::ffff:192.168.1.5"],
                                                                                        // or IPv4 range of 192.168.3.0 --> 192.168.3.15 use CIDR format :
                                                                                        // ["127.0.0.1", "::ffff:127.0.0.1", "::1", "::ffff:192.168.3.0/28"],

        useHttps: false,        // Support HTTPS or not, default "false" will use HTTP
        httpsPrivateKey: "",    // HTTPS private key path, only require when useHttps is true
        httpsCertificate: "",   // HTTPS Certificate path, only require when useHttps is true

        language: "it",
        logLevel: ["ERROR"],
        timeFormat: 24,
        units: "metric",
        zoom: 1.25,

        // serverOnly:  true/false/"local" ,
        // local for armv6l processors, default
        //   starts serveronly and then starts chrome browser
        // false, default for all NON-armv6l devices
        // true, force serveronly mode, because you want to.. no UI on this device

        modules: [
                {
                        module: "alert",
                },
                {
                        module: "clock",
                        position: "top_left",
                        config: {
                                dateFormat: "dddd, D MMM YYYY"
                        },
                },
                {
                        module: 'MMM-AlarmClock',
                        position: 'top_left',
                        config: {
                                alarms: [
                                                {time: "7:00", days: [1,2,3,4,5], title: "Wake up", message: "It's 7.00!", sound: "birds-in-the-forest.mp3"},
                                ],
                                format: 'dddd @ H:mm',
                                touch: 'true',
                                volume: 0.50,
                                timer: 180 * 1000
                        }
                },
                {
                        module: 'MMM-Tado',
                        position: 'top_left', // This can be any of the regions.
                        config: {
                                username: '[email protected]',
                                password: 'your_password',
                                updateInterval: 600000
                        }
                },
                {
                        module: "currentweather",
                        position: "top_right",
                        config: {
                                location: "Your_city",
                                locationID: "1234567", //ID from http://bulk.openweathermap.org/sample/city.list.json.gz; unzip the gz file and find your city
                                appid: "_your_free_key_number_goes_here_",
                                decimalSymbol: ",",
                                appendLocationNameToHeader: false
                        }
                },

                {
                        module: "weatherforecast",
                        position: "top_right",
                        header: "Previsioni meteo:",
                        config: {
                                location: "Your_city",
                                locationID: "1234567", //ID from http://bulk.openweathermap.org/sample/city.list.json.gz; unzip the gz file and find your city
                                appid: "_same_free_key_number_as_above_",
                                maxNumberOfDays: 3,
                                showRainAmount: false,
                                colored: true,
                                decimalSymbol: ","
                        }
                },
                {
                        module: "newsfeed",
                        position: "bottom_left",
                        config: {
                                feeds: [
                                        {
                                                title: "Ultim'ora Televideo",
                                                url: "https://www.servizitelevideo.rai.it/televideo/pub/rss101.xml"
                                        }
                                ],
                                showSourceTitle: true,
                                showPublishDate: true,
                                broadcastNewsFeeds: false,
                                broadcastNewsUpdates: false,
                                reloadInterval: 600000,
                                ignoreOldItems: true,
                                ignoreOlderThan: 43200000 // 12h
                        }
                },
                {
                        module: "MMM-Online-State",
                        position: "bottom_right",
                },
        ]
};


/*************** DO NOT EDIT THE LINE BELOW ***************/
if (typeof module !== "undefined") {module.exports = config;}
Source: MagicMirror Alarm Clock