Let's build an IoT device that sends flame sensor data to SAMI using SAMI's WebSockets. The IoT device consists of an off-the-shelf sensor, Arduino UNO and Raspberry Pi.
In this implementation, a Simple Manifest is used to create a new device type quickly. Then you can easily connect the IoT device to SAMI, and start to send sensor data from the device to SAMI.
Prerequisites
”'For this tutorial you should be familiar with the basic SAMI APIs. ”'
Architecture
The purple diagram below shows the high-level architecture:
We use the following hardware components:
- Raspberry Pi with a network connection
- Arduino UNO with a breadboard
- IR flame sensor
- USB and power cables, plus wiring for the breadboard
We will write the following software:
- A Sketch program running on the Arduino
- A Node.js script running on the Raspberry Pi
”'If you do not have a Raspberry Pi, you may still work through this tutorial. Connect your Arduino UNO to your computer that has an Internet connection and run the Node.js script on the computer instead of the Raspberry Pi.”'
Step 1: Create and connect a new device type
Go to the Developer Portal to create a private device type.
- First, sign into the SAMI Developer Portal. If you don't have a Samsung account, you can create one at this step.
- Click “+ New Device Type”.
- Name this device type “Flame Sensor” and give it the unique name such as “com.example.iot.flame”.
- Click “Create Device Type”. This creates the device type and takes you to the device types page.
Now let's create a Manifest for our “Flame Sensor” device type.
- Click “Flame Sensor” in the left column.
- Click “Manifest” and then “+ New Version”.
- Enter “onFire” as the Field Name and “Boolean” for Data Type.
- Click “Save” and then “Next: Actions”.
- Bypass Actions for this tutorial and click “Save New Manifest”.
”'A Simple Manifest is automatically approved. Do not publish this device type, since it is for tutorial purposes only.”'
Finally go to the User Portal to connect a new Flame Sensor device:
- Sign into the SAMI User Portal.
- On the dashboard, click to connect a new device.
- Choose the “Flame Sensor” device type you just created.
- Click “Connect Device…”. You're taken back to the dashboard.
- Click the Settings icon of the device you just added. In the pop-up, click “GENERATE DEVICE TOKEN…”.
- Copy the device ID and device token on this screen. You will use these in the code.
Step 2: Set up the Arduino
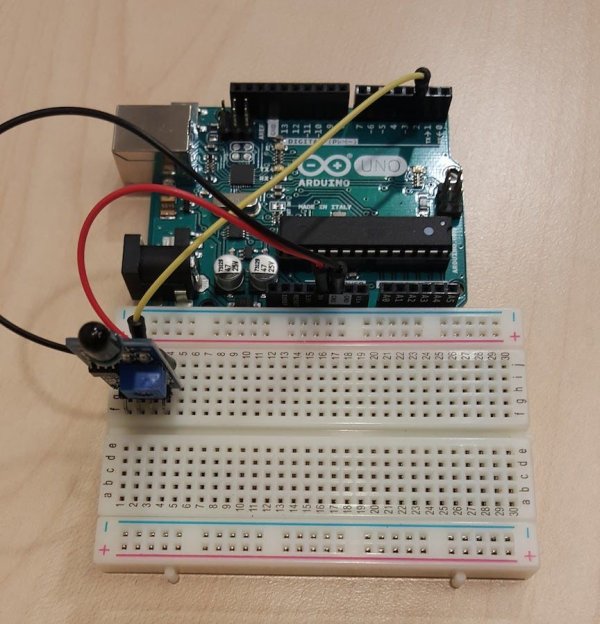
Now let's wire the sensors to the Arduino.
The two sensors are wired as in the Frizting image above.
Next, upload the Sketch program (read_flame_sensor.ino) to the Arduino UNO using the Arduino IDE. This code reads one digital value from the IR flame sensor, and then sends it to the serial port every 5 seconds (you can change this parameter in the code later, since SAMI has rate limits for the number of messages per day). For the digital readings, “0” means that a fire is detected and “1” means no fire.
Here is read_flame_sensor.ino. The code is straightforward.
// Delay between reads
const int delayBetweenReads = 5000;//5s
// For flame detector senso const int flameDigitalPinIn = 2;
void setup() {
// initialize serial communication @ 9600 baud:
Serial.begin(9600);
pinMode(flameDigitalPinIn, INPUT);
}
void loop() {
// HIGH(1) means no fire is detected
// LOW (0) means fire is detected
int flameDigitalReading = digitalRead(flameDigitalPinIn); Serial.println(String(flameDigitalReading));
delay(delayBetweenReads);
}
Step 3: Set up the Raspberry Pi
Connect your Raspberry Pi to a monitor, mouse and keyboard. Ensure that an Ethernet or WiFi connection is working, and make sure the OS is up-to-date:
- $ sudo apt-get update
- $ sudo apt-get upgrade
If not already installed, install Node.js for ARM, then add the packages serialport and ws via npm:
- $ npm install serialport
- $ npm install ws
Now connect the serial port from the Arduino to the USB on the Raspberry Pi.
Finally, download the Node.js code (send_data_to_sami.js) to the Raspberry Pi. Replace the placeholders in the code with the device token and device ID you collected from the User Portal.
The Node.js code is also given below. It establishes a bi-directional WebSocketconnection between the Raspberry Pi and SAMI. After the WebSocket connection is open, register() method registers the device with the WebSocket. Each time, the code reads one data point from the serial port, and then wraps it in a message and sends the message to SAMI via WebSocket.
var webSocketUrl = “wss://api.samsungsami.io/v1.1/websocket?ack=true”;
var device_id = “”; var device_token = “”;
var isWebSocketReady = false; var ws = null;
var serialport = require(“serialport”)
var SerialPort = serialport.SerialPort;
var sp = new SerialPort(“/dev/ttyACM0”, {
baudrate: 9600,
parser: serialport.parsers.readline(“\n”)
});
var WebSocket = require(‘ws');
/**
* Gets the current time in millis
*/
function getTimeMillis(){
return parseInt(Date.now().toString());
}
For more detail: Make a fire detector in minutes with Samsung SAMIIO, Arduino UNO and Raspberry Pi


