
In this project, I will show you how you can make some of your standard Halloween decorations “smart” using Phidgets and a Raspberry Pi. This can be done with almost any decoration that is powered, but it's best if you have a decoration with a demo mode.
These ones are easy to pick out as they will have a button or switch that allows you to test their functionality in the store. However, if your decoration does not have that functionality, I will show you how to make it work anyway, as that is what I am using.
This project assumes you have some familiarity with Python, Phidgets, and Rasberry Pi, as well as soldering.
Supplies
- Raspberry Pi
- Phidgets Vint Hub
- REL2001_0 or REL1100_0
- DST1200_0 (Optional)
- Wire Cutters / Strippers
- Spare Wire (Optional)
- Soldering Iron + Solder
- Heat Shrink Tubing or Electrical Wire
- A Powered Haloween Decoration
Step 1: Planning
This step is important as there needs to be some flow to how things will be assembled. In my case the Halloween decoration already needed to be put together, so all the modifications will be made before assembly. Like I said before it the decoration you are going to use is important.
In my case the decoration I used does not have a demo mode, but like I said that's fine. There are two key things to look for. In my case, the decoration I have has the main power switch, which carries less than the maximum rated voltage for the Phidgets relay, and the other was a sound sensor that the decoration was included.
I chose to attack the sound sensor, as it was pretty low quality, but the easiest thing to access.
Step 2: Disassembly

This step will be different for everyone unless you happen to have the same decoration like the one used in this tutorial, although the process is fairly straightforward. If you have a unit with a demo mode switch, you can skip this step and move on to step 4.
When disassembling something unknown I like to follow the simple process see a screw, remove a screw, until I get to what I need. In this case, it was only 4 Philips head screws and I was into the main body.
A point of importance is to watch out for any ribbon or pin connectors when pulling apart the decoration. In my case, there was a battery connection running from the bottom half to the top half of the unit that had to be removed in order to fully open the case. Not ripping these types of connections is key as having to fix them can be a huge headache, so be careful when pulling apart your decoration.
Step 3: Identifying What to Cut
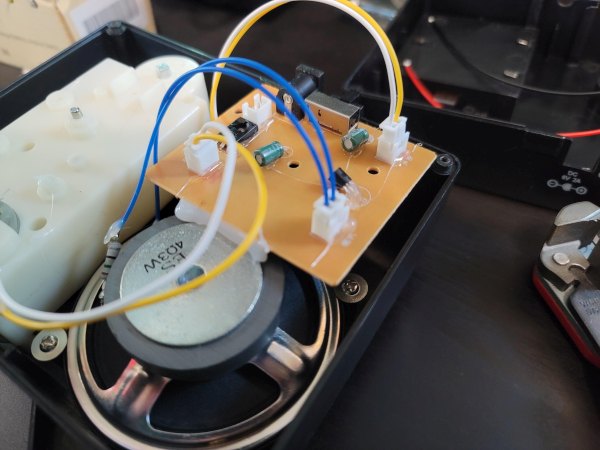
This is where having a good plan comes into play. You will want to look around and see what all you have to play with inside the decoration. In my case, my original plan was to simply desolder the main power switch, and wire in the relay at that point, but once opened a better opportunity presented itself.
This decoration happened to have a sound activation feature, which was way too sensitive and had no adjustment. Luckily for me as long as power was enabled simply shorting the leads would activate the decoration. You can test this by using a rubber or plastic-handled screwdriver to short the leads or solder joints, just be careful as shorting the wrong pins could damage or break your decoration.
Once you have identified where best to connect the relay, move on to the next step.
Step 4: Making Connections

Now that you know where to wire up the relay we will need to make some modifications to our decoration. If you are modifying the demo switch, simply cut off the button leaving as much of the cable as possible. Strip back the rubber insulation with wire strippers, leaving about 5-10mm of wire exposed.
If you are modifying your decoration internally try to give yourself as much cable to work with as possible. Once cut then strip back the insulation, leaving approximately 5-10mm of wire exposed.
Finally, if you need extra wire in order to make your connection work, now is the time to roughly measure out and cut the wire to length. Giving yourself extra wire to work with never hurts, so don't be afraid to add an extra few centimeters to what you think you may need. Again strip it leaving about 5-10mm of exposed wire as mentioned above, the goal is to have the wires fully overlapping when they are soldered.
If you are using the remains of a demo switch, and have enough wiring already exposed, skip to step 7.
Step 5: Soldering
Now that you are ready to make your connection, start by tinning your wires. To do this simply apply a light coat of solder to your iron first, and then touch the wire with the soldering iron on one side, and the solder on the other. This will force the solder to be pulled through the wire, which is especially important if the wire does not have a solid core.
Once tinned now is the time to cut and place your heat shrink tubing on the wires, if you are going to use electrical tape simply skip to the next paragraph. It is always good practice to put your heat shrink on the wiring before you make your solder connections, as you may not always have the access to put heat shrink on afterward.
Now you can make your solder connections. If you tinned your wires properly it should just be a matter of holding them together in parallel and heating them up with the iron in order for the solder to melt. Although if you did not get enough solder on the wires, or they are fairly large, you may need to add some extra solder in order to make your connection strong.
Step 6: Wrapping Things Up
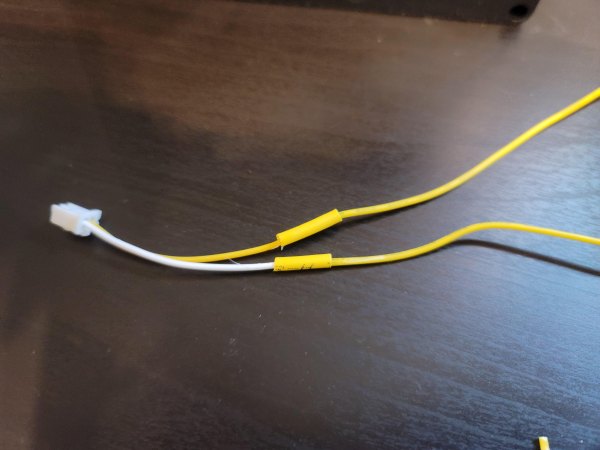
Now if you chose to use heat shrink simply pull it up around your exposed connections and heat it up to prevent the exposed wires from shorting out. If you chose to use electrical tape then simply wrap a piece big enough to cover the entirety of the exposed wire, as having it short out will lead to unintended circumstances.
If you are running your wires from the inside of the decoration to the outside, you will want to find some way to get them out. You may need to cut or drill a hole, or like in my case, there will already be one in the unit which you can simply run your wires through.
Step 7: Connecting Your Phidgets
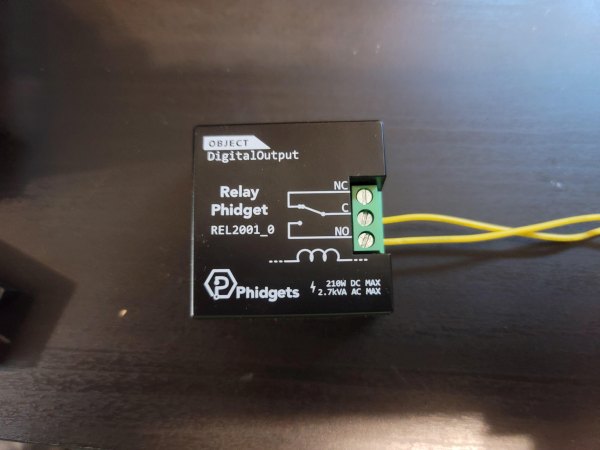
Now that you have the wires run it is time to connect your Phidgets. In my case, I am using a relay to briefly switch on and off the connection and a sonar Phidget to sense distance. That being said there is a multitude of different Phidgets that could be used for this and similar decorations.
This part was fairly straightforward. Start by connecting your two leads to the normally open (NO) section of the relay. Then simply plug the relay and the sonar into a VINT hub and the VINT hub into your Pi.
Step 8: Writing Code
Again this step will vary depending on the Phidgets you used, and what you want your decoration to do. In my case, I simply wanted to replace the crummy sounds sensor with a proper distance sensor so that the decoration would only go off when people got close, instead of every time a small noise was made.
Writing the code for this is fairly straightforward, below I have given an example of a short program written in Python. This will simply wait until someone comes within half a meter of the sonar Phidget before activating the relay with a short burst in order to turn on the decoration.
If you are using the same Phidgets as within this tutorial you can use this code directly, and see how your decoration behaves. Just keep in mind you have to plug the relay into port 0 as otherwise it will not be detected, however, the sonar can be plugged into any other port.
#!/usr/bin/python3
from Phidget22.Devices.DigitalOutput import *
from Phidget22.Devices.DistanceSensor import *
import time

# Initalize Objects
distanceSensor = DistanceSensor()
relay = DigitalOutput()

# Set up Distance Sensor
distanceSensor.openWaitForAttachment(1000)

# Set up Relay
relay.setHubPort(0)
relay.setIsHubPortDevice(True)
relay.openWaitForAttachment(1000)

# Loop
while True:

    # If distance is less than 500mm then activate
    if distanceSensor.getDistance() < 500:
        # Open then close relay
        relay.setState(1)
        # Hold relay open for 0.25 seconds
        time.sleep(0.25)
        relay.setState(0)

    # Wait 1 second
    time.sleep(1)
Step 9: Running Code on the Pi
If you know how to Phidgets on the Pi you can skip this step, otherwise continue on.
One of the easiest ways to do run code on the Pi is by taking advantage of Pi OS's desktop environment and using Thonny to run your code, however that is not always an option as to where my Pi will end up, it won't have any display attached to it.
The easiest way to set everything up is to first plug a display and a keyboard into the Pi. Then enable ssh for later by clicking on the Raspberry Pi logo on the navigation bar, and going to Preferences > Raspberry Pi configuration. Then simply click enable on ssh to enable ssh by default.
Next, you will need to install the Phidget libraries. To do this start opening a terminal and running
curl -fsSL https://www.phidgets.com/downloads/setup_linux | sudo -E bash -
sudo apt-get install -y libphidget22
Then update pip by running
sudo python3 -m pip install --upgrade pip
and finally
python3 -m pip install Phidget22
While you have a display connected it wouldn't hurt to grab your Pi's current IP address by running
ip -c -h a
It will either start with 192.168.X.X or 10.10.X.X depending on your local network, with the Xs being any number.
Now you should be good to run your script through the terminal. The reason it is important to enabling ssh is so that you can run your script without having to connect a display to the Pi, as it would sort of ruin the decoration aspect. To do this with ssh simply run the following command below, and then execute your script using python3.
Step 10: Conclusion
Now after all that hard work you can see your decoration in action! All you have to do is find a place with power in order to place your decoration, and plug in the Pi. Hopefully, you were able to follow along, and make some of your decorations “smart” using Phidgets. There are lots of possibilities when it comes to how and what to do with the decorations and Phidgets, so be creative and see what works for you.
Source: Making Your Halloween Decorations Smart With Phidgets