
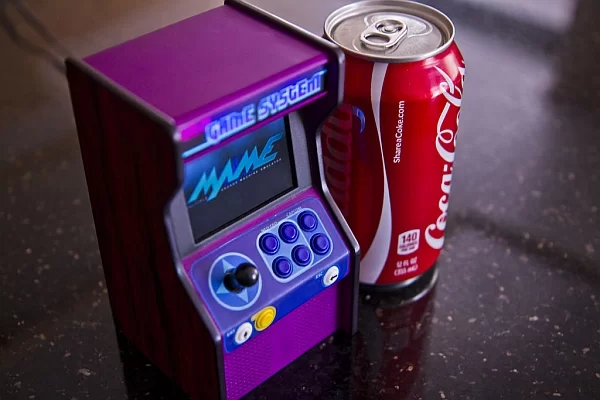
Fully functional micro arcade machine using a Raspberry Pi model B or B+.
I always wanted a tiny arcade machine for my desk, I decided to build it as small as possible. It may look simple from the outside but a lot of engineering went into building it. After months of development and 8 printed prototypes later, its finally ready. I decided to post the build steps here and links to the 3D printed parts so anyone can build one for themselves.
3D printed parts are available in more colors, check the link below.
Painting instructions are optional, you can paint it anyway you want.
enjoy 🙂
Parts list:
Shapeways.com
update: added vent holes on the back panel.
- 1X Micro arcade cabinet (pick color for cabinet)
http://shpws.me/Bvif - 1X Micro arcade buttons (pick color for buttons)
http://shpws.me/wIoJ
Adafruit.com
- 1X Raspberry Pi B (#998) or B+ (#1914)
- 1X NTSC/PAL 2.5″ TFT (# 912)
- 1X LED Sequins warm white, pack of 5 (#1758)
Digikey.com
- 1X slide switch (CKN5004-ND)
- 1X 2.1mm jack (CP-010A-ND)
- 1X 15 pin D-sub connector (609-4042-ND) (optional plug for controller)
- 9X tactile push buttons (679-2431-ND)
- 1X mini joystick (GH7455-ND)
- 1X 5vdc wall adapter (237-1385-ND)
Amazon.com
- 1X HMDX HX-GO3 speaker case
- 1X SD card (8Gb or larger)
- 1X Roll 24 AWG wire or 1X PC IDE ribbon cable
- 1X Pack of Crimp female D-sub pins (B000BSN7D8)
Tools:
- Soldering iron & some solder
- Needle nose pliers
- Sharp tweezers
- Mini file set
- Epoxy glue
- PC/MAC
- USB thumb drive
- Keyboard and mouse
Painting supplies (optional)
- Paints/markers
- Paint brush
- X-Acto knife
- Sand paper 200 & 400 grit
- Krylon Crystal Clear varnish / Testors Dullcote varnish
- Inkjet water-slide decal paper, I use: 120 White Inkjet Decal Film, from:
http://www.bare-metal.com/Experts-Choice-Decal-Fil… - Micro Set decal fluid
Step 1: Disassemble speaker
Start with getting the audio board and speakers out of the Mp3 player case.
I would recommend to test it first and make sure its working before proceeding.
- Pop off the inner liner behind the speakers, unscrew the panels and PCB board, be careful not to rip the speaker cables when dissembling
- De-solder the battery compartment connections
- De-solder the audio cable and replace it with longer cables.
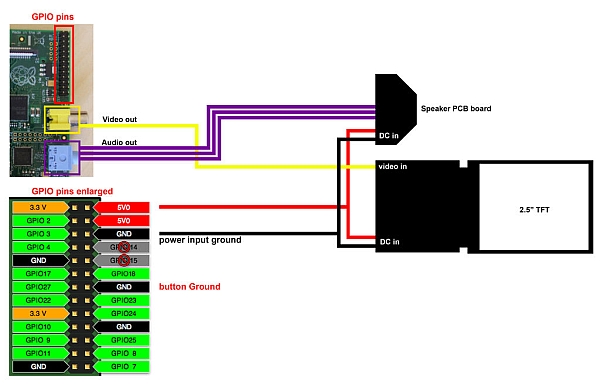
Step 2: Connect electronic parts
Connect the screen audio board to the raspberry pi
- Solder the 3 audio and 2 video cables to the under side of the Pi, see pictures for connection info
- Connect to DC power to the LCD, amp and raspberry Pi GPIO pins double check the polarity (+/-)
- Connect keyboard and mouse power it on.
Step 3: Testing hardware and software
Test all the hardware/software to make sure it works. there are many tutorials and videos online on how to set up emulators on the raspberry pi, the following will cover only the general steps that I did to get it working.
- Connect keyboard, mouse and the USB for power (I used a backup battery) I had test buttons plugged into the GPIO pins, this is not necessary, use the keyboard for controls.
- Plug in the SD card into your PC and install operating system and emulators with test game: http://blog.sheasilverman.com/pimame-raspberry-pi…
- Plug the Raspberry Pi into a monitor for better viewing resolution.
- Plug in the SD card into the Raspberry Pi, boot it up, run the test game to make sure it works.
- Press ESC and exit to command line. type in (no quotations) “startx” and press enter, this should start the OS which will show a desktop.
- Download Retrogame https://github.com/adafruit/Adafruit-Retrogame and copy it on to the Raspberry Pi with a thumb drive.
- Extract on the desktop and install Retrogame, (follow the install instructions) this will allow cabinet buttons to connect directly to the GPIO pins on the raspberry pi, instructions can be found here: https://learn.adafruit.com/retro-gaming-with-rasp…
- To set button configuration, edit the retrogame.c file and run the “make” file
Step 4: Test fit the 3D printed parts
I started with the purple color cabinet, keep in mind its also available in white for custom painting.
If you ordered the white unpolished material, rinse it thoroughly to clean off all the loose powder and dry it with a hair dryer.
Do not separate the buttons yet, leave them attached for easy handling and painting.
- Clip on the inner top panel, this will hold the audio amp.
- Attach and press the rear panel, this will hold the Raspberry Pi. There are 6 clips simply press them in from the back, it should snap on.
- To take it apart press on the clip from the inside. It may be hard to snap on the first time, take it apart and snap it back on, do it a few times until it loosens up.
- To attach the top panel hook up the front and clip on the back, do this in reverse to take it off.
Step 5: Painting, finishing
The 3D printed parts can be painted anyway you want, its made of nylon, it wont dissolve with alcohol or acetone. You can use pens, markers, acrylic, enamels, car paint, almost anything.
For a smooth surface finish, before painting the case, wet sand the parts first.
Always cover the paint with clear varnish, this will keep the paint protected from repeated handling. Make sure any paint is completely dry before applying any clear varnish this will prevent the paints from reacting with the varnish.
The following steps describe how I made mine:
- Color the T molding black with permanent Sharpie marker, then spray many coats of Krylon Crystal Clear.
- When the clear varnish is dry, wet sand it with wet/dry sand paper, wet sanding works faster and gives better result.
- After sanding spray several more layers of Crystal Clear and sand it again.
- Repeat the varnish and sanding step 3 times, use progressively finer sand paper (100-200-400 grit) this will gradually create a smooth surface, then leave the surface sanded for decal application.
Step 6: (optional) Apply decals part1
- Print the decal, follow decal paper instructions, the steps are different for each band. I recommend printing multiple copies just in case the decal doesn't apply properly. for inkjet water-slide decals remember to spray thick coats of clear varnish on the printed decal before immersing it in water.
- Use a brush to apply decal fluid, Micro Set, on the 3D printed part.
- Dip the decal in water when the decal is loose, pick up the decal with the paper backing from the water and place both on the part, carefully slide one edge of the decal to the part and position it properly, then pull the paper backing out from under the decal, then brush it smooth with a paint brush.
- Push all excess fluid out from under the decal, do not peal off the decal to re-position it, it will curl up. Try to slide it around the surface if it doesn't work you may have to peal it and re-start with a new decal.
- Wait for the decal fluid to dry before trimming the decals. Decals may wrinkle a little bit when its wet, it will smooth out as it dries.
- When the decal is dry cut the decal around the T molding with a sharp new X-acto knife, and pull the excess decals off, more Micro Set may be applied around the edges as needed.

Step 7: (optional) Apply decal part2
- For the button panel, cut the decal out around the design.
- Punch holes on the decal sheet at the center of each button, this will help line up the decal for placement and application around the holes
- Apply Micro Set on the part where the decal would go on.
- Same as before, dip the decal in water, when the decal is loose, pick up the decal with the paper backing from the water and place both on the part, carefully slide one edge of the decal to the part and position it properly, then pull the paper backing out from under the decal, then brush it smooth with a paint brush.
- Wait for decal to completely dry.
- Cut slits around the button holes and apply more Micro Set, fold the decal through the holes to the back with a brush.
- When the decals are all dry, spray a final layer of clear varnish on top.
For more detail: Micro Raspberry-Pi arcade cabinet