
Like the look and feel of vintage radio, but want Pandora, internet radio and your own music? This project is for you!
Story
Inspiration
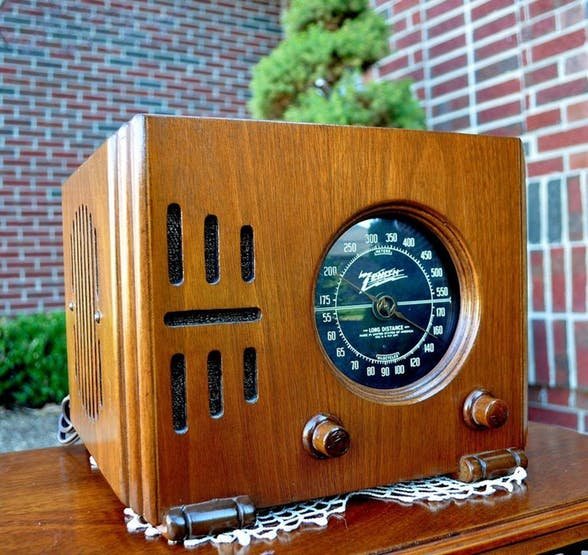
I used to love playing around with my Dad's big 1940's Zenith radio, tuning in to stations across America and around the world. The charm of that old Zenith stuck with me across the years: that beautiful dial, the tactile connection to those tuning knobs. Zenith was the king of “User Interfaces” back then. These days, I like to follow others who have vintage radio projects (BIG shout out to Tinkernut, here and youtube) and longed to make a retro radio just for me – to recreate those good old times.
So here it is – now, in an adorably convenient size.
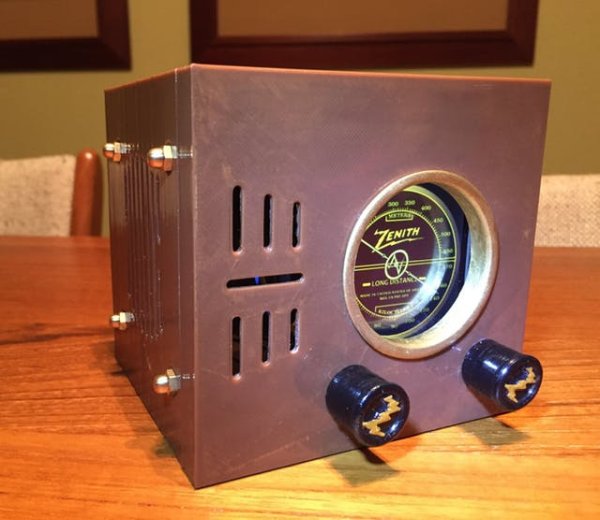
I researched quite a few old radios. Many, like “Cathedral” radios, were very cool looking, but could be hard to model in 3D, print and assemble. Finally, I settled on the classic Zenith “Cube” 5R216 model. I wasn't trying to faithfully replicate the 5R216. I just wanted something that would suggest the look and feel of it.
Skill Level
Advanced – 3D printing, soldering, code installs.
There's a significant amount of soldering to this project, some a little challenging. The real work begins when assembling the components into the 3D printed case. The case is less than 5 inches/120mm square (if you dont scale the 3D print up). If you have large hands you may have a struggle. If you have a larger build-platform 3D printer, I strongly recommend you scale up the box and face – but you'll have to keep the other dimensions the same.
Cost
Around $100 USD
Build Time
2 days, not counting 3D print. 3D print done in two main pieces, 6.5 hours and 11.5 hours, along with 2x 1 hour prints.
Acknowledgement
This project would not have been possible without the contributions and support of the Open Source/Maker Community. I have noted “key contributors” in the Team section of this article. For the sake of brevity and clarity, I will present a short version of their work. I will leave links to the original source material. Please take a few moments to explore and support their great work.
Overview
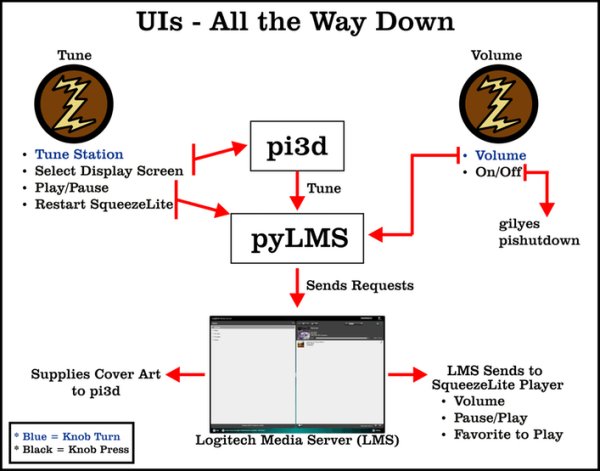
When you're finished with this project, you'll have a working internet streaming radio that's powered by the popular Logitech Media Server(LMS). The client for LMS, SqueezeLite, is installed on the same Raspberry Pi, making a complete stand-alone music system. You'll be able to tune in 5 (or many more, with some minor code tweaks) of your favorite Pandora channels, internet radio stations, or playlists, using the tuning knob. You can also use a supplied web page to control the music, or use IOS/Android Apps. The PI TFT display will simulate a radio dial that works with the tuning knob. The tuning knob will also let you select different screens: an art deco clock, or cover art for Now Playing. A tune button press will toggle pause/play, cycle through display screens and restart the SqueezLite player. The other knob will turn the device on and off, and control volume.
If you want to use Pandora, you must have a paid account.
How it Works
The pi3d graphical software draws the radio dial and needle, as well as an art deco clock and Now Playing art. When the tune knob turns the needle, its location (based on degrees of a circle) is looked up in a dictionary. The pylms software is a python wrapper for LMS commands. If a Favorite is in the dictionary at a pre-mapped location, pylms sends a play request to Logitech Media Server (LMS). LMS then sends a request to the SqueezeLite player to play the Favorite.
The tuning knob is also a push button. A short press toggles pause/play through pylms. A long press triggers a screen change to the clock or Now Playing art, or back to the radio dial. Pi3d displays the clock. The Now Playing art and track title is passed from LMS to pi3d to draw. Turning the volume knob up/down sends a request through pyLMS. The volume knob has a push button, too. It can trigger a safe shutdown/power-on/reset. See the Operations section below for more details.
About pi3d:
If you haven't seen this powerful software in action, check out the intro on YouTube. The miniz project uses only a trivial amount of its capabilities. Pi3d can draw detailed, immersive, moving 3D landscapes. And, because it uses the Raspberry Pi GPU, it even works on the PI zero.
Process
Test the hardware/software modules while building to make sure everything is working properly, Here's the workflow:
- Download/configure/test the required software
- Solder the components and test. Back to software. Repeat as needed.
- Print the 3D parts. Post-process to taste
- Test the completed hardware before final assembly into the case
- Assemble hardware in the 3D case
- Finally – great joy listening to radio station K-YOU (W-YOU East of the Mississippi)
Build
Step 1: Raspbian Stretch Lite
- Download Debian Stretch Lite
- Install to micro sd card. This is a good set of instructions.
- Two files need to be added to the /boot directory on the new sd image card.
On Windows, create an empty file called ssh and a file named wpa_supplicant.conf with the contents shown (second box) below
For Linux/Mac:
sudo touch ssh
sudo nano wpa_supplicant.conf
And for Windows/Linux/Mac, enter and save the following, changing ssid and psk to your router's ssid and password:
ctrl_interface=DIR=/var/run/wpa_supplicant GROUP=netdev
update_config=1
country=US
network={
ssid=“Your network SSID”
psk=“Your WPA/WPA2 security key”
key_mgmt=WPA-PSK
}
After getting Raspbian configured, run headless (no monitor/keyboard/mouse) – insert the SD card into your pi and power up. Allow a couple of minutes for the pi to fully start up. If you are running Windows, download the putty terminal emulator to connect to the pi with SSH. You should be able to find the IP address from your router's web page. And, to SSH in from a Mac/Linux terminal:
ssh “192.168.0.xxx” -l pi
Where “192.168.0.xxx” = your pi's IP address (without quotes). The default password is raspberry. Be sure to change it on first login. You should also configure other settings, as gerrelt recommends, via:
sudo raspi-config
- Network Options/Hostname (I named my host miniz)
- Localisation Options
- Advanced Options – Expand Filesystem and Memory Split
- For Memory Split, change the value to 128 (needed for pi3d, later)
After completing the config, reboot. When you sign back in, update packages and set up git:
sudo apt-get update
sudo apt-get upgrade # This step takes a long time!
sudo apt-get install git-core
git clone http://github.com/thisoldgeek/miniz
Cloning this github repository will create a new directory under /home/pi/miniz. This miniz directory contains all the assets needed for this project, including setup scripts and documents.
Step 2: Prepare Initial Hardware
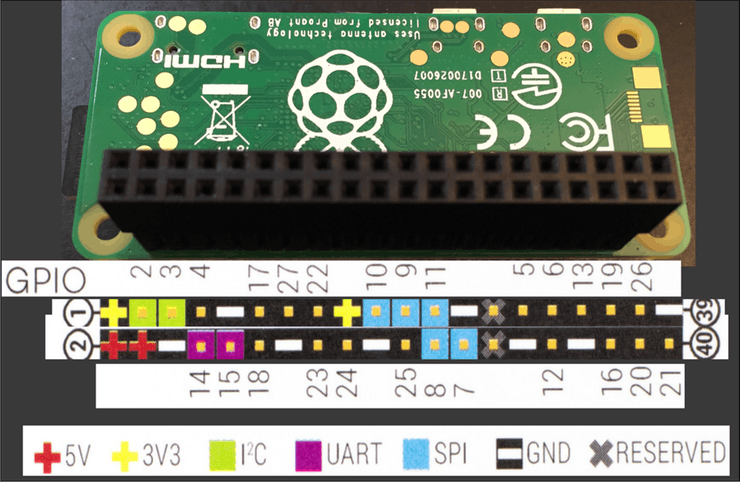
Solder the raspberry pi stacking header to the pi zero. This will connect the mono amp and speakers, via a breadboard, to the pi for sound installation testing. Be careful of orientation. The pi Zero header pins will be inserted into the back of the piTFT. So, all the pins on the pi are upside-down and backwards! This is confusing and can cause errors hooking things up.
This diagram should help. Turn the pi so the back of the pi is facing up, with the large silk-screen of the raspberry facing you:
Insert the stacking headers so the female headers are pointed up, facing you. Fasten the headers down with blue painter's tape or blue tack. Make sure they are fully inserted and 90 degrees to the board. Turn the pi over to solder.
I found soldering the stacking headers difficult. I had to re-do several bridged solder pins and some that had poor joints. My suggestion is to go slowly and carefully, first soldering the inside pins, then the outside. Work in a single direction, finishing one row of pins at a time.
Next, set up the mono amplifier, a quick soldering job. Adafruit has a complete write-up on the amp at learn.adafruit.com. Follow along in that tutorial and complete all the sections from Overview through Raspberry Pi Test, but Raspberry Pi Setup is essential. To complete the test, you must have your speaker soldered up with two lengths of wire at least 3 inches/80mm long. Heat shrink applied over the joints offers good strain relief. Remember that you have to run the setup script twice!
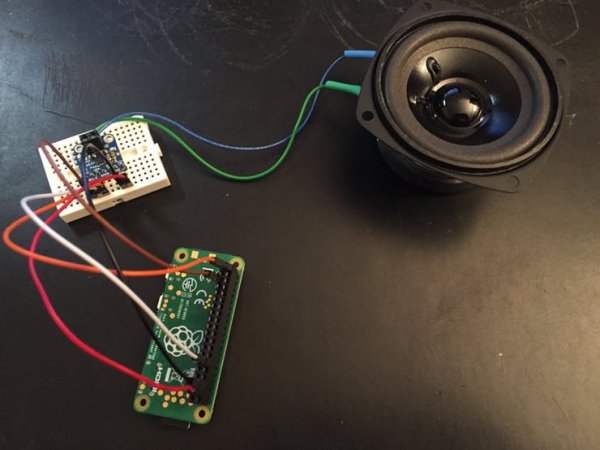
When the mono amp is attached to a breadboard, you may experience some crackling noises. That's because the jumpers may be loose in the breadboard. Try pushing/holding the breadboard wires and you may get cleaner sound. This will be fixed when you have proper solder connections to the bonnet. Also, note that the Adafruit tutorial says to “Solder in both pins with plenty of solder!” on the amp speaker connections.
I chose the GRS 3FR-4 speaker from parts-express because it had mounting holes and good sound frequency range. It mounts directly to the 3D case with screws and nuts, to keep the vintage look. Won't be confused with audiophile quality, but enjoyable to listen to.
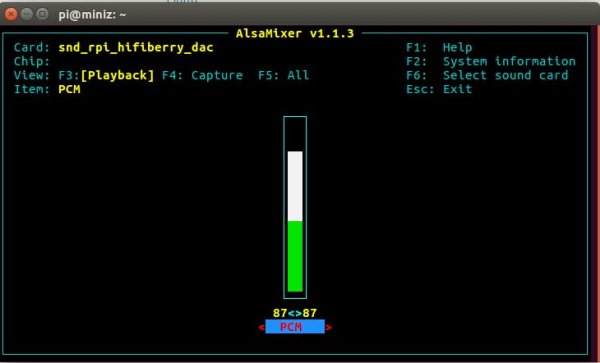
Check the alsa sound controller:
sudo alsamixer
It should look like this:
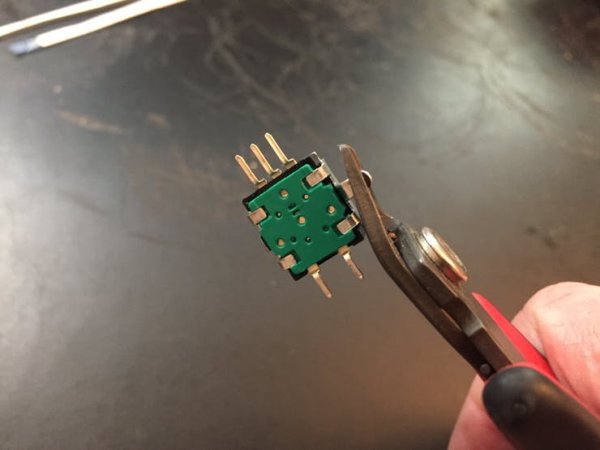
To get the rotary encoders to fit properly into the case, cut the side mounting tabs and carefully bend the solder pins parallel to the base:
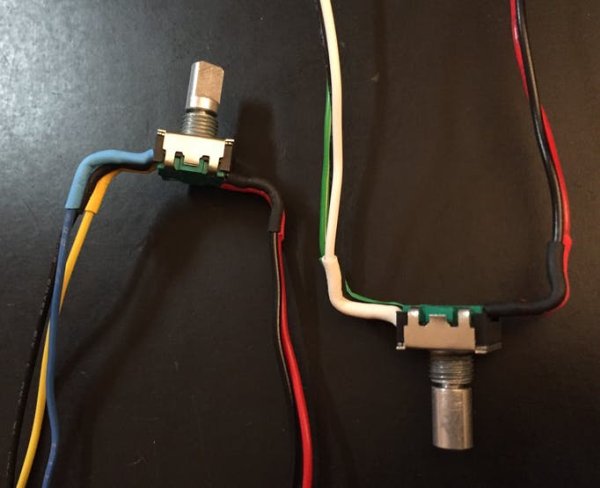
Wire up the rotary encoders, using 2 black wires (GND) and 3 different colored wires for the other pins on each encoder. The different colors will help you tell which encoder connects where, when the encoders are mounted out of sight below the piTFT. Cut the wires about 7 inches/18 cm long. Tin both the pins and the wires with a good amount of solder. For each wire, press the wire into the pin with your soldering iron until solder flows. Remove the iron and continue holding down the wire with your other hand until solder cools. Helping Hands are your friends.
I used heat shrink for strain relief. Gently bend the wires up at a 90 degree angle away from the encoder shaft to fit into the case. Keep your thumb on the pins to prevent the pins from breaking while you make the bend.
Be careful handling the encoder wires after bending! I broke a pin off from rough handling and had to re-do an encoder.
Your finished encoders should look something like this:
There's a test program included in the miniz directory, test_rotary_switches.py. Connect the encoders to the pi female headers according to the pinouts in that program (TUNE and VOLUME).
To test:
cd ~/miniz
python3 test_rotary_switches.py
Step 3: Setup Music Software
The original source for the following scripts is poster gerrelt. Gerrelt has written excellent posts on installing Logitech Media Server (LMS) and Squeezlite.
Gerrelt said Spotify was a possibility on this setup. Alas, Spotify support for LMS ceased on July 19, 2017.
Use the scripts in the /home/pi/miniz/scripts directory (created by the git clone) for LMS and SqueezeLite installs (run these one by one):
cd ~/miniz/scripts
chmod +x *.sh
./LMS_install.sh
./squeeze_install.sh
The miniz uses a different sound device from the gerrelts tutorial. The Adafruit install software will set up the mono amplifier as an audio source, specifically dtoverlay=hifiberry-dac in the /boot/config.txt.
The default hifiberry-dac works without the changes gerrelt needed. HOWEVER: You need to comment out a line in one of the gerrelts scripts to get squeezelite to run. Also, UNcomment the line for SB Server as shown below. Make these changes for the LMS/SqueezeLite to run properly:
sudo nano /usr/local/bin/squeezelite_settings.sh
##but make sure this line is COMMENTED out like so:
#SL_SOUNDCARD=”sysdefault:CARD=ALSA”
# Be sure to UNcomment this line and add your pi IP address, keep the quotes!
SB_SERVER_IP=“192.168.0.xxx”
#Then restart the service with:
sudo systemctl restart squeezelite
Before configuring Logitech Media Server, you need to create a directory to store your music. You will be asked which directory to use when you enter the web page. I simply created one called ‘music' at the root level, on the miniz:
cd /
sudo mkdir music
Copy some music to this directory to test out the interface in the next steps. Filezilla can copy files, with clients for Windows/Mac/Linux. for playlists:
cd /music
sudo mkdir playlists
To add music from a remote share, such as a NAS unit or a Windows Share:
cd /music
sudo mkdir /music/NAS
sudo chmod 777 /music/NAS
sudo mount -t cifs //192.168.0.xx/music /music/NAS -o user=username,pass=userpassword
where 192.168.0.xx is the address of the remote server/share if you would like this as a permanent share, remaining after reboot:
sudo nano /etc/fstab
# add the line below at end of fstab
//192.168.0.xx/music /media/windowsshare cifs guest,uid=1000,iocharset=utf8 0 0
Step 4: Configure Logitech Media Server
LMS serves an html page for configuration and control. Connect to it from your favorite browser. Use the IP address of your raspberry pi, followed by :9000, eg. – http://192.168.0.xxx:9000
On first run, LMS will prompt for a mysqueezebox.com email and password. Apps like Pandora, TuneInRadio (free streaming radio stations), SOMA and Podcasts require you to create an account on mysqueezebox.com. More on that later. For now, click “skip” at the bottom of the page.
On the next page, navigate to /music (directory created above) and press “Next”. Choose a folder for playlists – we created playlists. Click “Next” and then “Finish”.
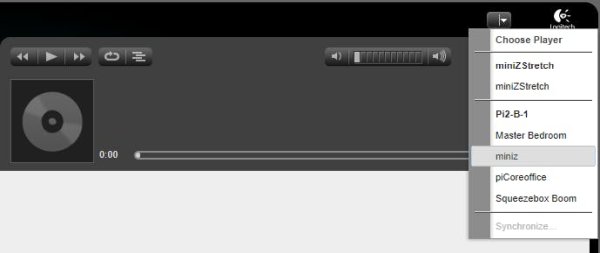
Choose a player from the pull-down in the upper right corner. It's the hostname of your new pi. This should show up automatically if it is your only Squeeze player.
On the left pane, navigate to My Music/Music folder, and hover your mouse over a song or album you want to play. Still in the left pane, but on the right side, three icons will appear. Click on the Play icon to start.
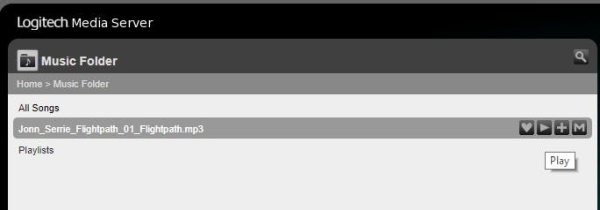
Hey, look at you! You're playing music.
Step 5: Apps
If you'd like to use Pandora or the other Apps I mentioned earlier, you need to sign into mysqueezebox.com and click on “Create an Account”. Save your account information – you need to enter it into LMS after your apps are set up. Once you create an account and login, click on “App Gallery” at the top of the page. Pick an app from the list and click the blue “Install App” button at the top right. After that, click Configure.
- For Pandora, enter the username and password you use for Pandora.
- Click on Player Settings. Your player name should appear in the list.
- Set Status to Enabled and set Home to “Display on home menu”.
- Don't forget to click on the blue “Save Changes” button at the bottom of the screen.
Logoff from mysqueezebox.com and go back to the LMS web page. At the lower right pane of LMS, click Settings. Click the mysqueezebox.com tab on the next page and fill in the username and password you used to create your mysqueezebox account. When done, click Apply, then Close in the lower right of the screen.
Almost done! Click on Settings again, then the tab for Plugins. Scroll down and make sure there is a check mark next to the Pandora app (or whatever app you set up). Click Apply. As an added check, in the “Author” column for Pandora to the right, there should be a link to Logitech. If you click on that, and you are properly set up, the link will open mysqueezebox.com again in the configuration dialog for Pandora. You can close that and click on Close for the plugin page.
Go back to the LMS Home Page; click on My Apps. You should see Pandora, or other newly-added apps under My Apps. If you don't see it, try refreshing the web page. If that doesn't work, try restarting the logitech media service:
sudo systemctl restart logitechmediaserver
Setting up Favorites
The radio dial will automatically start playing Favorites if they are linked in a favs dictionary in the miniz.py program.
# format below is degrees:fav_number
# see separate guide to LMS for setting up favorites in https://github.com/thisoldgeek/miniz
favs = {82:0,57:1,30:2,8:3,352:4,333:5}
Favorites can also be played from the LMS web page.
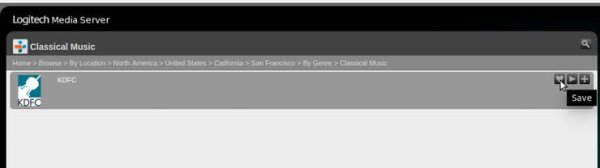
Here's an example for TuneIn Radio Favorites. The TuneIn App in LMS will guide you to selecting a radio station by several criteria. This example uses:
Home > Browse > By Location > North America > United States > California > San Francisco > By Genre > Classical Music
To create the Favorite, hover your mouse over the heart icon at the right side of the left pane, and click it to save as a Favorite.
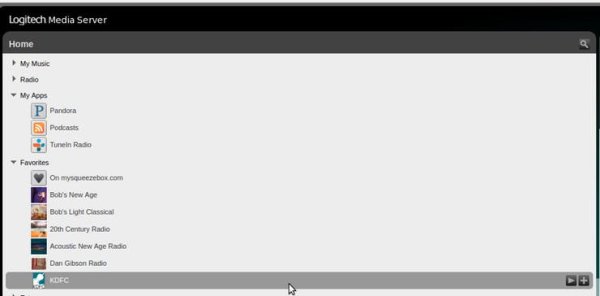
Go back to the LMS Home page (you can just click on “Home” seen in the image above). You should see the new item added at the end of your list of Favorites.
Note: A Favorite for “on mysqueezebox.com” is always added in this list. The list is zero-indexed based. So, the new Favorite created here is number 6.
Step 6: piTFT
Setup the 3.5 inch piTFT for OpenGL using the Adafruit tutorial. Although this is written for Raspbian Jessie, it works for Stretch.
cd
curl -O https://raw.githubusercontent.com/adafruit/Raspberry-Pi-Installer-Scripts/master/pitft-fbcp.sh
sudo bash pitft-fbcp.sh
When the pitft-fbcp.sh starts, choose “4. Configure options manually”, and input the following values at the prompts:

Do the piTFT 3.5inch setup using the manual config operation, with HDMI Rotation option 4 and TFT rotation 2, 90 degrees. This will orient the pi zero, when attached to the piTFT, so its power connector is at the lower right.
Read More Detail:MiniZ: Tiny Streaming Radio Based on Classic Zenith “Cube”