
This project shows how I automatically capture and classify images of birds visiting my bird feeder.
Project Introduction
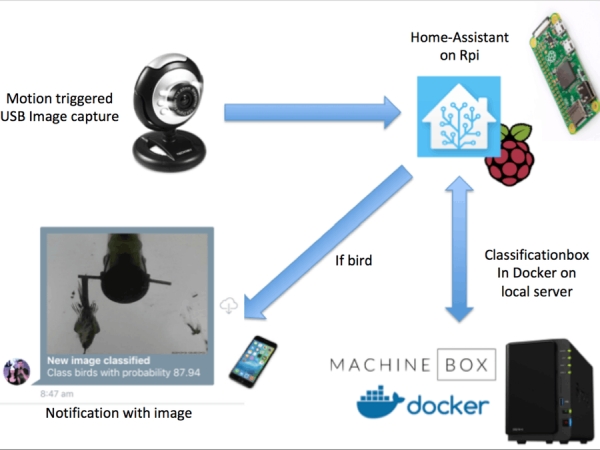
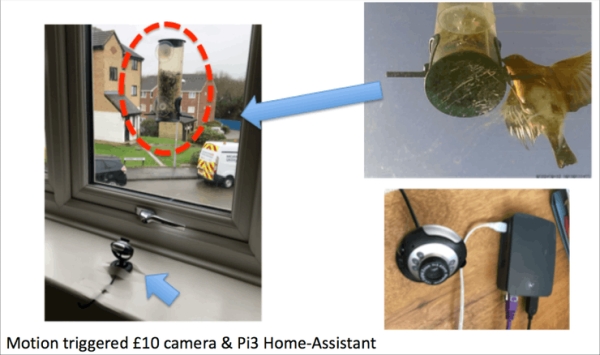
Being interested in bird watching, I attached a bird feeder to a window of my flat and within a few days various species of bird started visiting the feeder. I decided it would be fun to rig up a motion triggered camera to capture images of the birds, and I used Home-Assistant and a £10 USB webcam to capture images via motion trigger, and set up Home-Assistant to send an image notification to my phone when an image was captured. This setup is shown below:
However I quickly discovered that all kinds of motion could trigger an image capture. The result was hundreds of images of all kinds of motion, such as planes flying in the distance or even funky light effects. Approximately less than half the images actually contained a bird, so I decided it was necessary to filter out the non-bird images. I have been interested in image classification for a while, and whilst searching online I came across this article on Classificationbox, which looked ideal for this project. This write-up will first present the image classification work using Classificationbox, then describe the practical implementation within an automated system. Tools used:
- Motion: software for capturing motion triggered images
- Classificationbox: deep learning classifier for classifying bird/not-bird images
- Home-Assistant: software for automated image capture and performing classification, recording data and sending notifications
Introduction to Classificationbox
Classificationbox provides a ready-to-train deep-learning classifier, deployed in a Docker container and exposed via a REST API. It uses online learning to train a classifier that can be used to automatically classify various types of data, such as text, images, structured and unstructured data. The publishers of Classificationbox are a company called Machinebox, based in London, UK. Their docs advise that the accuracy of a Classificationbox classifier improves with the number and quality of images supplied, where accuracy is the percentage of images correctly classified. If you have less than 30 images of each class (bird/not-bird in this case, so 60 images total), you may achieve better accuracy using their alternative product called Tagbox, which uses one-shot learning. I initially experimented with Tagbox but found that in many cases it could not identify a bird in the images since the illumination in the images is poor and often the bird appears as a colourless silhouette. After a few weeks of image captures I had over 1000 images of bird/not-bird so could proceed to use Classificationbox. I have uploaded the image dataset to Quilt.
Assuming you have Docker installed, first download Classificationbox from Dockerhub by entering in the terminal:
sudo docker pull machinebox/classificationbox
Then run the Classificationbox container and expose it on port 8080 with:
MB_KEY="INSERT-YOUR-KEY-HERE"
sudo docker run -p 8080:8080 -e "MB_KEY=$MB_KEY" machinebox/classificationbox
There are a number of ways you can interact with Classificationbox from the terminal, for example using cURL, HTTP or python libraries such as requests. To check that Classificationbox is running correctly using cURL, and assuming you are on the same machine that Classificationbox is running on (localhost), at the terminal enter:
curl http://localhost:8080/healthz
You should see a response similar to:
{
	"success": true,
	"hostname": "d6e51ge096c9",
	"metadata": {
		"boxname": "classificationbox",
		"build": "3ba550e"
	}
The if you don't get "success": true investigate the issue, otherwise you can proceed to training.
Training Classificationbox
This article explains the training of Classificationbox, and links to a GO script which can be used to perform training. However if you have difficulty getting GO installed on your system (it took me a few tries!) I've also published a training script in python called teach_classificationbox.py and included the code in this article. However one advantage of the GO script is that it will both create a model for you and print out the accuracy of your trained model, which are features I will add to the python script in time. Whichever script you use, the first step is to decide on the classes you want to identify, and create a model. If you aren't using the GO script, you can create a model using CURL:
curl -XPOST --header "Content-Type: application/json" --header "Accept: application/json"  http://localhost:8080/classificationbox/models --data '{
   "id": "model1",
   "name": "myModel",
   "options": {
       "ngrams": 1,
       "skipgrams": 1
   },
   "classes": [
       "class1",
       "class2",
   ]
}'
For this project I wanted two classes, bird/not-bird images, with examples shown below. So in the above CURL the classes are bird/not-bird.
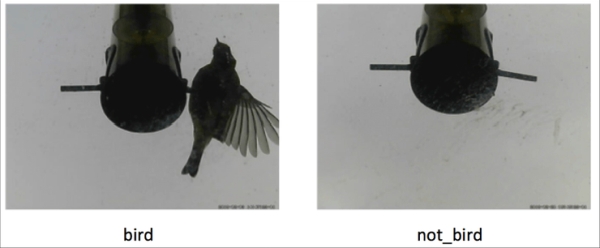
I had a total of over 1000 images that I manually sorted in two folders of bird/not-bird images, with each folder containing 500 images (this number may well be excessive, and in future work on this project I will experiment on reducing this number). Make sure that the images you use for training are representative of all the situations Classificationbox will encounter in use. For example, if you are capturing images at day and night, you want your teaching image set to also include images at day and night. With the images sorted into the two folders, I ran the GO script mentioned earlier and calculated that the model achieved 92% accuracy, pretty respectable! For 1000 images, teaching took about 30 minutes on my Macbook Pro with 8 GB RAM, but this will vary depending on you image set and hardware.
Classificationbox is capable of hosting multiple models, and you will want to know the model ID of the model you just created. You can use cURL to check the ID:
curl http://localhost:8080/classificationbox/models
This should return something like:
{
	"success": true,
	"models": [
		{
			"id": "5b0ce5d8023d4e35",
			"name": "5b0ce5d8023d4e35"
		}
	]
Now that the model is created we can use another cURL command to perform a classification on an test image `bird.jpg`. I enter:
export FOO=`base64 -in /absolute/path/to/bird.jpg`
curl -X POST -H "Content-Type: application/json" -d  '{ "inputs": [ {"type": "image_base64", "key": "image", "value": "'$FOO'" } ] }' http://localhost:8080/classificationbox/models/5b0ce5d8023d4e35/predict
I then see:
{
	"success": true,
	"classes": [
		{
			"id": "birds",
			"score": 0.915892
		},
		{
			"id": "not_birds",
			"score": 0.084108
		}
	]
Now that we have confirmed the model is performing correctly, we can download the model as a binary file. This is important if you are on the free tier of Machinebox as the model will be erased every time you restart the Docker container. Once we have the model file we can upload it after restarting the Docker container, or transfer it another machine. In my case I performed teaching on my Macbook but actually want to use the model in production on a Synology NAS. To download the model file I used:
curl http://localhost:8080/classificationbox/state/5b0ce5d8023d4e35 --output 5b0ce5d8023d4e35.classificationbox
You will want to replace my model ID (5b0ce5d8023d4e35) with your own. Note that just heading to the URL above in your browser will also download the file. The downloaded file is 60 kb, so small enough to be shared on Github and elsewhere online. This is useful if you want others to be able to reproduce your work.
To post the model file to Classificationbox use the cURL:
curl -X POST -F 'file=@/path/to/file/5b0ce5d8023d4e35.classificationbox' http://localhost:8080/classificationbox/stateYou should see a response like:
{'success': True,
'id': '5b0ce5d8023d4e35',
'name': '5b0ce5d8023d4e35',
'options': {},
'predict_only': False}
Using Classificationbox with Home-Assistant
Home-Assistant is an open source, python 3 home automation hub, and if you are reading this article then I assume you are familiar with it. If not I refer you to the documents online. Note that there are a couple of different ways to run Home-Assistant. In this project I am using the Hassio approach which you should read about here, running on a Raspberry Pi 3, and a home-Assistant version newer than 0.70. However it doesn't matter how you have Home-Assistant running, this project should work with all common approaches.
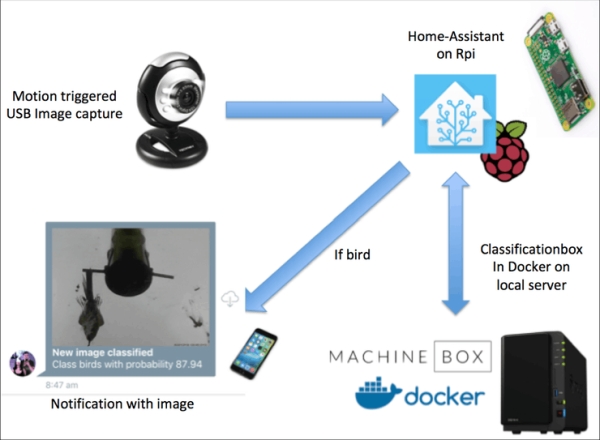
I have written code to use Classificationbox with Home-Assistant, and in this project we use this code with Home-Assistant to post images from my motion triggered USB camera to Classificationbox. If a bird image is classified, we are sent a mobile phone notification with the image. A diagram of the system is shown below:
Hardware
- Webcam: I picked up a cheap webcam on Amazon. However you can use any camera that is compatible with Home-Assistant.
- Raspberry Pi 3: I have the camera connected via USB to a raspberry pi 3 running Home-Assistant.
- Synology NAS: The Raspberry Pi 3 doesn't have sufficient RAM to run Classificationbox (2 GB min required) so instead I am running it on my Synology DS216+II that I have upgraded to have 8 GB RAM. Alternatively you could use a spare laptop, or host Classificationbox on a cloud service such as Google Cloud.
- Bird feeder: My mum bought this, but there are similar online, just search for
window mounted birdfeeder.
Motion triggered image capture via Motion addon
I connected the USB webcam to the Raspberry Pi running Home-Assistant and pointed the webcam at the birdfeeder. There are a number of options for viewing the camera feed in Home-Assistant, but since I am using Hassio and want motion detection, I decided to try out an approach which uses the Motion software deployed as a Hassio addon. Hassio addons are straightforward way to extend the functionality of Home-Assistant, and are installed via a page on the Home-Assistant interface, shown below:
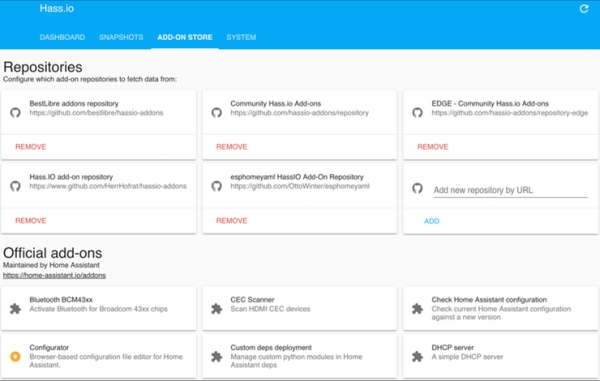
The addon I am using is called Motion, available at https://github.com/lovejoy777/hassio-addons. You will need to add his repository as a location accessible to Hassio (search for the box that states Add new repository by URL). The addon will both continually capture still images, and capture timestamped images when motion is detected. I experimented with the addon settings but settled on the configuration below. The addon is configured by the Hassio tab for the addon:
{
 "config": "",
 "videodevice": "/dev/video0",
 "input": 0,
 "width": 640,
 "height": 480,
 "framerate": 2,
 "text_right": "%Y-%m-%d %T-%q",
 "target_dir": "/share/motion",
 "snapshot_interval": 1,
 "snapshot_name": "latest",
 "picture_output": "best",
 "picture_name": "%v-%Y_%m_%d_%H_%M_%S-motion-capture",
 "webcontrol_local": "on",
 "webcontrol_html": "on"
}
The addon captures an image every second, saved as latest.jpg, and this image is continually over-written. On motion detection a timestamped image is captured with format %v-%Y_%m_%d_%H_%M_%S-motion-capture.jpg. All images are saved to the /share/motion folder on the Raspberry Pi. The above configuration should work regardless of the USB camera you are using, but if you have several USB cameras attached to your Pi you may need to use the terminal to check the camera interface (here /dev/video0). If you want to download the saved images install the SSH addon, configure it to use a password, then install FileZilla and connect via SFTP. You can then browse and download images via the FileZilla UI, shown below:
Source: Motion Activated Image Capture and Classification of Birds