
Using MQTT, NodeMCU, DHT22, RaspberryPi and IoT MQTT Panel to monitor temperature and humidity.
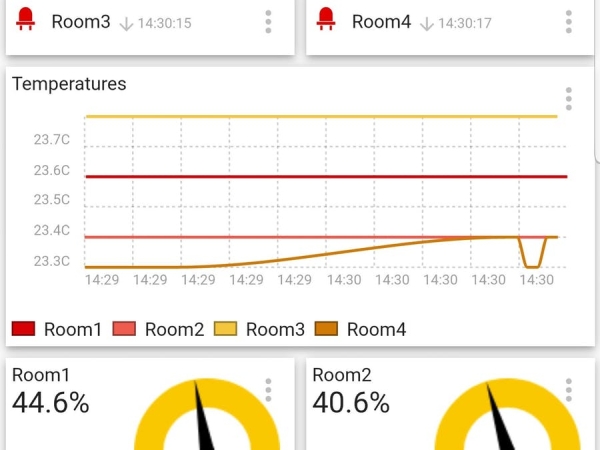
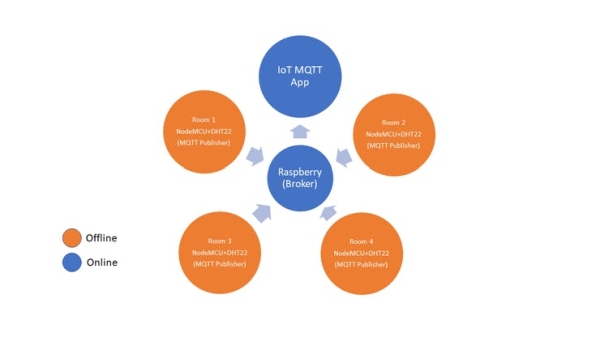
Using a Raspberry Pi 3 B+ as a broker for several NodeMCU with DHT-22 sensors measuring temperature and humidity and monitor on IoT MQTT Panel App. I made the algorithm for NodeMCU and Raspberry escalable. Just change the topics published and subscribed and add on IoT MQTT Panel App to have all the data at your hand anytime.
I have searched the internet for a lot of information as I have no knowledge of raspberry, python and MQTT. So, I have summarized everything I've learned and have given credit to those websites.
If your internet connection is lost your sensors will keep sending data to your broker. Meaning you can save your data!!! (of course you need to do some programming)
Please follow me for any updates. Soon I will post a video of everything running! 🙂
1. Connecting things:
How your network it will look like:
2. Programming things:
First you have to be sure you have all libraries installed on your Arduino IDE and on your Raspberry Pi 3B+.
2.1 Arduino
Install the libraries on your Arduino IDE.
- MQTT – https://github.com/knolleary/pubsubclient/releases/tag/v2.7
- DHT Sensor Library: https://github.com/adafruit/DHT-sensor-library
- Adafruit Unified Sensor Lib: https://github.com/adafruit/Adafruit_Sensor
- Esp8266 – https://github.com/esp8266/Arduino/tree/master/libraries/ESP8266WiFi
2.2 Raspberry Pi 3 b+
Install the libraries on your Python IDE.
- time – Native library on Python
- Paho MQTT – type “pip install paho-mqtt” on your LX terminal to install the MQTT library. If any doubts this website is AWESOME!! http://www.steves-internet-guide.com/mqtt/
2.3 Uploading codes
Upload the codes respectively to your NodeMCU and Raspberry.
2.4 Explaining the code – ARDUINO IDE
Those are the libraries mentioned before to be installed on your Arduino IDE.
#include <ESP8266WiFi.h> // Esp8266/NodeMCU Library#include <PubSubClient.h> // MQTT Library#include "DHT.h" // DHT SensorVariables declared to be used through out the code:
const char* mqtt_server = "Broker_IP_Address"; // MQTT Server IP Addressmqtt_server: to get the IP address on Raspberry pi open a terminal screen and type in:
pi@raspberrypi:~ $ ifconfigwlan0: flags=4163<UP,BROADCAST,RUNNING,MULTICAST> mtu 1500 inet 192.168.1.200 netmask 255.255.255.0 broadcast 192.168.1.255On this example the IP address would be 192.168.1.200
const char* clientID = "room1"; // The client id identifies the NodeMCU device.clientID: Any name or number to identify the NodeMCU you are using. In this case it will be located at room1. So it is named room1.
const char* topicT = "/room1/temperature"; // Topic temperatureconst char* topicH = "/room1/humidity"; // Topic humiditytopicT: Topic to publish temperature. In this example for room1 temperature the topic will be “/room1/temperature”.
topicH: Topic to publish humidity. In this example for room1 humiditythe topic will be “/room1/humidity”.
const char* willTopic = "/room1/status"; // Topic Statusconst char* willMessage = "0"; // 0 - DisconnecetdwillTopic: Topic to publish the will testament. This will be used to check if the NodeMCU is connected/on. If it disconnects it will publish the willMessage to the willTopic. In this case “/room1/status”
willMessage: Message to be published on willTopic if the NodeMCU is disconnected/turned off.
int willQoS = 0;boolean willRetain = true;willQoS: Used to set the quality of service. In this case 0.
willRetain: Used to retain will message in case of disconnection. Set to True.
int counter = 0; // Used to reconnect to MQTT serverconst char* swversion = "1.0"; // Software versioncounter: counter used on reconnect routine.
swversion: used to control my software revision.
WiFiClient wifiClient;PubSubClient client(mqtt_server, 1883, wifiClient); // 1883 is the listener port for the BrokerwifiClient: Creates a client that can connect to to a specified internet IP address and port as defined in client.connect().
client(): Client is the base class for all WiFi client based calls. It is not called directly, but invoked whenever you use a function that relies on it.
DHT dhtA(2, DHT22); // DHT instance named dhtA, Pin on NodeMCU D4 and sensor typeDHT: Creates an instance named dhtA and assign pin 2 of the NodeMCU V3 (D4) of sensor DHT-22. As per schematics below. If you want to use another pin change the value to the correct pin. Before changing the pin used check the pinout below to assign the correct pin.
- Using pin D2 -> GPIO4
- DHT dhtA(4, DHT22)
If you are using DHT-11 it would be:
- Using pin D2 -> GPIO4
- DHT dhtA(4, DHT11)
NOTE: If you are using the same library as I am. If you use a different library please check the library documentation to check how you should declare pin and sensors used.
void setup() : Here we initialize things.
void setup() {Serial.begin(9600); // Debug purposes check if DHT and connection with MQTT Broker are workingSerial.print(swversion);// Debug. Software versiondhtA.begin(); // Starting the DHT-22Connecting to MQTT broker.
delay(2000); // Delay to allow first connection with MQTT Brokerdelay(2000): increase time if first connection fails. In this case 2000 allows the NodeMCU to connect to the Broker.
if (client.connect(clientID,"","", willTopic, willQoS, willRetain, willMessage, true)) { // Connecting to MQTT Brokerclient.connect(): explained below. Taken from: https://pubsubclient.knolleary.net/api.html#connect5
____________________________________________________________
boolean connect (clientID, username, password, willTopic, willQoS, willRetain, willMessage, cleanSession)
Connects the client with a Will message, username, password and clean-session flag specified.
Note : even if the cleanSession is set to false/0 the client will not retry failed qos 1 publishes. This flag is only of use to maintain subscriptions on the broker.
Parameters
- clientID : the client ID to use when connecting to the server.
- username : the username to use. If NULL, no username or password is used (const char[])
- password : the password to use. If NULL, no password is used (const char[])
- willTopic : the topic to be used by the will message (const char[])
- willQoS : the quality of service to be used by the will message (int : 0,1 or 2)
- willRetain : whether the will should be published with the retain flag (int : 0 or 1)
- willMessage : the payload of the will message (const char[])
- cleanSession : whether to connect clean-session or not (boolean)
Returns
- false – connection failed.
- true – connection succeeded.
Source: MQTT Communication Between NodeMCU and Raspberry Pi 3 B+