
| Hardware components: | ||||||
|
× | 1 | ||||
 |
|
× | 1 | |||
|
× | 1 | ||||
|
× | 1 | ||||
|
× | 1 | ||||
|
× | 1 | ||||
|
× | 1 | ||||
 |
|
× | 2 | |||
 |
|
× | 2 | |||
| Software apps and online services: | ||||||
|
||||||
 |
|
|||||
| Hand tools and fabrication machines: | ||||||
 |
|
|||||

STORY
Long time ago (2006), in a kingdom far away (France), lived a rabbit. It wasn't a normal rabbit, it had very special powers. It could wiggle it's ears, had RGB LED lights in his belly, and it could talk! Reading up the weather forecast, new emails, or just chit-chat, it was the most famous rabbit of all. So it was given a special name: Nabaztag (Armenian for “hare”).
But as with many fairy tales, the story took a twist and the rabbit died.
Nabaztag was very the first IoT device available on the market that humans could buy. But ahead of his time, the inventor went bankrupt and had to shut down their servers. The rabbit wasn't open source and heavily relied on the servers from it's inventor.
Since then, the rabbit was sitting in a corner of my room, it didn't talk, it didn't wiggle it's ears, it didn't bring any joy. Playing with Raspberry Pi's, I always had the idea to bring it alive one day, but it was on the long list of projects.
But today, receiving my Google AIY Voice HAT, I'm going to change that!
And the rabbit happily lived ever after!
Hacking time: open the rabbit and take it apart!
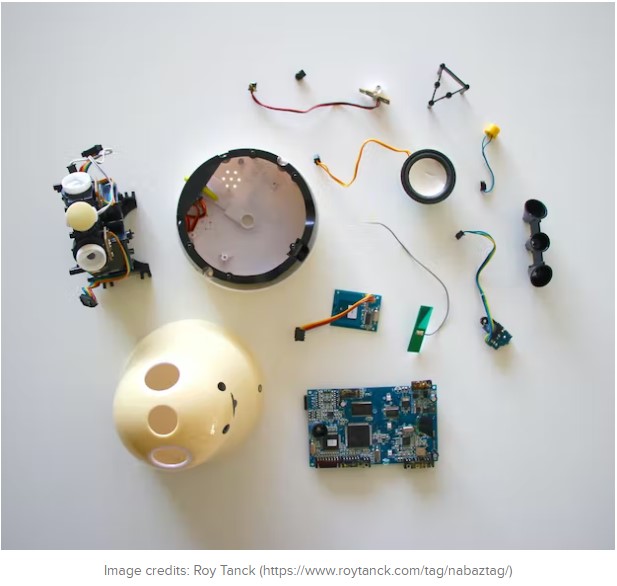
This is what every hacker likes, taking stuff apart. So starts this project too, to see if there is room enough to fit a Raspberry Pi and the Google AIY Voice HAT inside it. Goal is to leave the motors for the ears in tact, and see what else can survive. It turns out that the main PCB has all components soldered right to it, including the LEDs. Only separate PCB is the RFID reader and a small WiFi-antenna. So unplug all wires (don't cut them!) and disassemble the rabbit.
Save all parts, we will use some of them, others might come in handy later on for other projects maybe?
Wiring it up for the basics
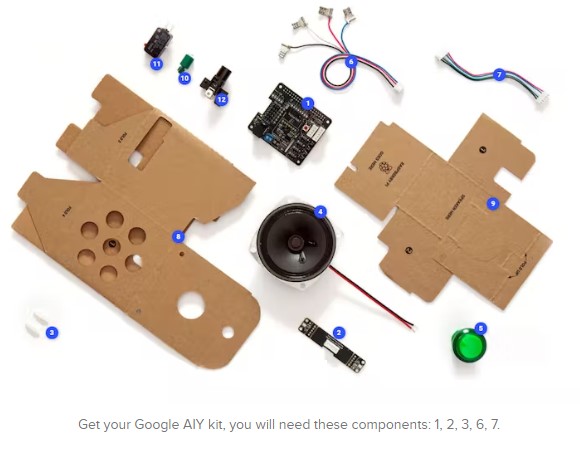
Your rabbit is stripped, time to connect the components! Get your Google AIY kit, you will need these components: 1, 2, 3, 6, 7. Don't throw away the other parts, they might come in handy later on.
The Voice HAT seems to come in different versions: with and without soldered headers. Mine had headers at the Servo 0/1/2/3/4/5 and Driver 0/1/2/3 sections, others seem to have no headers at all. So probably you will need to solder your headers on. In my first build I did this quick and dirty by using straight headers, but using the default wire connectors, the rabbit shell cannot be closed. So I've ordered angled headers and will add pictures of this once I've received and soldered them on.
Take your Raspberry Pi, click the spacers (nr 3) on the 2 corners opposite the GPIO header, and click the Voice HAT (nr 1) on top of it.
Take the microphone board (nr 2), the 5-wire cable (nr 7) and connect these together and to the Voice HAT. There is only 1 way of connecting.
Take the speaker cable from the rabbit (yellow/orange), remove the connector (this time you can cut it) and insert the stripped wires in the screw-terminal. Yellow is + and Orange is -.
Take the 4-wire cable (nr 6) and eject the wires from the connector (pinch them with a small screw driver). Take the button cable from the rabbit (gray/white) and remove the connector from this too. Now insert the 2 clips into the connector from the kit, where the button-wires are the 2 at the bottom, replacing the black and white wires (order doesn't matter).
Booting your Raspberry Pi with a prepared Google Voice Kit SD-card
Download the Voice Kit SD image from the Google website, and write it to an SD-card. I've used Etcher for that.
To setup your wireless network and SSH, we will take a small step at start before inserting the SD-card. Open the SD-card in Windows/Mac/whatever, and add an empty file with the name “ssh”, and a file with the name “wpa_supplicant.conf” having these contents (replace by your network credentials):
network={
ssid="yourssid"
psk="password"
}
Now it's time to insert the SD-card into your Raspberry Pi and boot it up for the first time.
If you have an HDMI-screen, you can proceed with the next steps from a Terminal window. Without a screen, use a tool like PuTTY to connect through SSH to your Raspberry Pi.
*** Note to self (and others): don't apt-get upgrade, it will break audio/microphone support ***
Enabling VNC Server
As we will use the Raspberry Pi / Voice HAT without a screen (doesn't fit inside the rabbit), we use VNC to teleport it to another computer. Follow these steps from the Raspberry Foundation to get it installed:
At the SSH terminal or on-screen terminal enter these commands to install VNC Server:
sudo apt-get update
sudo apt-get install realvnc-vnc-server realvnc-vnc-viewer
Next step is to enable VNC Server. You can do this on-screen or at the command line:
With a screen, select Menu > Preferences > Raspberry Pi Configuration > Interfaces. Ensure VNC is Enabled.
Or you can enable VNC Server through the (SSH)-terminal:
sudo raspi-config
Enable VNC Server by doing the following: Navigate to 5 Interfacing Options. Scroll down and select P3 VNC > Yes.
To use the VNC Server, download the VNC Viewer and open it on your Windows/Mac/whatever computer. Just enter the Raspberry Pi IP-address, you will now be connected to your very own Raspberry Pi.
To change the display resolution, click the Raspberry icon top-left, Preferences > Raspberry Pi Configuration. Click the Set Resolution button and make the change to what your screen fits. Reboot to apply the change.
Configuration of the Google Voice tools
See The MagPi #57 or Google documentation for now, but I will add some detailed write-up later on.
When you have completed these steps, you can test your setup and connections. On the desktop, click the “Check Audio” and “Check Cloud” links to see if this is configured correctly.
One last step is a missing library, run this in the Terminal:
sudo pip install PySocks
You will now be ready to use all the basics of the Voice Recognition. Play something around by asking silly questions (hint: ask for singing a song, beat-boxing, sounds that animals make).
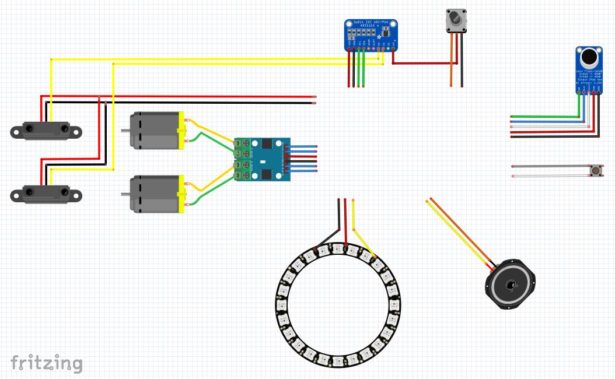
SCHEMATICS
# Copyright 2017 Google Inc.
#
# Licensed under the Apache License, Version 2.0 (the "License");
# you may not use this file except in compliance with the License.
# You may obtain a copy of the License at
#
#     http://www.apache.org/licenses/LICENSE-2.0
#
# Unless required by applicable law or agreed to in writing, software
# distributed under the License is distributed on an "AS IS" BASIS,
# WITHOUT WARRANTIES OR CONDITIONS OF ANY KIND, either express or implied.
# See the License for the specific language governing permissions and
# limitations under the License.

'''Signal states on a LED'''

import itertools
import logging
import os
import threading
import time

import RPi.GPIO as GPIO

from neopixel import *
import math
# LED strip configuration:
LED_COUNT      = 32      # Number of LED pixels.
LED_PIN        = 12      # GPIO pin connected to the pixels (must support PWM!).
LED_FREQ_HZ    = 800000  # LED signal frequency in hertz (usually 800khz)
LED_DMA        = 5       # DMA channel to use for generating signal (try 5)
LED_BRIGHTNESS = 255     # Set to 0 for darkest and 255 for brightest
LED_INVERT     = False   # True to invert the signal (when using NPN transistor level shift)
LED_CHANNEL    = 0
LED_STRIP      = ws.SK6812_STRIP_GRBW


logger = logging.getLogger('led')

CONFIG_DIR = os.getenv('XDG_CONFIG_HOME') or os.path.expanduser('~/.config')
CONFIG_FILES = [
    '/etc/status-led.ini',
    os.path.join(CONFIG_DIR, 'status-led.ini')
]


class LED:

    """Starts a background thread to show patterns with the LED."""

    def __init__(self, channel):
        self.animator = threading.Thread(target=self._animate)
        self.channel = channel
        self.iterator = None
        self.running = False
        self.state = None
        self.sleep = 0

        GPIO.setup(channel, GPIO.OUT)
        self.pwm = GPIO.PWM(channel, 100)

        self.iterator_Color = None
        # Create NeoPixel object with appropriate configuration.
        self.strip = Adafruit_NeoPixel(LED_COUNT, LED_PIN, LED_FREQ_HZ, LED_DMA, LED_INVERT, LED_BRIGHTNESS, LED_CHANNEL, LED_STRIP)
        # Intialize the library (must be called once before other functions).
        self.strip.begin()


    def start(self):
        self.pwm.start(0)  # off by default
        self.running = True

        # Led Ring = CLEAR
        for i in range(self.strip.numPixels()):
            self.strip.setPixelColor(i, Color(0, 0, 0, 0))
            self.strip.show()

        self.animator.start()

    def stop(self):
        self.running = False
        self.animator.join()
        self.pwm.stop()
        GPIO.output(self.channel, GPIO.LOW)

    def set_state(self, state):
        self.state = state

    def _animate(self):
        # TODO(ensonic): refactor or add justification
        # pylint: disable=too-many-branches
        while self.running:
            if self.state:

                if self.state == 'listening':
                    self.iterator = None
                    self.pwm.ChangeDutyCycle(100)
                    self.sleep = 0.05

                    # Led Ring = ORANGE scrolling
                    ledcolors = []
                    for i in range(self.strip.numPixels()):
                        ledcolors.append(Color(255, 50, 0, 0))
                        for j in range(self.strip.numPixels()-2):
                            ledcolors.append(Color(100, 20, 0, 0))
                    self.iterator_Color = itertools.cycle(ledcolors)

                elif self.state == 'power-off':
                    self.iterator = None
                    self.sleep = 0.0
                    self.pwm.ChangeDutyCycle(0)

                    # Led Ring = CLEAR
                    self.iterator_Color = None
                    for i in range(self.strip.numPixels()):
                        self.strip.setPixelColor(i, Color(0, 0, 0, 0))
                        self.strip.show()

                elif self.state == 'starting':
                    self.iterator = itertools.cycle(
                        itertools.chain(range(0, 100, 10), range(100, 0, -10)))
                    self.sleep = 0.2

                    # Led Ring = WHITE scrolling
                    """Movie theater light style chaser animation."""
                    ledcolors = []
                    for i in range(self.strip.numPixels()):
                        ledcolors.append(Color(0, 0, 0, 100))
                        for j in range(self.strip.numPixels()-2):
                            ledcolors.append(Color(0, 0, 0, 20))
                    self.iterator_Color = itertools.cycle(ledcolors)


                elif self.state == 'thinking':
                    self.iterator = itertools.cycle(
                        itertools.chain(range(0, 100, 5), range(100, 0, -5)))
                    self.sleep = 0.05
                    # Led Ring = GREEN
                    self.iterator_Color = None
                    for i in range(self.strip.numPixels()):
                        self.strip.setPixelColor(i, Color(0, 255, 0, 0))
                        self.strip.show()

                elif self.state == 'stopping':
                    self.iterator = itertools.cycle(
                        itertools.chain(range(0, 100, 5), range(100, 0, -5)))
                    self.sleep = 0.05

                    # Led Ring = WHITE
                    self.iterator_Color = None
                    for i in range(self.strip.numPixels()):
                        self.strip.setPixelColor(i, Color(0, 0, 0, 0))
                        self.strip.show()

                elif self.state == 'ready':
                    self.iterator = itertools.cycle(
                        itertools.chain([0] * 300, range(0, 30, 1), range(30, 0, -1))) # 3 times slower
                    self.sleep = 0.01 # 5 times faster (was 0.05)

                    """Rainbow movie theater light style chaser animation."""
                    ledcolors = []
                    for j in range(256):
                        for i in range(self.strip.numPixels()):
                            ledcolors.append(wheel(math.floor(((i * 255 / self.strip.numPixels()) + j)) & 255))
                    self.iterator_Color = itertools.cycle(ledcolors)


                elif self.state == 'error':
                    self.iterator = itertools.cycle([0, 100] * 3 + [0, 0])
                    self.sleep = 0.25

                    """Movie theater light style chaser animation."""
                    ledcolors = []
                    for i in range(self.strip.numPixels()):
                        ledcolors.append(Color(255, 0, 0, 0))
                        for j in range(self.strip.numPixels()-2):
                            ledcolors.append(Color(100, 0, 0, 0))
                    self.iterator_Color = itertools.cycle(ledcolors)

                else:
                    logger.warning("unsupported state: %s", self.state)

                self.state = None
            if self.iterator or self.iterator_Color:
                if self.iterator:
                    self.pwm.ChangeDutyCycle(next(self.iterator))

                if self.iterator_Color:
                    for i in range(self.strip.numPixels()):
                        self.strip.setPixelColor(i, next(self.iterator_Color))
                    self.strip.show()

                time.sleep(self.sleep)
            else:
                time.sleep(1)

def wheel(pos):
    """Generate rainbow colors across 0-255 positions."""
    if pos < 85:
        return Color(pos * 3, 255 - pos * 3, 0)
    elif pos < 170:
        pos -= 85
        return Color(255 - pos * 3, 0, pos * 3)
    else:
        pos -= 170
        return Color(0, pos * 3, 255 - pos * 3)


def main():
    logging.basicConfig(
        level=logging.INFO,
        format="[%(asctime)s] %(levelname)s:%(name)s:%(message)s"
    )

    import configargparse
    parser = configargparse.ArgParser(
        default_config_files=CONFIG_FILES,
        description="Status LED daemon")
    parser.add_argument('-G', '--gpio-pin', default=25, type=int,
                        help='GPIO pin for the LED (default: 25)')
    args = parser.parse_args()

    led = None
    state_map = {
        "starting": "starting",
        "ready":    "ready",
        "listening": "listening",
        "thinking": "thinking",
        "stopping": "stopping",
        "power-off": "power-off",
        "error":    "error",
    }
    try:
        GPIO.setmode(GPIO.BCM)

        led = LED(args.gpio_pin)
        led.start()
        while True:
            try:
                state = input()
                if not state:
                    continue
                if state not in state_map:
                    logger.warning("unsupported state: %s, must be one of: %s",
                                   state, ",".join(state_map.keys()))
                    continue

                led.set_state(state_map[state])
            except EOFError:
                time.sleep(1)
    except KeyboardInterrupt:
        pass
    finally:
        led.stop()
        GPIO.cleanup()

if __name__ == '__main__':
    main()