
Ads and interrupting pop-ups are extremely annoying. If you're like me you've taken steps to remove these ads by installing ad-block software and pop-up blockers. The thing is you have to do this with every device. Computers, tablets, phones, and even then, some sites require you to give them permission to show you ads before you are let into the site. After all, companies rely on these ads to make money, and if your ad-blocking software is preventing them from making money, well, you cannot enter. As companies catch on to these work arounds they will find a remedy, and the ad-blocking software will undoubtedly have an update for that remedy (which you must install). On and on it goes.
What if there was a solution to this circle of annoyance? There is, and it's easier than ever to make. Pi-hole is a hardware based network wide ad-blocker without the need to install software on every device. In fact, when you're in-laws and friends come to visit, they will also enjoy this benefit when they use your wi-fi. Now your parents and friends can surf the internet without denture ads!
Step 1: Parts List
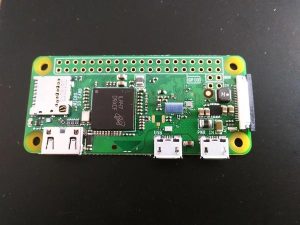
For this project you will need the following:
The Complete Kit:
Or…Individual Parts:
Step 2: Install Raspberry Pi OS
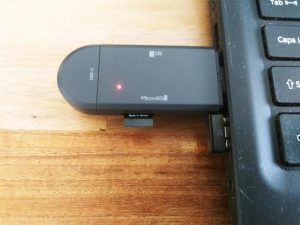
Insert your USB micro SD Card Reader into your computer. Then insert your Micro SD Card into the USB Micro SD Card Reader. Go to Raspberrypi.com/software, then download, install, and open the Raspberry Pi Imager. Click on “Choose OS”, then “Raspberry Pi OS”, then “Raspberry Pi OS Lite (32 Bit)”. Click “Write”.
Once you click Yes, the Imager will write the OS to your SD card and then it will verify the install. You may get prompts to format your SD card at this time. Ignore these messages. Once the verification process is complete you will need to remove the SD card and then reinsert it back into the computer with the USB reader.
Step 3: Adding Files to the Boot Directory
At this point your SD card should be reinserted into the USB reader and in your computer. You will need to add two files to the boot directory (the root file) of the SD card.
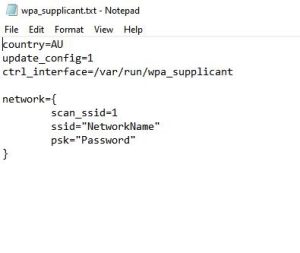
First, download the network settings template WPA-Supplicant in this step. Open this file with wordpad or notepad to edit. In the SSID field you will need to replace “NetworkName” with the name of your network making sure it is spelled out exactly how it appears. Then you need to type in your network password in the PSK field. Again, your password needs to be typed in exactly how it is. Save the file and change the extension from .txt to .conf. Move this file to the Boot directory of the SD card.
Next, make a new text file in the boot directory called SSH. Then delete the extension. That's it, you're done with the files in the Boot Directory.
Step 4: Prepare to Access Your Pi
Before we get into accessing your Pi there's a crucial step that may take some digging into depending on your network setup. I am by no means an IT expert so I will do my best to describe what you must do here without overcomplicating things.
Your Raspberry Pi is assigned a unique IP address which will change. I don't know the frequency, that's not really important. What is important is you don't want it to change. In this step we will be making that IP address “static” (unchanging).
First, you need to connect to your router settings to identify all of the things connected to it. Try accessing your router through your web browser. On the bottom, or side of your router there will be a sticker with an IP address. Identify that number and use it to log into the router through your web browser. Type in “http://”IP Address Here”” and press enter. This will take you to a login page where you will enter a login and password. On that same sticker where you found the IP address there should be a generic login and password for you to enter. Try this first. If that doesn't work, you may need to contact your internet provider if they set up your router, or you are renting your router from someone.
If you are unable to login to your router your best option is to contact your internet providers tech support to help you. Trust me, they get excited over the non-typical “hey my internet doesn't work” questions. Tell them you're trying to make your raspberry pi's IP address static and they should be able to help you here.
Once a static IP address is assigned make a note of the IP address and the MAC address for later use.
Step 5: Download Putty and Install Pi Hole
Now that the Pi's IP address is static you need to install Putty on your computer to access your Pi remotely. Here's the link:
https://www.chiark.greenend.org.uk/~sgtatham/putty…
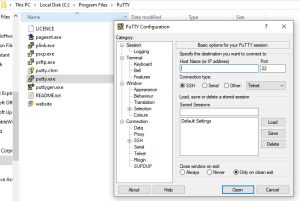
I took plenty of photos in this step to help those who are new to Raspberry Pi, so if you are lost please check the photos. First, open Putty.exe. Enter the Pi's IP address and press open. Accept the PuTTY security alert.
First thing you need to do is login to the Pi. The generic Login credentials are as follows:
Login: pi
Password: raspberry
Congratulations, you are in and ready to enter your first command! Type the following exactly as follows to access the Raspberry Pi Software Configuration Tool: sudo raspi-config
Once in the Software Config Tool you'll want to change your username and password using the following path:
System Options –> Wireless LAN
Then change your regional settings with the following path:
Localisation Options –> Locale
Once these are updated you can exit the Config Tool and install PI Hole by typing in the following command:
$ curl -sSL https://install.pi-hole.net | bash
Follow the prompts to completion. When the install is done you will see an install complete page. Write down the web interface password and address.
Step 6: Setup Pi As the Primary DNS Server
One last step before you're Pi starts blocking ads across your entire network. You need to setup the Pi's IP address as the primary DNS Server. To do this you will need to log back into your router and poke around until you find this option. If a second DNS Server is required, you will need to set this one up to your Pi's IP address as well. If you don't have access to this because your internet provider is stingy you will need to call their tech support again to help out.
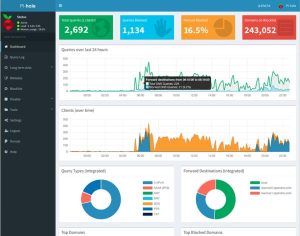
That's it! Go to a few websites that are notorious for unwanted ads and see how it performs. The Pi Hole Dashboard will show you all the stats and details on your new devices block history. You can also use the Dashboard to setup a whitelist or blacklist for added control settings.
If you made this, let me know in the comments how you like it.