| Hardware components: | ||||||
 |
|
× | 1 | |||
|
× | 1 | ||||
 |
|
× | 1 | |||
|
× | 1 | ||||
|
× | 1 | ||||
|
||||||
STORY
I wanted to give my family a simple, meaningful, beautiful way to stay connected. We are spread out across two countries, and sometimes misunderstandings between us make communication even more difficult.
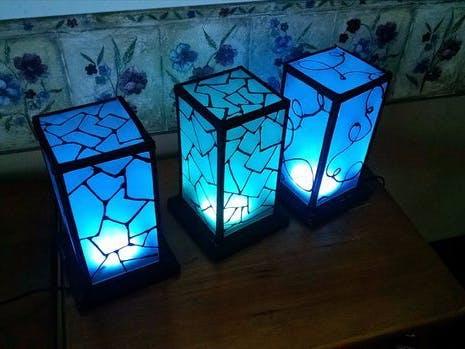
As holiday presents this last year I built 6 RGB Wi-FI enabled networked decorative touch lights. Each member of my family has one connected to their Wi-Fi. When one of us is thinking of the family, that person can touch their light. Everybody’s light will light the same color simultaneously. All of us will know one of us is out there thinking of us. If the same person touches the light again, the color for all the lights will vary slightly. That person can find a color that speaks to them to share with all of us.
If another member of the family then touches their light, everybody’s color will change more dramatically. All of us will know one of us has responded. All the lights fade to black within 2 hours of being touched.
There is no limitation to how many lights you can be synchronized; it's just a function of how many people are in your family and how many lights you want to make. You could make just a pair of lights or 500 of them all networked together if you wanted.
These lights have been received so positively that we have decided to manufacture and sell them. If you pre-order some today, you can have them at your home before the holiday season this year for less money than it costs to make them yourself. But for you DIYers out there, let's get started!
Step 1: Gather Materials, Supplies and Tools Needed
Materials
- Acrylic sheets 1/8″ thick, clear or, if you can find them affordably, frosted. Clear sheets from Home Depot.
- 4″ Square Wood Plaque
- Black double-fold 1/2″ bias tape (optional)
Supplies
- Black spray paint
- Frosted spray paint
- Electrical tape
- Masking tape or painter's tape
- Solder
- Sand paper – 60 grit
- Acrylic cement
- Sticky glue (optional with bias tape)
Electronics
- Spark Core ($39 each. You need one for each light)
- One Raspberry Pi (any model) with SD card ethernet cable and power. (You can substitute any Linux server)
- Adafruit 16 Neopixel Ring ($10 each. You need one for each light)
- Conductive paint. (One light can use as much as 10ml of paint. I know it's expensive but I tried various DIY conductive paint recipes but could find nothing that works like the real thing.)
- Wire. A 4-wire-strip ripped off ribbon cable from an old computer works great.
- 10 MOhm resistor.
- High quality cell phone charger power supply. Cheaper off-brand power supplies do not work because the power is not clean enough for the touch sensing. Simple filtering with a capacitor does not fix this. You can buy name brand units (Samsung, Apple, LG, etc.) Alternatively, I picked up used brand-name chargers from the thrift store for $0.99 each and they work great.
Tools
- Vibrating sander.
- Table saw.
- Scraper. A screwdriver would work.
- Soldering iron.
- Drill press with router table, or drill press and router.
- Multimeter.
- Wire Snips.
- Heavy Duty Stapler and Staples.
Step 2: Frost Acrylic
Frosted acrylic sheets are expensive and hard to find. As an alternative you can frost your own acrylic fairly easily:
- Fasten acrylic securely to a flat solid surface
- Using a vibrating electric sander, sand acrylic with 60 grit sandpaper
Sand both sides of the acrylic so the acrylic diffuses the light fully. Many DIYers recommend finer grit sandpaper to frost acrylic, but rougher sandpapers such as 60 grit are better for diffusing.
(I loved this job because I got to use my dad's old vibrating sander. He was a great DIYer and he is no longer with us, so it's nice to have memories of him and his projects when I use his tools.)
Step 3: Cut Acrylic
Using a table saw, cut four 3.5″x7″ sheets and one 3.5″ square sheet of acrylic for each light. Set the saw blade at a 45 degree angle so you get a nice mitered corners. Acrylic is less forgiving than wood and hard to cut cleanly without cracking or melting. Here are some tips:
- Use a sharp blade with very fine teeth designed for cutting acrylic.
- Run the blade slowly.
- Set the blade height to barely clear the acrylic.
- Tape both sides of the acrylic with masking tape or painter's tape where you are going to cut it. This helps prevent cracking.
- Push the acrylic through the blade with a sacrificial piece of wood on top so the acrylic will not kick up off the table.
Read More: Networked RGB Wi-Fi Decorative Touch Lights


