
Background/Scenario
In many military applications, communications to unmanned systems are limited or prohibited and In the undersea domain, this is often the norm. Conducting submarine-launched Autonomous Underwater Vehicle (AUV) operations requires a level of autonomy for the AUV dependent on its assigned tasks, environmental conditions, and operational permissiveness. In some covert undersea operations, the AUV may not rely on acoustic communications for navigational or information management purposes, thus requiring the AUV to have some amount of on-board processing and decision-making ability based on sensor inputs.
The scenario of interest is for an AUV to be able to take in pre-determined coordinates (based on well-established “intel”) to begin a search of an undersea cable that emits a magnetic field on the seabed, with control decentralized from the submarine or SEAL delivery vehicle and instead pushed to the AUV.
Thus far in ME4823, we have conducted essentially all data processing, algorithmic decision-making, and higher-level control on the laptop, and only communicated with the Turtlebot to issue actuator commands (/cmd_vel) and to receive sensor data (/odom, /amcl_pose, /rfid, etc.). In this package, we accomplish two major tasks: (1) Transfer ROS Packages onto the Raspberry Pi Model 3B Single Board Computer (SBC) so that the only means of issuing commands is by establishing a secure shell (ssh) via laptop; and (2) Develop a Control Algorithm in MATLAB's Simulink to detect an “undersea cable,” which will be simulated by a row of RFID cars taped to the floor. The laptop represents the “manned submersible” and the TurtleBot represents the AUV. The ThingMagic RFID reader represents a towed magnetometer, although field intensity is not measured; instead, only presence of the “magnetic field” or RFID emission is detected. We will remove other RFIDs from the area of operations (AO) to simplify things.
References and Prerequisites
Gitlab Repository: https://gitlab.nps.edu/bryan.lowry/mrc_final/tree/master
This assumes the user already has completed MRC 2019 Assignments 1-7.
- It may be helpful to better understand running Master on multiple platforms, a key step in decentralizing control: https://wiki.nps.edu/display/RC/MultiMaster.
- Steps to convert Simulink into a standalone node will be used, as well as secure copying (scp) files and folders over the ssh port: https://wiki.nps.edu/display/RC/Simulink+Standalone+Hello+World
SBC Embed Setup
Instead of the turtlebot3_nps git repository we've been using to pull down ROS packages, we will install packages from an external site, Robotis.
Install Packages
- With the Turtlebot off, plug the ethernet cable into the Turtlebot. Note: You may need to remove some USB cables temporarily. Turn on the Turtlebot.
- LAPTOP: Secure shell into the Turtlebot from the laptop: ssh [email protected] where 192.168.11.XXX is the IP address of the Turtlebot.
- Ensure the laptop is connected to internet using a second ethernet cable or on the NPS wireless network.
- Go to http://emanual.robotis.com/#turtlebot3 and from the drop-down menu under “2.3.2. TurltleBot3” select SLAM. You will be directed to another page.
- On the left hand panel, click “6. Setup” then “6.1. PC Setup” then “Install Dependent ROS Packages.”
- Under “6.1.3. Install Dependent ROS Packages,” locate the commands to utilize.
- TB: In a new terminal (ssh'd into Turtlebot), you can copy the install command from the site to get all packages, but for this exercise we only need to copy the commands from below.
sudo apt-get update
sudo apt-install ros-kinetic-amcl ros-kinetic-map-server ros-kinetic-move-base ros-kinetic-urdf ros-kinetic-xacro ros-kinetic-compressed-image-transport ros-kinetic-rqt-image-view ros-kinetic-gmapping ros-kinetic-navigation
cd ~/catkin_ws/src/turtlebot3
git pull origin master
cd ~/catkin_ws/src/turtlebot3_msgs
git pull origin master
cd ~/catkin_ws && catkin_make
$ git clone https://github.com/ROBOTIS-GIT/turtlebot3_msgs.git
You will also want to install the ros-robot package the same way. This contains the robot state publisher, which is necessary for amcl and the map_server to function properly.
Transfer ROS Packages
We now want to transfer ROS packages that we already have on the laptop over to the Turtlebot using the scp command. scp allows you to use the ssh port to transfer files from the laptop to the remote server (Turtlebot) or vice versa. If secure copying a directory, you'll likely want to use the recursive option ( -r ) with scp.
- LAPTOP: In a terminal on the laptop, issue the command: scp -r ~/catkin_ws/src/turtlebot3_navigation [email protected]:~/catkin_ws/src where the IP address is that of the Turtlebot. Enter the frl password.
- catkin_make
- Repeat for all applicable ROS Packages you may want to run on the SBC. You'll want to ensure the ThingMagic_RFID package is secure copied over to the Turtlebot. See steps at ThingMagic USB Pro RFID Reader, Turtlebot3 Integration to integrate the ThingMagic RFID reader. Make sure you follow the steps to run the reader on the Raspberry Pi
- TB: On a terminal that is ssh'd into the Turtlebot, verify that the files and directories made it to the SBC by navigating to the appropriate directory.
Transfer Map
- LAPTOP: scp -r /map.pgm [email protected]: ~/catkin_ws/src then repeat for the map.yaml file.
- catkin_make in the working directory.
- Verify the map's .pgm and .yaml transferred successfully.
Exercise 1 Manual Commands with Embedded Packages
In order to ensure you are able to run the ROS packages embedded on the SBC, this exercise involves simple commands given to the Turtlebot from the laptop, except it is ssh'd into the Turtlebot so it is as if there is no actual communication between the laptop and Turtlebot.
Setup
- TB: While ssh'd into the Turtlebot, open up the turtlebot3_navigation.launch file using nano, and comment out RVIZ sections and arguments. This is because the Turtlebot does not have a screen, so if we want to use RVIZ we can do so from the laptop for telemetry and debugging purposes.
- TB: Ensure the <!–Turtlebot3 –> section is not commented out, because we will need the robot's state publisher active.
- TB: Edit the map.yaml in nano to ensure the image location is /home/frl/map.pgm so that other services and packages are accessing it from the correct directory.
- TB: Edit the ~/.bashrc in nano to add the Turtlebot's IP address as master at the bottom: export ROS_MASTER_URI=http://192.168.11.100:11311 (or whatever the Turtlebot's IP address is).
- Note: do not delete or comment out the export ROS_MASTER_URI=http://{IP_Address_of_laptop}:11311 line. The Turtlebot will just have two masters in this case.
- TB: Issue a Twist command to the vehicle: rostopic pub -1 /cmd_vel geometry_msgs/Twis — ‘[1.0, 0.0, 0.0]' ‘[0.0, 0.0, 0.5]'
- Does the vehicle move forward quickly and turn?
- TB: Do a quick test running the rfid reader.launch file to ensure the sensor is operating. In another terminal, use rostopic echo /rfid to ensure it is functioning properly.
Manually Controlled Survey
- TB: Open 4 new terminals all ssh'd into the Turtlebot. Copy and paste the twist command from above into each one (but do not press Enter). It is recommended to position the 4 terminals in a ” + ” arrangement for easier human interface.
- TB: For the terminal at the bottom, this will be your “brake,” so leave this as the stop command (all zeros).
- TB: For the top terminal, this is your “go” command, making the angular velocity all zeros and the linear velocity 0.09 0.0 0.0.
- TB: For the left terminal, this is to turn left, making the linear velocity 0.02 0.0 0.0 and the angular velocity 0.0 0.0 0.2.
- TB: For the right terminal, this is to turn right, making the linear velocity 0.02 0.0 0.0 and the angular velocity 0.0 0.0 -0.2.
- Note: For the turning commands, that particular combination of linear and angular velocity values enable the Turtlebot to turn with one wheel essentially stationary, which will be useful when doing search operations with a “lawn mower” pattern.
- TB: Using these commands, manually control the robot around the room while recording all topics, including /odom, /amcl, /rfid. Pass over a few RFID cards to ensure detection.
- LAPTOP: You can also use RVIZ on the laptop. In a new terminal, run rviz command. Once open, go to File > Open Config > on the left panel select your user folder > catkin_ws > src > turtlebot3 > turtlebot3_navigation > rviz then select the only file in that folder.
Post-Mission Analysis (PMA)
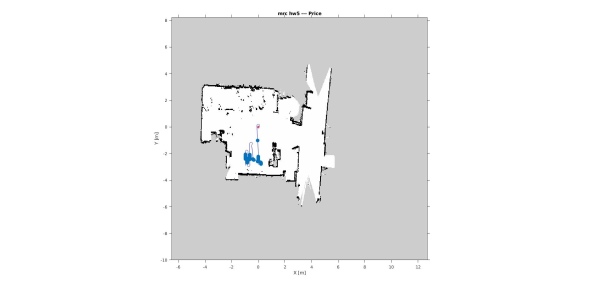
In order to ensure everything is working from the manually controlled survey, let's plot the vehicle's path and RFID detections. In the project gir repository, matlab/embed_wp.m provides a file for post-processing. Be sure to use odom or amcl_pose as appropriate.
Exercise 2 Developing a Simulink Standalone Node
- Follow the instructions at Simulink Standalone Hello World to see the general process for building and generating the code for a standalone node. This process walks through the code generation, build, and transfer to the turtlebot.
- Alternatively, you can download the three files/folders beginning with robot_preplanned from the git repository here: https://gitlab.nps.edu/bryan.lowry/mrc_final/tree/master/mathworks_standalone_ex
- Once you have the files above, follow the latter steps in the Hello World tutorial (after the Code → Deploy to Hardware step)
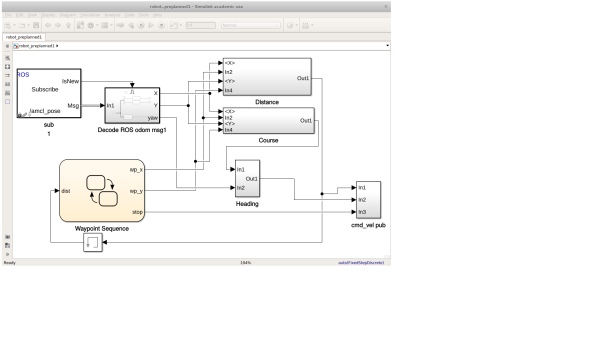
- The robot_preplanned standalone node is build on the simulink model below, which runs a predetermined path. You can adapt the robot_preplanned.slx file as you see fit, and then generate the code.
Running it all on the Turtlebot
The main goal of the project was to use the tools gained in the class to develop a turtlebot that could run autonomously, i.e. completely separate from the ROS laptops. With the standalone simulink node complete, you now have the ability to do this.
From the laptop, open six terminals and ssh into the turtlebot in each one. Run the following:
- roscore
- Starts the ROS master on the turtebot
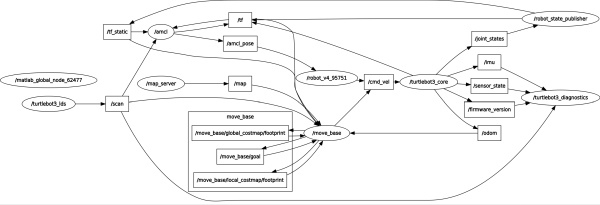
- roslaunch turtlebot3_bringup turtlebot3_robot.launch
- roslaunch turtlebot3_navigation turtlebot3_navigation.launch map_file:=$HOME/map.yaml
- starts the amcl, map_server, and move_base nodes on the turtlebot
- roslaunch thingmagic_rfid reader.launch port:=/dev/ttyACM1
- starts the RFID reader on the turtlebot
- rosrun robot_preplanned robot_preplanned_node
- Runs the standalone node generated from the simulink model
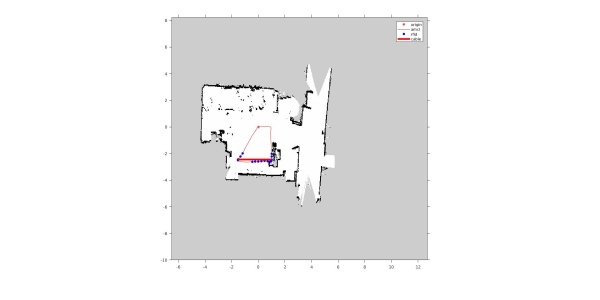
- rosbag record amcl_pose rfid
- This captures the turtlebots position and the RFID hits for post-processing. You can record other rostopics if you want, but keep in mind that bag files can become quite large and there is limited memory on the Raspberry Pi.
Alternatively, you could combine several of these into one launch file, which would make the process easier.
Your turtlebot should now execute it the preplanned path and gather RFID data. You could take a hammer to your laptop, and the turtlebot would still finish its task. But don't do that. After it is finished, scp the bag file from the turtlebot over to your laptop for post-processing.
Troubleshooting/Development Techniques
This process will likely involve lots of troubleshooting. In general, start small, change one thing at a time, and look for a change in the results or generated errors.
- Make sure your ~/.bashrc files have the proper machines as the ROS Master. For most cases, it will be the turtlebot. If you make a change, you need to source ~/.bashrc in any terminals that are currently open.
- Rviz – It will be helpful to have Rviz available to visualize what your turtlebot is seeing. Since you cannot run Rviz on the Raspberry Pi, you can change the ROS master in your laptop's ~/.bashrc file to be the turtlebot's IP address.
- This will allow you to run the command “rviz” from a laptop terminal and see what the turtlebot sees. Do this after bringing up the amcl, map_server, and move_base nodes on the turtlebot
- If rviz is blank after doing the above, you need to load the rviz configuration for the turtlebot: File → Open Config → and open the file home/catkin_ws/src/turtlebot3/turtlebot3_navigation/rviz/turtlebot3_navigation.rviz
- rqt_graph and rqt_tf_tree – By setting your computer's ~/.bashrc file to use the turtlebot at the ROS Master, you can use these tools to debug issues
- Launch File – the navigation launch file should contain the following:
- the turtlebot3_remote.launch, which starts the robot state publisher, among other things.
- the map_server, amcl, and move_base
- Simulink Code Generation – It is a time consuming process to build a standalone node, compile it, get it over to the turtlebot, build it again, and then run it. This is especially frustrating if the Simulink code does not do what you want it to do. To get around this, you can run the Simulink model from your computer, as was done in previous assignments. This requires the following:
- Your laptop's ~/.bashrc file must recognize the turtlebot as the ROS Master
- After roscore is running on the turtlebot, run the following command in MATLAB: rosinit(‘http://192.168.11.143:11311′), with the 143 replaced with the IP address of your turtlebot. The 11311 can remain the same.
- Right now, it seems that Simulink cannot write the model into code if there are MATLAB functions embedded. This makes logic and math difficult; you need to get creative with switches, triggers, and other Simulink blocks.
Future Work
- Ugrade to MATLAB 2019b, which may support MATLAB functions in the Simulink encoder
- Incorporate the RFID hits into the decision making of the robot, vice running a preplanned path