
Introduction.
If one subject is surrounded by myths, it is overclocking. It would be dangerous and destroy your Raspberry Pi. This article provides the essential background, after which you can safely overclock the Raspberry Pi to 2.1 GHz.

Theory.
The BCM2711 chip on the Raspberry Pi 4 consists of millions of transistors. They are all MOSFET (metal-oxide-semiconductor field-effect transistor).
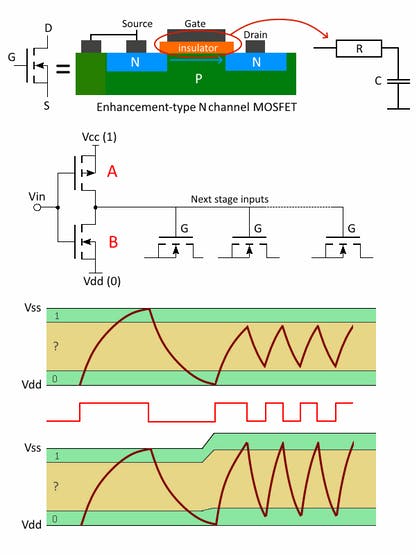
When a positive voltage is applied to the gate, negatively charged electrons inside the body are drawn just under the gate insulator, thereby forming a conductive tunnel between the source and the drain. The state is ‘on'. Removing the voltage on the gate and the MOSFET switches off again. The insulator between the gate and the body ensures that almost no current is needed to control the transistor. That explains why, for instance, pocket calculators can work years on a single battery.
Overvoltage.
To switch on, a positive electrical charge is routed to the gate through the previous MOSFET A output. The same applies to switch off when this charge is to be drained by MOSFET B. This sourcing and the draining of electrical charge generates a small current peak. It is clear that the faster the clock runs, the more energy is transferred and then the more heat the chip will generate.
This switching takes time, the so-called rising and falling time. During this periode the output is neither ‘0' or ‘1', the state is undefined. In the graph shown above, it's the yellow band.
When the rise plus fall time is larger than the clock intervals, the output never hits the stable 1 or 0 bands but remains swinging in the undefined region. That's the moment your Raspberry Pi becomes unstable. It is no longer able to run programs flawless and chances are that it will crash.
Now overvoltage comes into play. When the power supply is increased, there is more energy available for charging and draining gates. Subsequently, the rise and fall times decrease. Although the increase in power also increases the undefined area proportionally, the overall result is nevertheless faster. The second graph above illustrates this behavior. Mostly, overclocking goes hand in hand with overvoltage.
Heat.
The insulator inside the MOSFET, an extremely thin layer of metal-oxide, becomes your limiting factor when it comes to overvoltage. In modern 28 nm chips, this layer is only a few dozen atoms thick.
Such a thin layer can not withstand large potential differentials. The tension inside the material will become too large. The layer will burst, a current will flood from the gate to the body and destroying your transistor forever along with your Rpi. Overvoltage up to 6 is safe, above that number, you have your adventure without any warranty.
Throttling.
The Raspberry Pi monitor the temperature continuously. Above 82 ° C (180 ° F), the clock frequency is automatically lowered. This action will reduce heat development. Once cooled down, the clock is restored to its original frequency, the so-called throttling. During throttling, an icon is shown on your display.

In a normal situation, it may be sufficient to rely on the throttling to prevent overheating of the chip. However, this is not wise in the case of overclocking.Due to the overvoltage, stress on the insulators inside the transistors is already above normal, heat will only enlarge it even more. The upper-temperature limit must, therefore, decrease depending on your overvoltage. That is the most important lesson when overclocking!
Preparations.
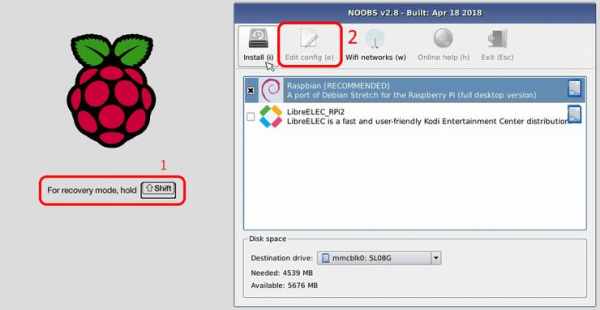
First of all, you need an emergency door so that you can undo the overclocking if something goes wrong. If Raspbian is installed by NOOBS (New Out Of Box Software) you have the option to hold down the Shift key during startup. You are lead to the original installation screen where you can modify config.txt, the file used for overclocking. If you do not have NOOBS, you better back up your SD card before you start overclocking.
As mentioned earlier, you must control the heat generated. That's why you have to monitor it. We like to use two applets on the status panel, the CPU Usage Monitor and the CPU Temperature Monitor. You know exactly how healthy your system is at a glance.
EEPROM.
Another preparation is the installation of the latest EEPROM firmware (electrically erasable programmable read-only memory). The Raspberry team has released a new firmware that will reduce your heat generation. It is of course not mandatory to install this software. If you want to install it follow the commands. For more information see this article on Hackster: https://www.hackster.io/news/raspberry-pi-4-firmware-updates-tested-a-deep-dive-into-thermal-performance-and-optimization-2f22c78e7089
$ sudo apt-get update
$ sudo apt-get full-upgrade
$ sudo apt-get install rpi-eeprom
# to get the current status
$ sudo rpi-eeprom-update
# to update the firmware
$ sudo rpi-eeprom-update -a
$ reboot
Beta version software.
In your regular Raspbian overclocking is limited to 1850 MHz. If you want higher frequencies, you have to install the latest Raspbian beta firmware, as the limits have been removed in this version. When you are satisfied with 1850 MHz, still an increase of 23% speed, leave your Raspbian as it is. Or, if you want to get the maximum and you have active cooling on your Raspberry Pi, you can take the risk and install the latest version with the following commands.
$ sudo apt-get update
$ sudo apt-get dist-upgrade
$ sudo rpi-update
Practice.
The actual overclocking is surprisingly simple. Two lines of text, over_voltage= x and arm_freq = y, in the /boot/config.txt will do. The table below, some frequencies are given with the corresponding overvoltage. Up to 2140 MHz, the Raspberry Pi 4 still works, but it can crash when all four cores are used simultaneous during demanding tasks.
No improvements were observed with overvoltage stage 7 or 8. So, don't use them. It can only wear out your Raspberry Pi in the long run, even with proper cooling.
With one extra line gpu_freq = z, the GPU can also be overclocked to a maximum of 650 MHz. Overclocking the GPU also requires overvoltage and it generates extra heat of course. SDRAM overclockingon the Raspberry Pi 4 is not possible. Fortunately, the design team used the latest DDR4 memory that is 52x faster than the RPi 3 RAM.

Open the Nano text editor with the following command and place your lines at the end of the file. Close the session with the <Ctrl+X> key combination. With <Y> and <Enter> changes are being saved. Now reboot and your Raspberry Pi 4 runs at the new speed. Please note, the figures given are only examples. You can adjust them to your good.
$ sudo nano /boot/config.txt
# Add your lines at the end.
over_voltage = x
arm_freq = y
gpu_freq = z
# Ctrl+X, Y, Enter to save the session
# Reboot to run at the new clock frequency
$ reboot
As mentioned earlier, keep an eye on your temperature when your Raspberry is running at high speed. Below are some graphs with different cooling options. I like to use this ‘sandwich' heat sink because it also protects your electronics on the back against damage or short circuits.