
This is the second part of a 2-part series on ‘How to build a High-Definition FPV UAV using a Raspberry PI with HD camera, using a high speed WiFi link.
In my first post on the subject (located here), I discussed the parts I used, and how to install them into a Hobby King Go-Discover FPV model.
In this post, I will discuss installing the Raspberry PI and the PI camera in the Go-Discover gimbals, and the software configuration for both the Raspberry PI and the ground station PC.
From the previous post, step 3 was completed by installing the Ubiquity Rocket M5 in the model. Now onto step 4:
Step 4: Install the Raspberry PI and PI Camera
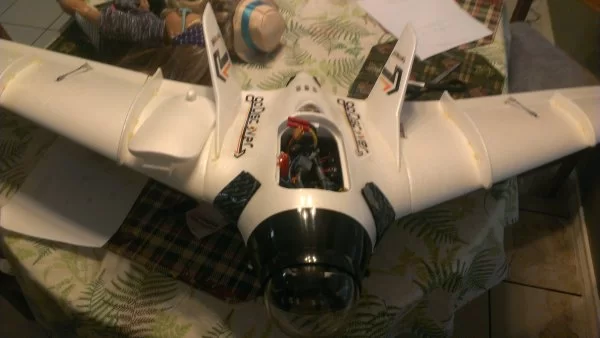
The PI fits nicely just behind the camera gimbals, with the USB and HDMI ports on top. In the right side you can see the Cat5 network cable attached. This cable connects to the ethernet switch, which is also connected to the Rocket M5 input port.
The two cables shown on top are the servo control wires for the gimbals, which I have directly connected to channel 4 and 5 on my radio. I am using channel 4 (normally the rudder stick on my radio. Since there is no rudder on a flying wing, this is a convenient channel to use to move left and right with the camera. I have not (yet) moved to a head tracker, but if you already have that setup, just assign the channels accordingly.
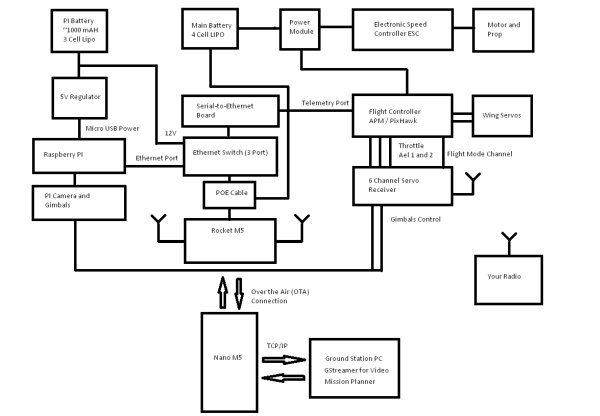
Some comments on my previous post suggested that it is possible to eliminate the ethernet switch and serial-to-ethernet converter using the Raspberry PI and a serial port on the PI. I believe this post describes how to talk to the PI via the NavLink, but in this case, I want to use the PI to bridge the connection from the ground station to the APM/PixHawk. Somebody please comment on this if you know more about it. I believe it would require a TCP/IP to serial link from the PI to the telemetry port on the APM, and some software on the PI to act as the bridge. The main connection to the ground station is via the Rocket M5 and TCP/IP, not through a telemetry link (900 Mhz or Zigbee like I used on my other models).
Step 5: Getting it all to work with software configuration (the really fun part starts now).
Check out this post on what others have done with streaming and the PI. My experiments showed that using GStreamer on both the PI and on Windows gives really good results with very low latency, if you use the right parameters.
Get GStreamer on the PI by following this blog. This is the same version of GStreamer that I am using on my setup.
Make sure your PI camera works ok by plugging in the PI to a standard monitor using the HDMI port and follow the instructions on the Raspberry PI website on how to get the camera up and running (without GStreamer). Once you have a working PI and camera, you can then proceed to stream things over the network.
 Note: It is suggested that you first get the PI streaming video by plugging it directly into your local network where you can also connect your ground station PC with the correct IP addresses (without the Rocket M5). For my PI, I picked 192.168.1.2, and for the ground station, 192.168.1.1. Make sure you can ping the PI from your PC and the PC from the PI.
For streaming, you will also have to make sure all the ports you intent to use are open on the firewall (described later).
For the ground station PC, you can download GStreamer here. Make sure when you install, select to install everything , or full installation (not the default).
For more detail: Part 2: How to build a High-Definition FPV UAV using a Rasperry PI with HD camera, using a high speed WiFi link