
Story
This is my 3rd tutorial with a focus on Scratch and Physical Computing. Regarding this topic, I have already published:
- Physical Computing – Scratch for Arduino, where as the name says, I explored how to use Scratch and Arduino to interact with the physical world.
- Physical Computing – Scratch for Raspberry Pi, same but using Raspberry Pi and Scratch 1.4
Here, we will learn the new version of Scratch, the 2.0, exploring some new and exciting projects.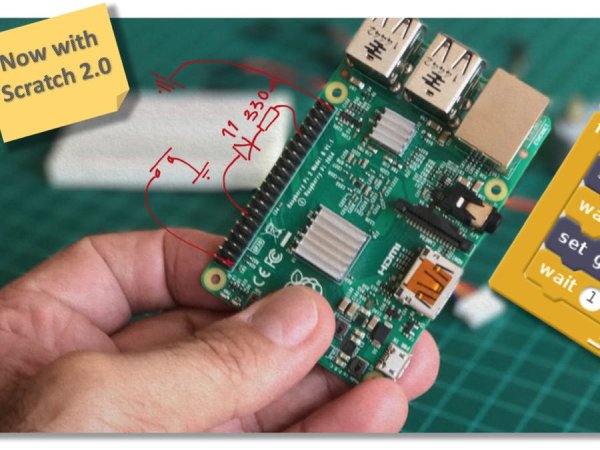
In short,
We will learn:
- What is Scratch 2.0 and its differences with Scratch 1.4
- How to interact with LEDs, Push-Buttons and a Buzzer
- How to create Special Blocks
- How to handle with variables
- How to integrate animations and the Physical world.
Let's go!
Step 1: Bill of Material – BoM
For the experiences in this tutorial, you will need at least the items:
- Raspberry Pi (V2 or V3)
- LEDs (Red, Yellow, and Green)
- 1 Button
- 1 Active Buzzer
- Resistors: 3 x 220 ohm
- Cables
- Full Breadboard
Step 2: The Scratch 2.0
As we know, Scratch is a great tool to teach beginners how to code, but before starting our tutorial, I really recommend that you go familiarize yourself with the Scratch 2.0 language, following some basic tutorials. Doing that will help you to better understand how to use a Raspberry Pi for Physical Computing.
There are 2 ways to do that:
- Go to Scratch Official Website, or
- Go to Official Raspberry Foundation site,
A new offline Scratch 2 version started to be delivered bundled with the last Raspbian OS release, and it is really great, with several new features that will help you to create a more professional codification.
WARNING: At least with me, the actual version introduced some “freezing issues”, that could be related with Flash. Those freezings appeard whe I tried to upload new background or sprits.
Opening the program:
When you have the Pixel desktop in front of you, go to left up corner Application Menu (the “Raspberry Pi logo”) and open it. You will find as one of the options: “Programming“.
- Open it and click on “Scratch 2” (note that the old version Scratch 1.4 (named as “Scratch“) is also there.
- Once you open the Scratch program, you will get the screen shown above.
- Click on “More Blocks“
- Click on “Add an extension“. The option “Pi GPIO” Library will be available. Select it and click [OK]
- The PI GPIO library will be installed and the “green led” shows that it is running properly.
- 2 news blocks will be now available to be used with your Physical Computing programs.
The first block:
set gpio <GPIO number> to [output high]
above has 3 possible parameters:
- output high
- output low
- input
The second block:
gpio <GPIO number> is high? will return:
- “True” or “False” depending on GPIO digital level (“True = 1” and “False = 0”).
Scratch 2.0 also allows the creation of custom blocks, allowing code to be encapsulated and used (possibly multiple times) in a project. We will see how to do it in the examples.
Step 3: The GPIO Pin Numbering
We will not cover how to prepare the Raspberry Pi to be used in this tutorial, but If you need any help, please refer to this link: Installing Raspbian with NOOBS.
Our Raspberry Pi will be running with the latest Raspbian version of the Operational System, having PIXEL, as our desktop environment.
Once we will interact with the physical world it is good to remember that our gateway to that will be the Raspberry Pi GPIO connector. The above photo shows the connector, where I have drawn some fictional components in red.
Pin Numbering Important to mention that we will use Broadcom (BCM) pin numbering for the GPIO pins, as opposed to physical (BOARD) numbering. Any pin marked “GPIO” in the above diagram can be used as a pin number. For example, if a LED was attached to “GPIO13” (physical pin 33) you would specify the pin number as 13 and not “33”.
Step 4: Blinking a LED
t's time for the “Hello World” of Physical Computing, the “blink of a LED”!
Let's start connecting a LED to GPIO 13 of our Raspberry Pi (RPi, for short).
For starting, drag 2 new “set gpio” blocks to the SCRIPTS AREA,
set gpiot <13> to [output high]
set gpio <13> to [output low]
Clicking on those blocks you will turn ON and OFF the LED
Now, let's create a real blink code using Scratch 2.
- Start your program when the “Green Flag” is clicked, for that you will need the block:
- When “green flag” clicked (it is the first block in the “Event menu” – colored in brown)
- Drag the loop block “Forever” (you will find it on “Control menu” – colored in yellow)
- Inside the loop Forever, put the blocks that you used on the before.
- if you run your code, you will see that nothing happens, or better, the LED will be ON and OFF so quickly that you will not realize it. So, you must add some delay, let's say 1 second after each block.
Step 5: Using Custom Blocks – Multiples LEDs Blinking
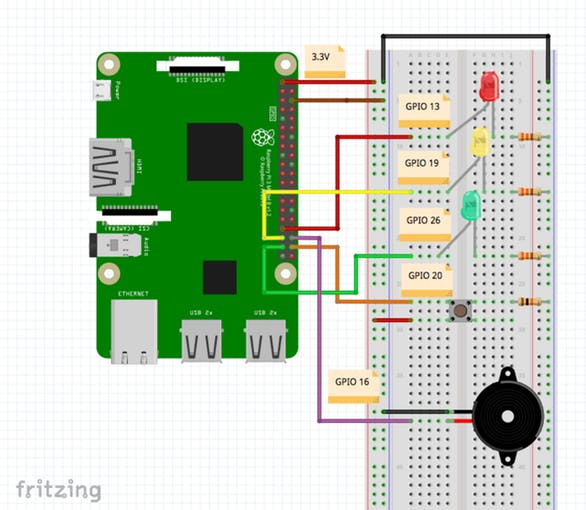
Now, that we know how to control one LED, let's install 2 new ones, with different colors:
- RED
- YELLOW
- GREEN
Repeat what you did at last step, connecting the LEDs as shown above:
- RED ==> GPIO 13
- YELLOW ==> GPIO 19
- GREEN ==> GPIO 26
Suppose that we want now the 3 LEDs blinking independently at different frequencies. The first thing that you can do is to copy the set of block developed on the last step, changing the GPIO number and the delays for each one of the blocks, let's say:
- Blink Block for GPIO 13 ==> delay: 1 second
- Blink Block for GPIO 19 ==> delay: 2 seconds
- Blink Block for GPIO 26 ==> delay: 4 seconds
It would work, but let's use the opportunity here and introduce a new feature of Scratch 2, the “Custom Blocks”.
First, let's create a custom block naming it “setup”, that will be used to turn OFF all LEDs
- Go to “More Blocks” menu
- Select “Make a Block”
- Enter the name “setup” and click OK
You will see that a new block will appear “define [setup]“, below it, we can add 3 blocks setting the GPIOs to LOW as shown at above print screen. Now, this custom block “setup” (that it is, in fact, a “function”), can be called anytime in the program. Let's call it at starting, under the green flag, so anytime time that the program run, we will guarantee that the LEDs will be OFF.
Now, we will create a more elaborate custom block. We will create a type that can receive parameters allowing further generalization and reuse of code blocks. The idea is to create a generic “Blink block”, where the parameters will be the GPIO number and the time. So, our final block will be like:
blink <GPIO> <time>
So, let's do the following:
- Go to “More Blocks” menu
- Select “Make a Block”
- Enter the name “Blink” and click at sub-menu “Options”
- Click on the first option: “Add number input” and type “GPIO”
- Click again on same option and type “time”
- Enter OK
Now, a new block will appear:
define [Blink] [GPIO] [time]
Under this block we will add the blocks that we used for the blink, but, instead of specific numbers, we will add the “blue” and generic parameters: “GPIO” and “time”
Now if we want to blink the LEDs independently it is enough to use blocks like those:
Blink <13> <1>
Blink <16> <2>
Blink <26> <4>
The code for this example is here: blink_V2.sb2
Step 6: Introducing a Push-Button and Variables
Using a push-button with the Raspberry Pi and Scratch 2 is a “straight forward task”. with the Scratch 1.4, we saw that an internal pull-up resistor was used. Here, instead, we will use “direct logic”, or:
- If Push-Button is pressed (closed) ==> GPIO = “1 ” (3.3V)
- If Push-Button not pressed (open) ==> GPIO = “0” (0V)
So, let's connect the button as shown in above diagram.
WARNING: you must use the 3.3V output (physical pin number #1). The RPi does not support 5V on its GPIOs
For reading our push-button, we will create a new variable “button” to be associated with its state:
- If Push-button is PRESSED ==> “button = ON”
- If Push-Button is NOT PRESSED ==> “button= OFF”
The blocks to that will be:
if <20> is high?> then

else
We will include those blocks on a new block that we will call: “gpioStatus” and by the way, we will do the same for LEDs, creating variables associated to each one of them:
- red
- yellow
- green
And will associate values to those variables, and we will act on correspondent GPIO accordingly:
- If Red LED should be ON ==> variable “red = ON” ==> GPIO 13 ==> “high”
- If Yellow LED should be ON ==> variable “yellow = ON” ==> GPIO 19 ==> “high”
- If Green LED should be ON ==> variable “green = ON” ==> GPIO 26 ==> “high”
And of course, the opposite for LEDs off.
All above logic should also be included at “gpioStatus” function, that will be running during all the time. So, we will not need to be worried about GPIOs anymore. Instead, we will use the variables to build our program logic.
For example, let's create a program that:
- Run the LEDs in a fixed sequence on a given frequency as a normal traffic light:
- RED
- YELLOW
- GREEN
And so on. If a button is pressed, the frequency is changed, let's say around 3 times faster.
The first thing to do is to create a new variable, named “time” that will have a value, let's say:
- 1 second if the variable “button” is OFF and
- 0.3 seconds if “button” is ON.
As you can see, we are in fact controlling time's value actuating on a physical push-button, but here only “variables” are used.
We can do the same for the LEDs sequence. We will set red, yellow and green variables, ON or OFF, keeping them ON using the variable “time” now.
Here the code used in the example: 3LED_button_V2.db2
Step 7: Let's Animate!
One of the great features of Scratch is the animation. So, let's introduce some very simple animation on our projects.
Let's change the last project a little. Now, The traffic lights will perform its sequence only when the push button is pressed. If not pressed, all lights must be off. The code is very simple. Try to do it before you see my solution.
OK, but let's make the things more interesting. Let's create a new sprite a “Blue Button” (I left with its default name, sprite 1. You can change it) that will have 2 possible costumes:
- button OFF
- button ON
I used the internal editor to create the simple costumes. We will want that this sprite will always appear at Stage, but with its costume “button OFF” if the push-button is released (variable button = OFF) and of course, with the costume “button ON” if the push-button is pressed. One simple block that should run all the time.
Now we must create the Traffic Light that will show the LED status on the Stage. We can do it or creating a new Sprite, or creating new backdrops. We will do the second on, so you can see 2 different examples of animation creation here.
With the paint editor, I created 3 empty circles, that I called “OFF”. Coping this backdrop 3 times, I filled one of the circles with one of the LEDs color (Red, Yellow, and Green) in this sequence. I name them (SURPRISE!): RED, YELLOW, and GREEN.
So, at Backdrop”s Script tab I included a piece of code that will run forever, changing the backdrop according to LED variables (see above). Very simple and straight forward.
And that's it! As you can see, the final project is a group of various simple parts, what's make it at end also very simple to understand.
NOTE: The secret here is to be ORGANIZED with the code.
Below a video with our project and animation running:
The code can be downloaded from here: Traffic Lights V2.sb2
Step 8: It's Show Time!
On the last step, we had a lot of fun creating simple animation and mixing physical and virtual things together. Let's now, do a more elaborate project.
Before we enter in the animation part of it, let's complete the HW. This project will have a pedestrian Traffic Light and so, we will include a Buzzer that will produce a sound (“Beep”), during the time allowed for pedestrians crossing a street. The buzzer will be installed at GPIO 16. AS we did before, to simplify things, let's create a new variable “beep” that will activate GPIO 16 High or Low. The logic will be included at gpioStatus, same we did for the LEDs.
Let's take our little friend, the MJRoBot and show him London, the birthplace of Raspberry Pi!
For starting, we must define the general specification regarding our project:
- Our little friend will start its journey around London, moving right to left across all stage area.
- When he touches the left Stage's border, we must change for the next London's backdrop.
- When he reaches Abbey Road, he must stop because there is a pedestrian cross (Yes! The famous one!)
- Suppose that was installed there, a traffic light to protect tourists. The robot will ask us to press the push-button for him, so he can go across the street, same as Paul, John, George, and Ringo did years ago) but in an opposite direction 😉
Let's this time create two new sprites:
- A Traffic Light (in opposite for using several backdrops) with 3 costumes (red, yellow and green)
- The little robot, the MJRoBot that has 2 costumes to help him to walk (or something that resembles walking). 😉
We will have 4 backdrops. 3 for London surrounds and the most important one: Abbey Road.
That's it!
Try to code it by yourself and only after, compare your solution with mine! There are several different ways to do that.
Enjoy it!
A quick video about the final project working:
My code solution here: MJRoBot around London V1.sb2
Step 9: Conclusion
As always, I hope this project can help others find their way in the exciting world of electronics.