
Here were my requirements
– Use a Pi (Raspberry Pi 2 in the case)
– Spherical case, that can be bounced, kicked, thrown
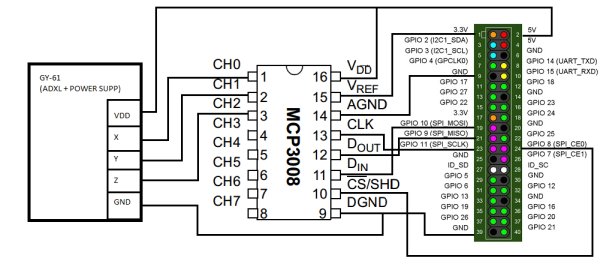
– Accelerometer onboard to monitor the motion of the ball
– Wireless everything! Wireless keyboard/mouse, networking, sound and video
(Pi Ball in on! LEDs on! Wirelessly connected to the screen in the background – running the accelerometer tracking program.)
Project by sections
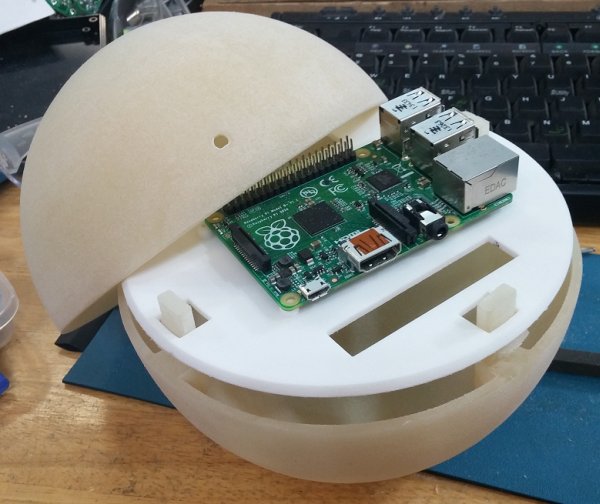
The Pi Ball enclosure:
The Pi Ball spherical enclosure consists of three pieces. Two hemisphere and the mounting plate attached in the middle.
The 3D model of my concept. I used Solidworks 2013.)
I wanted a smooth external appearance. No screws/bolts holding it together.
When the hemisphere lock together, they wedge the mounting plate in the middle. The hemispheres are made of “elasto-plastic” from Shapeways, and the mount plate is regular ridged ABS. The Elasto-plastic shells were quite bouncy – when empty. However, with all the components inside, the high bounce was gone.
The middle mount plate has slots for passing wires and such, and the Pi is attached to the plate via standoffs printed on the surface. Those standoffs were tapped for M2.5 bolts.
Wireless devices:
Making everything wireless turned out to be very easy with today’s tech. Wireless keyboard and mouse adapter was a single low profile USB transceiver. The WIFI adapter was exactly the same. The wireless HDMI comes via a Nyrius AERIES 1080p transmitter. (The HDMI receiver is attached to the screen. The one I used had a 165 foot line-of-sight range. But, I found that I could get about 90-100 feet without issue.)
To stay wireless, the devices need power. I used two onboard battery packs – for two different, but critical reasons.
ONE – The HDMI adapter needed 5V@ 1.5A, so to take the strain off the main battery I found a small 2200mAh external battery. Tool the enclosure off of it, and placed it on top. The Pi and the LEDs shared a 8400mAh external battery supplying 5V@ 2A.
TWO – The two separate batteries created a better balance inside the sphere. So, it rolled more like a ball than an egg.
(Almost everything attached to the mount plate. Pi2 on top with the HDMI transmitter and 2200mAh battery (not shown). Bottom has the 8400mAh battery, USB hub, and accelerometer (not shown) )
The Adafruit NeoPixel LED strip needed to source more power than the Pi 2 could supply. So, I connected them to their own USB cable connected to the 8400mAh battery directly. Only the signal life from the NeoPixels connected to the Pi 2 (pin 12 to be exact)
(The 2200mAh battery removed from its red case. This way it was much smaller to put on top of the HDMI adapter.)
The HDMI adapter on the 2200mAh battery was what gave out first. It lasted 3 hours of constant streaming. I could have easily doubled that with another 2200mAh battery, there was room.
(Anker 8400mAh battery strapped to the back on the mount plate. An early step in the build.)
For the Pi 2 itself. the 8400mAh battery lasted about 12 hours of intermittent use. But, after 3 hours I did not have video output. That may have extended the life.
Software (all in Python):
Aside from running the full OS, where one could do regular computer work, tinkering, etc.. I had two specific Pi Ball applications.
– An on screen representation of the Pi Ball’s location and movement in an isometric representation on 3D space. It looks like a fading comet trail. I also put in a mode to trace the movement. My idea was for someone to hold the ball and draw in 3D. However, it only partially worked. I need to change it to take more samples.
 – I also had a mode to count the # of impacts detected, like bouncing.
– The second feature was turning on LEDs inside the ball. The main feature was to react to the accelerometer data, and turn on, flash or chaser effects on one of those Adafruit Neopixel LED strips. This worked spotty at best. But, when it worked, it did what I wanted.
(I have an always on, always off, a constantly flashing/chasing, and accelerometer effected modes.)
The difficulties
– All the USB cables used inside the Pi Ball had copious amounts of rubber/plastic on the connector ends. I used a knife and shaved off the excess to make them more flexible and smaller.
For more detail: Pi Ball – A Spherical and Interactive Raspberry Pi 2 Case