| Hardware components: | ||||||
 |
|
× | 1 | |||
 |
|
× | 1 | |||
|
× | 1 | ||||
|
× | 1 | ||||
| Software apps and online services: | ||||||
|
||||||
|
||||||
|
||||||
|
||||||
STORY
Introduction
There are some pretty cool smart doorbells out there, but they are expensive and the basic components of a wireless button, camera and a small computer are cheap! In fact the most expensive component in this project is the camera module, which is still a bargain at sub 20 USD.
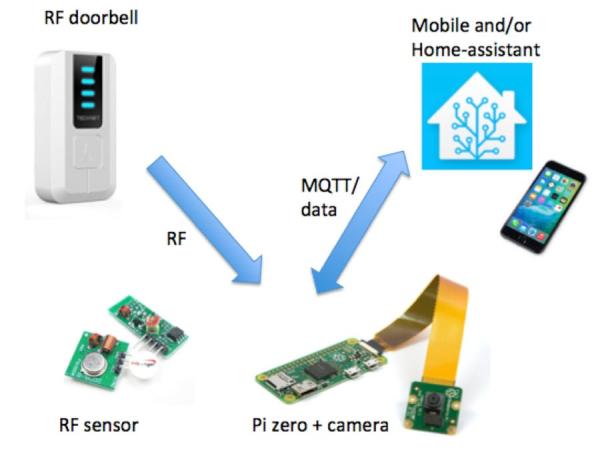
An overview of the system is shown in Figure 1. When someone pushes the doorbell button, the button module transmits a 433 MHz RF signal to a receiver (not show) which sounds a chime. However, the RF signal can be freely intercepted (not ideal for security but pretty convenient), and here an RF module attached to a Raspberry Pi is used to intercept the RF signal. On receiving the signal, the Pi takes an image using the camera. This image can then be sent as a mobile notification, for example using the Telegram app. In this project, I actually send the image to my home automation system, Home-assistant.
Hardware
Cheap wireless doorbells that communicate between a button and a chime via RF can be picked up for less than 10 pounds on Amazon, and I chose one (link) based purely on aesthetics, rather than any technical requirements.
Perhaps I got a bit lucky, since my doorbell was compatible with the Python module Rpi-rf that I used to interpret intercepted RF signals. I have subsequently bought RF devices that were not compatible with Rpi-rf, and I am not sure if this is because they used a custom pulse encoding (to avoid interference) or chipset. So be warned, some experimentation may be required unless you go for a device with known compatibility with Rpi-rf. However, if you already have a wireless doorbell bought in the EU/USA, chances are you can use it.
Raspberry Pis have WiFi and Bluetooth antennas built-in, but not 433 MHz RF. Luckily RF transmitter/receiver pairs are incredibly cheap, and I paid just over a pound for mine, including shipping! Rpi-rf explains the wiring to the Pi GPIO.
For the Pi camera, a wide range of options are available, and a old webcam could be used. Assuming you are using an ‘official' Raspberry Pi camera, follow the setup instructions here.
Hardware total costs (in pounds):
- Pi Zero W: 10
- Camera: 13
- Wireless doorbell: 9
- RF receiver: 1
- Home-assistant (optional): free!
- Total = 33 pounds
Install Software
I will assume that you are comfortable with the Terminal on your Pi, and highlighted text corresponds to commands entered at the Terminal. If you get warnings about permissions, add sudo before any command. I SSH into my Pi and use Samba (described later) to access the Pi file structure. Check the IP address of the Pi by logging in manually and running hostname -I which returns 192.168.0.21 in my case. I recommend setting a DHCP reservation on your router so that this IP doesn't change over time.
Before installing the packages required for this project I strongly recommend running sudo apt-get update and sudo apt-get upgrade to ensure your Pi firmware is up to date. We will also require the pip package manager, apt-get install python3-pip. We are going to need the Rpi-rf package installed with sudo pip3 install rpi-rf. If you want to follow this project and post images using MQTT then you need to install paho-mqtt and test the connection to your MQTT broker. Alternatively you could use requests to post images e.g. using the Telegram API.
The camera module is supported by the Rassbian OS so you will only need to install separate libraries if you are using a non-supported camera. Basic camera functionality is described here using raspistill. Test that your camera works by taking and viewing an image with sudo raspistill -o image.jpg and viewing the image. Within our python scripts we will make use of the camera module for which the docs are here.
To browse the files on the Pi remotely, I recommend you set up Samba file sharing and setup an Apache web server to share folders of images from your Pi over the network. However, neither of these are essential for this project since we will be posting the images to your mobile, but I do find it convenient to have Samba setup so I can view the Pi file structure when using SSH. Also using Apache it is convenient to be able to browse the captured camera images from the browser.
To setup Samba file share, if you have SSH to your Pi you can copy+paste code from this tutorial.
The Apache setup process is described here, and installation consists of running sudo apt-get install apache2 -y then pasting the IP of your Pi into the browser address bar on a remote computer attached to the network, you should see a splash screen if everything is working.
We next want to create a folder to save images. Apache creates its own folder structure at /var/www/html on the Pi. cd to this folder then make a folder for the camera images with the command sudo mkdir images and cd into this folder. Take an image with sudo raspistill -o test_image.jpg. You can now navigate to the folder via the browser to view the image on your remote computer.


