
Build a Semi-autonomous, 4WD Raspberry Pi Car with a camera stream!
Story
This is a guide on how to build my Pi Car!
When I first discovered the Raspberry Pi I was eager to learn electronics and coding in order to create cool gadgets. However, with no prior coding or electronic knowledge I didn't really know where to begin.
As a first project I decided I would build a Raspberry Pi Car.Whilst, along the way trying to learn the basics of the Raspberry Pi, Linux, Electronics and Python!
I have created this guide to help like-minded individuals (beginners) interested in learning the above. Providing links throughout to various guides and tutorials I found online when building my own Pi Car.
Ultimate Goal:
Build a Pi Car that has the following:
-4WD (Done!)
-Semi-Autonomous Capability (Done!)
-Camera Stream (Accessible over the Internet) (Done!)
-Automatically runs program on start up (WORK IN PROGRESS! 🙁 )
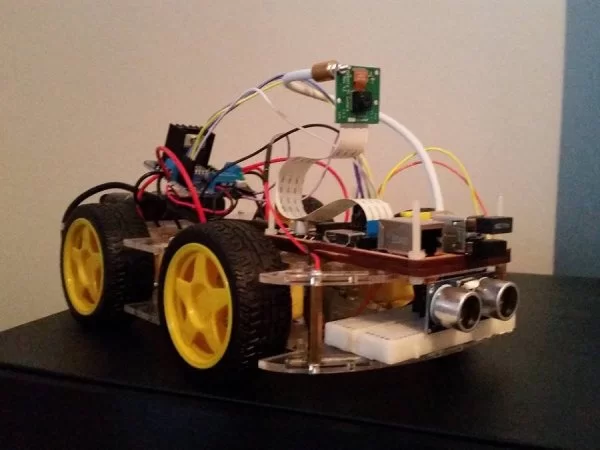
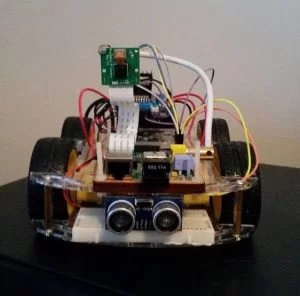
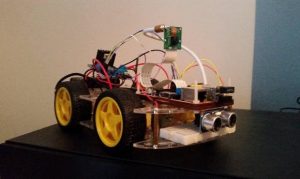
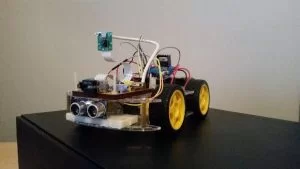
The Car (To Date!):
Building the Pi Car:
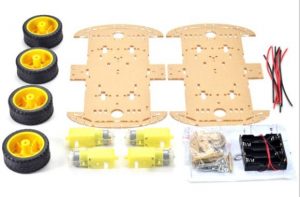
See the “Components and Supplies” list for the required parts to build this project.
1. Building the Chassis:
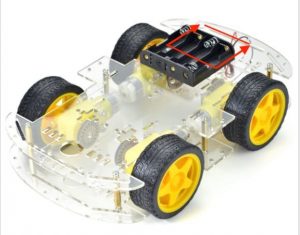
Assemble the chassis kit. This is rather straight forward but see the pre and post build pictures below for help.
Important: Before screwing the motors in place (exactly as positioned in the picture below) attach a red and black wire to each motor. The red wire needs to be attached top to of each motor, and likewise the black wire to the bottom. Secure these the connections tightly with insulation tape. You can solder these if you want a permanent connection.Lastly, remember to remove the brown cover from each plastic sheet.
In my build I moved the battery pack towards the end of the chassis to create more space (Indicated by the arrows in the photo below).
Next we will attach the 4 motors to the motor driver.
2.1 Connecting the wires:
See the pictures below to identify which motor is which, as well as a picture of the motor driver to clearly identify how to wire up each of the 4 motors. The list below also indicates how to wire each motor. For further help see the attached Schematics diagram.
Top Left Motor: Top Right Motor:
Red: Out 2 Red: Out 4
Black: Out 1 Black: Out 3
Bottom Left Motor: Bottom Right Motor:
Red: Out 1 Red: Out 3
Black: Out 2 Black: Out 4
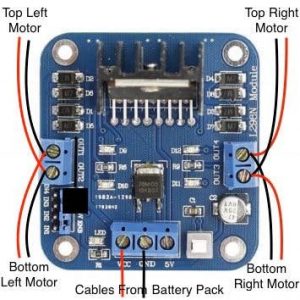
Important: For this project we will be connecting two wires into each ‘OUT' hole available on the motor driver. Screw each connection tightly to ensure the wires do not move.This can be rather fiddle process but take care to not to damage the wires. For cable management you can feed the wires through a number of the small holes built into the chassis.
2.2 Connecting the battery pack:
To connect the battery pack (already positioned on the chassis) to the motor driver connect the wires as follows:
Connect the Red wire into the VCC hole & the Black wire into the GND hole.
(See picture above for guidance)
Now all 4 motors are connected to the motor driver, we can add the Raspberry Pi and connect it to the motor driver aswell.
3. Connect the Raspberry Pi to the L298N Motor Driver
Before adding our Raspberry Pi we need to prepare it by following the steps:
3.1 Preparing the Pi:
1. Download Raspbian Jessie Operating Systems (OS) – AVAILABLE HERE
2. Format & Install Raspbian to SD Card – HOW TO DO GUIDE HERE
3. Insert the Wireless Internet & Wireless Keyboard USB Adapters into the Pi's USB slots.
3.2 Connecting to the L298N Motor Driver:
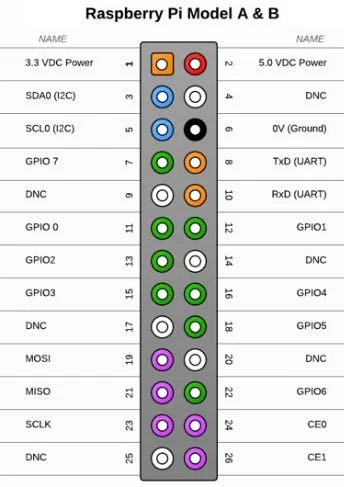
Once complete, we need position it at the front of the Pi-Car. (I was able to secure mine with some screws I had from a Pi-case) Next use jumper wires to connect the Pi's GPIO pins to the Motor Driver.
Connect the Pins as listed below:
GPIO Pin 2 to 5V (Use Female-to-Male Jumper Wire)
GPIO Pin 6 to GND (Use Female-to-Male Jumper Wire)
GPIO Pin 7 to INI4 (EVA)
GPIO Pin 11 to INI3 (5V)
GPIO Pin 13 to INI2 (5V)
GPIO Pin 15 to INI1 (EVB)
For help identifying the pins of the Pi see the picture below.
For help identifying the pins on the motor driver see the Picture above.
Now the Pi is positioned we need to add the Ultrasonic sensor.
4. Adding the HC-SR04 Ultrasonic Distance Measuring Sensor Module
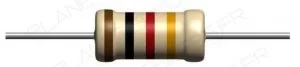
Attach the sensor module and wires to a breadboard as shown in the picture below. Ensure to include the 1ohm resistor as this will protect your Pi. (See other picture below of which resistor to use)
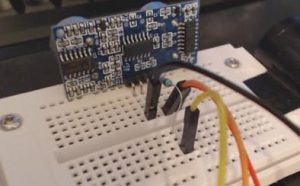
Once completed, position the breadboard at the front of the car, on the bottom layer.
4.1 Wiring the sensor to Pi:
Connect the wires on the breadboard to the Pi and Motor driver as follows:
Echo Cable (Yellow Cable in picture above) to Pin 16 on the Pi (Using Female-to-Male Jumper Wire)
Trigger Cable (Orange Cable in picture above) to Pin 12 on the Pi (Use Female-to-Male Jumper Wire)
Ground Cable (Black Cable in Picture above) to GND on the motor driver (Use Female-to-Male Jumper Wire)
Power Cable (Red Cable in Picture above) to 5V on the motor driver (Use Female-to-Male Jumper Wire)
See the pictures of the Pi and the motor driver if you need help identifying which Pins are which.
Congratulations! You should now have all of the necessary cables plugged into the motor driver! With 1 cable going into the VCC (From the battery pack), 3 cables entering the GND (1 from Battery Pack, Raspberry Pi and Ultrasonic Sensor.) and 2 cables entering the 5V (1 From the Pi and 1 from the Ultrasonic Sensor).
5. Adding the camera to the Pi:
Watch this fantastic Pi Camera Guide on that will will provide:
-An overview of the camera itself
-How to connect the camera module to the Raspberry Pi
-How to enable the camera module on the Pi Itself
-Basic commands to use the camera (i.e how to take pictures and videos)
On my build I used the ‘Scorpi / Flexible Mount' cable to help secure the camera in position.
6. Position the power pack:
Position the portable charger at the back of the chassis, on the bottom layer. I used an elastic band to help temporarily secure the charger in position whilst in use.
Setting up the Pi Car:
Now the car is built we can now develop the software for the Car.
1. Preparing the Pi:
Ensure the following are connected to the Pi before turning it on:
– Wireless Keyboard USB adapter
– Wireless Internet USB adapter
– HDMI cable to a monitor/TV.
-The camera should also be connected.
2. Turning on the Pi:
To power on the Pi connect the micro-USB cable from your power source into the Pi. The Pi will take a few minutes to boot the first time around. Once completed, the graphical user interface (GUI) will load automatically.
3. Configuring the Pi:
First thing we need to do is configure the Pi. To do so click:
Menu (Top Left of the Screen)>Preferences>Raspberry Pi Configuration
The following window will open:

Click ‘Expand filesystem' to ensure we use all of the available memory on our SD Card. (Feel free to change your password etc.)
Next, click the ‘Interface' tab and enable the camera (Ensure the SHH is enabled too.)
Then, click the ‘Localisation' tab and set the language and country to your preferences.
Click ‘Ok' and reboot the Pi.
4. Connecting to the internet:
Once the Pi reboots, click the ‘Network' icon located at the top right of the screen.
Select your router from the drop down menu and enter it's password.
5. Updating the Raspbian OS:
Now we are connected to the internet we can update our OS to its latest version. To do this open the ‘Terminal' and enter the following codes separately:
sudo apt-get update

sudo apt-get upgrade
(For the second command enter Y when prompted)
Both may take a few minutes to complete and once complete reboot your Pi.
6. Installing VLC:
VLC is the application we will use to stream our Raspberry Pi camera to the internet. We need to install this on both the Pi and the computer/smartphone you will want to view the camera stream from.
On the Pi:
Enter the following code into the terminal:
sudo apt-get install vlc
(Enter Y when prompted)
On the client computer/smartphone:
Go to: http://www.videolan.org/vlc/index.en_GB.html and download the appropriate version for your OS. (Windows/Mac/Android)
7. Creating the Files:
Now our Pi is up-to-date and we have all the required applications can create the code that will actually drive the car.
First, we will create a folder to house our files. To do this we enter the following command into the terminal:
mkdir PiCar
This will create a folder called ‘PiCar' – feel free to name this whatever you like.
Now the folder has been made we need to move into it by typing the following the command;
cd PiCar
Now we need to create the python files that will actually drive the car:
7.1 main.py – this will be the main file we run to drive the car
To create an empty file type the following command into the terminal:
sudo nano main.py
This will open up a new file within the Raspberry Pi's text editor. (Called Nano)
Now either copy or type the code, available in the attached main.py file,into this empty file.
7.2 sensor.py – this file will initialise the Ultrasonic sensor.
Complete this process above again for the sensor.py file. Remember to create the file first using the following command;
sudo nano sensor.py
(Ensure you create this whilst within the PiCar folder we created)
7.3 camera.sh – this file will stream our camera over the internet.
Create the file first using the following command;
sudo nano camera.sh
Now either copy or type the code, available in the attached camera.sh file, into this empty file.
Congratulation the car is now complete!!!
How to play with the car/Run the code:
1. Power on the Pi (with HDMI cable connected to a monitor)
2. Once booted, open up Terminal
3. Change directory to PiCar (Type cd PiCar)
4. Run Car File (Type ‘sudo python main.py')
5. The PiCar is now running and controllable via the wireless keyboard (Remember to remove the HDMI cable before driving the car!)
The below keys will drive the car:
W = Forward
S = Reverse
A = Turn Left
D = Turn Right
P = Stop
The Pi will also be semi-autonomous in the sense that if anything gets within 15cm of the front sensor then the PiCar will automatically reverse for a second.
Streaming the Camera (Optional):
On the Pi:
1. Open Terminal
2. Change directory to PiCar (Type cd PiCar)
3. Run camera.sh (Type ./camera.sh)
On the Client computer/smartphone:
1. Launch VLC
2. Click ‘File' and then ‘Open Network Stream'
3. Type http://<YourIPAddressHere>:8554/
4. Click ‘Open' and after a few seconds a new window will open with the stream.(There may be a few seconds lag)
Important: To find out your IP address enter the following command into the terminal:
hostname -I
For further help the fantastic guide below on how to stream the Pi's camera:
http://www.mybigideas.co.uk/RPi/RPiCamera/
Next Steps/FutureObjectives:
1. Get main.py file to automatically run on start-up (So i don't need to plug the Pi into a monitor overtime)
2. Create a python file that will perform the same action as our camera.sh bash script (using Picamera) and incorporate this into our main.py file.
3. Add additional ultrasonic sensors (Definitely one at the back and perhaps another at the front)
Any advice/feedback is extremely welcomed!
Further Reading:
The following is a list of guides/books/tutorials that I found extremely useful when looking to learn about the Raspberry Pi, Linux and electronics for the first time.
Raspberry Pi:
Raspberry Pi Website – Guides on installation, configuration and Usage
Camera:
Guides to setting up and using the Raspberry Pi camera module
Linux:
20 Useful Commands for Linux Newbies
Installing applications
Guide on how to Install Applications on the Pi
Advanced Package (Application) Management Commands
Motors:
Source:Pi Car