
I'm moving and will no longer have room for all my classic systems like my NES, SNES, Genesis, etc, so the first thing I think is that I can just play the games on emulators on my PC. But still, I love the experience of sitting back on the couch and playing with a controller, so where's the happy medium? The PiStation! Essentially, I am removing all the parts from a PlayStation 1 and replacing them with a Raspberry Pi, although I still want the new system to function almost perfectly like it's own system, with original buttons working and all. I've seen this done with other systems, but not with the PS1, so I thought I'd give it a try. I picked up a used PS1 for cheap at GoodWill and got started.
You don't have to follow my project exactly, but if you do want to, here's what you'll need:
- Raspberry Pi
- 4GB or larger SD card
- Used or Broken PlayStation 1
- Two Playstation 1/2 Controllers
- PS2 to USB Converter Adapter
- Micro USB cable (NOT mini!)
- USB Power Brick
- Short USB extension cable/USB hub
- An ethernet extender + fairly short ethernet cable
- Soldering Gun
Above is a quick demonstration video showing the final product.
Step 1: Setting Up The Pi
Now this guide isn't about the software end, only because there are so many tutorials that explain it better than I could, but I will give a quick explanation, as well as link you to some of my favorite tutorials. I'll do my best to answer any questions about this process as I can, I'm just not posting it here so I don't have to reinvent the wheel.
Just know that you will need to download the newest release of the RetroPie Project SD-card Image, and burn that onto a bootable SD card of 4GB or more. Once you insert the SD card into the Pi, you can follow any of these guides along the setup process. It will take some time, but once you're done you can change the boot screen to my custom PiStation boot up screen if you'd like to stick with the whole PlayStation theme. Download boot screen here.
Some of the most helpful tutorials:
- Life Hacker – How to Build an All-In-One Retro Game Console for $35, the Easy Way
- SuperNintentdoPi – An A to Z Beginners Guide to Installing RetroPie on a Raspberry Pi
- Libre Geek – RetroPie Installation Guide For The Raspberry Pi
I recommend you use paste this code into your RetroArch.cfg file so you can exit your games by holding Select + Start, as well as saving by Select + L2, and loading by Select + R2:
input_enable_hotkey_btn = 8
input_exit_emulator_btn = 9<br>
input_enable_hotkey_btn = 8
input_save_state_btn = 4

input_enable_hotkey_btn = 8
input_load_state_btn = 5
Assuming everything is working fine, and you have figured out how to put ROMS onto the Pi, then you can continue.
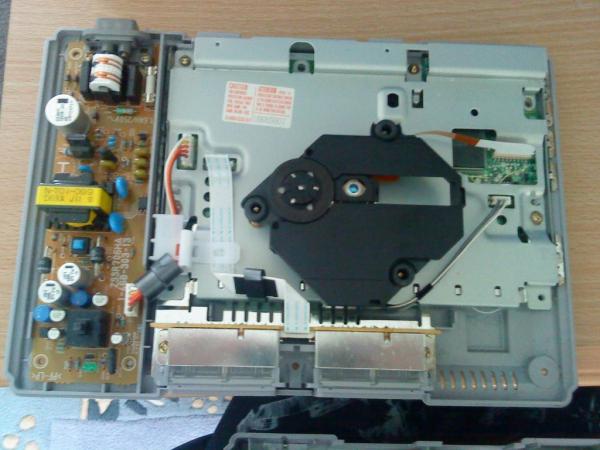
Step 2: Taking Apart the PlayStation
You're going to need to unscrew all six screws out of the back of your PlayStation and remove the casing. You can unscrew everything on the inside and remove it from the shell, but just make sure you keep the internal power brick off to the right, and the controller/memory card ports on the front – you'll be using these later.
Step 3: The Power Cable
In case you weren't aware, Raspberry Pi's do not have on/off switches, they power on as soon as they receive power. Because of this, we can use the original PS1 power switch as the switch for the Pi. The first thing you're going to want to do is drill holes above and underneath where the original board sits so we can get the USB cable coming in from the back, as well as the micro USB cable coming in from the side. I also popped one of the two metal prongs from the original AC port out, then threaded the powered USB cable through it, it took a little bit of drilling to make the hole big enough. You're going to want to plug the “Power USB” (the black one in my first picture) into a USB power brick that would usually charge your phone (as long as it is 5 volts).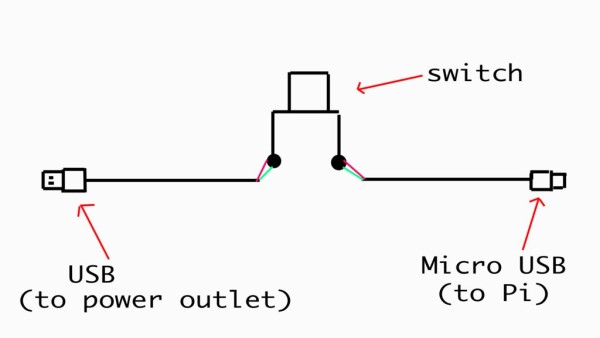
Then take the two micro USB cables and strip each one on the necessary side to make a connection from the USB power brick to the Pi if they were to be connected. Thread them through the holes and solder both cables to each side of the PS1 power switch from underneath the board. Use a voltammeter to test which solder points are connected by the switch. If you solder it right, when the usb is plugged into the wall, the Pi should only receive power when the PS1 switch is pushed in.
When you're all done, neatly tuck all the cables under the board and place the board back into the case. You can screw the AC port back down into the case to hold the board down.
Step 4: Connecting the Controller Ports
After you configure your PS1 controllers to work on your Pi with the USB adapter, you'll want to make it work off of the original controller ports. Don't forget you can unscrew the controller/memory card ports from the casing to make it easier to work with. Now, you'll want to unscrew the three screws on the back of the PS to USB adapter (ones hidden by a sticker). There are 9 solder points for each controller port, and you'll want to solder cables into the back of each port, and then match it to the corresponding solder point on the back of the original ports. I recommend you only solder one controller port at first, then test it with your Pi before doing the second port. Not every pin in a PS1 controller port is necessary for this project, but for the sake of accuracy I soldered them all just in case.
For more detail: PiStation – A Raspberry Pi Emulation Console