
Station to perform WiFi network audits, using Raspberry Pi Zero W and Raspberry Pi 3, with connection from the BT or mobile data cell phone.
Story
A station to perform WiFi network audits, using Raspberry Pi Zero W and Raspberry Pi 3, with connection from the BT or mobile data cell phone.

Always use technology for improve the world, if you are a black hat or gray hat hacker please abstain at this point ……… or at least leave your likes to make me feel less guilty XP.
Table of Contents:
- Introduction
- Materials
- BT Module
- Raspberry Pi Setup
- Software Setup
- Make Portble
- SSH Setup (Optional)
- References
Introduction:
In today's world, computer security is one of the main concerns of people and companies, but we are certainly exposed to attacks by black hat hackers, who only seek to do evil and use their skills to do wrong to companies, people or even you.
So it occurred to me that it would be incredible to be able to perform security tests of wireless networks through a simple system such as a Raspberry Pi, however one of the great disadvantages of these is the need to use display systems such as HDMI screens and keyboards to insert the commands.
In this case the project explains how to make a system based on a Raspberry Pi Zero W with a Bluetooth Serial or WiFi SSH to a smartphone, so that it is possible to write the commands on the console using the smartphone.
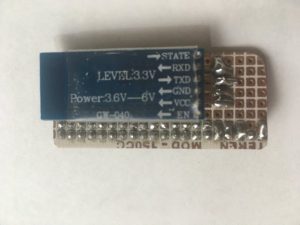
BT Module:
The first thing to do would be the module for Bluetooth communication with the Raspberry Pi, for this we must first configure the name and baud rate of the Bluetooth module to 115200 baud, since the Raspberry uses this transmission speed.
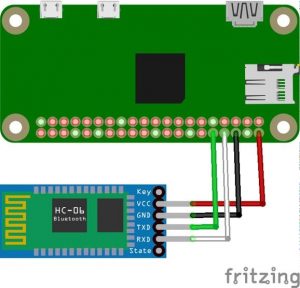
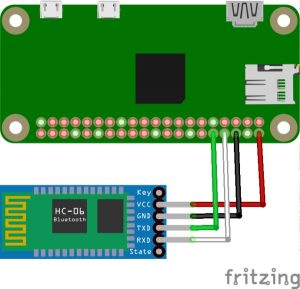
- We connect the serial ttl to the module Rx to Tx (Green), Tx to Rx( White), Vcc to Vcc (Red) and GND to GND (Black).

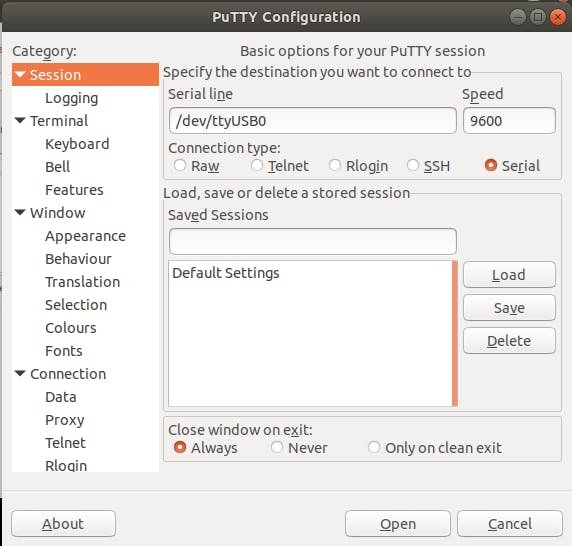
- Once connected we open the serial monitor that we have installed for example Putty (https://www.putty.org/).
- AT (to confirm that the module is receiving the commands.)
- -> Answer: OK
- AT+NAMEdevicename (to confirm that the module is receiving the commands.)
- -> Answer: OKsetname
- AT+PINyourpin
- -> Answer: OKSetpin
- AT+BAUD8 (115200 Baud Rate)
- -> Answer: OK115200
- Once we connect to the interface at 9600 baud (Default Baud Rate), we have to send the following commands to the Bluetooth, all commands are sent in uppercase and without NL or CR.
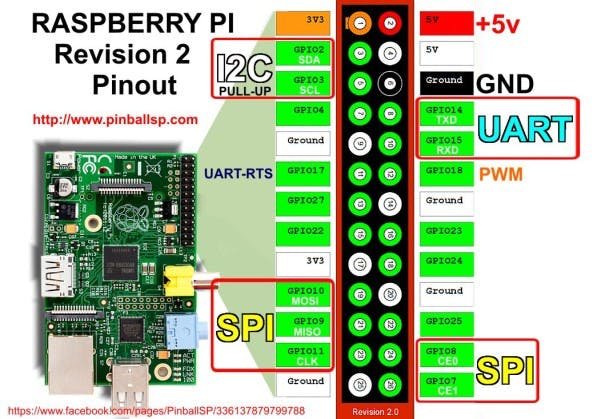
Since we finished these configuration, we will do this through the UART port that has the Raspberry Pi, as shown in the following diagram.
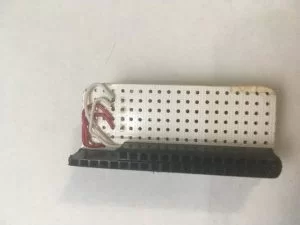
I recommend that you make the circuit on a breadboard PCB, as shown in the following 2 images, this in order that the module can be transported without cables being disconnected by movement.
Raspberry Pi Setup:
For the configuration of this tutorial we will use the Raspberry Pi Zero W, due to its small size, low power consumption and ease of use, however it is possible to use a Raspberry Pi 3, but you will have to use a much more powerful power bank, besides that the size is much bigger.
- You can install if you want the desktop version but it is best to use the liteversion to improve the performance of the Raspberry Pi Zero W.Download “RASPBIAN STRETCH LITE” from https://www.raspberrypi.org/downloads/raspbian/.
- Flash Raspbian on the sd card as indicated on the official page. https://www.raspberrypi.org/documentation/installation/installing-images/README.md
- Once the operating system is in the SD card, 2 disc partitions will be created in the SD card, we enter the one called “boot”.
- Open the file called config.txt
- At the end of the file put the following text “enable_uart = 1” and save.
- Download the two files in the Files folder and copy them to the “boot” partition,.
- Since both files are in “boot”, open the file “wpa_supplicant.conf” and replace the ssid and psk (password), with your network name and password without removing the quotes.(Below I show the example.)
country=us
update_config=1
ctrl_interface=/var/run/wpa_supplicant
network=
{
scan_ssid=1
ssid=“networkname”
psk=“password”
}
- We do this to activate serial communication for the Bluetooth module and communication via SSH (iPhone compatibility). However, it must be clarified that if the station is used through SSH, we must configure the wpa_supplicant.conf configuration with the shared network of the smartphone.
Note: I recommend that you first do the configuration with your home network because you have to download files.
Software Setup:
- Connect the SD card in the Raspberry and the connection to the power.
- Wait 3 minutes for the operating system to finish configuring.
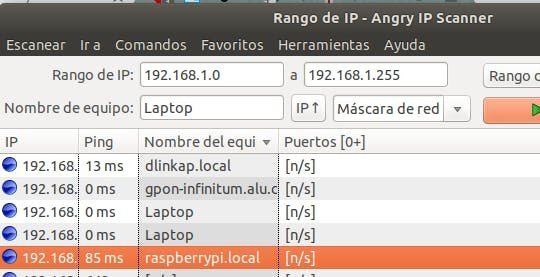
- Open the Advanced IP Scanner or Angry IP Scanner program and perform a full search, you can identify the Raspberry because it appears as shown at the bottom.
- Since we are in the Linux command console, we need to put the following commands (This process may take a long time depending on the internet connection).
sudo apt-get -y install libssl-dev libnl-3-dev libnl-genl-3-dev ethtool
sudo apt-get install aircrack-ng
sudo apt-get install wifite
- Once the IP is found, we open “Putty” program and put the ip in the box that says “Host Name” and press “Open” in the box below.
- When the word “login” appears, you need write “pi” and press the enter key, for password you have to put “raspberry” and press enter.
- Once we have finished this, we can start to make tests with the raspberry.
Note: DONT DO “sudo apt-get update” or “sudo apt-get upgrade” as this may corrupt the operating system and ruin the entire previous process.
Make Portable with Bluetooth Connection:
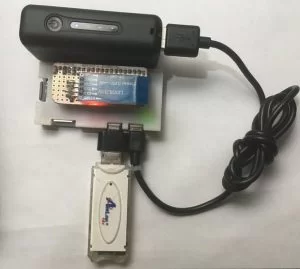
Connect all the hardware:
- Raspberry Pi
- Network card
- Bluetooth module
After:
- Connects the Raspberry to the power bank.
- Once this is done it configures the connection to the Bluetooth module from the Bluetooth configuration of each cell phone (only valid in Android).
- Once the configuration is done, open the Bluetooth Terminal app and elect the points in the upper right corner, press the “Setup” option, select the option “Append newline(\r\n)”, press “save”.
- Select the points in the upper right corner, press the option “Connect a device – Secure” and select the device.
- Note: the module may require several attempts to connect, keep trying if it does not connect.
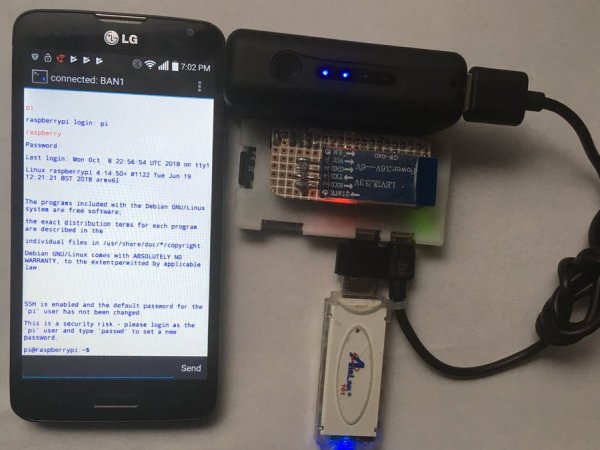
- Since I connect, we will type “pi” and then press “Send”.
- Then we write “raspberry” and press “Send”.
- You will notice that the Linux command console appears.
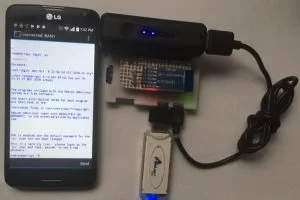
If all the previous steps were done correctly, CONGRATULATIONS you already have your own portable station to audit WiFi networks!
SSH Setup (Optional):
There are several ways to find the IP of the Raspberry at this point this only has to be done once.
- Option 1: Since the “wpa_supplicant.conf” file is modified, we will connect from the pc to our hotspot and analyze the cellular network in such a way that we find the IP of the Raspberry.
- Option 2: We connect the BT terminal from an Android device and type “hostname -I” to find the IP.
- Option 3: We connect the Raspberry to a screen, once it opens the terminal, we type “hostname -I” and it gives us the IP.
- Option 4: We connect the USB TTL that we use to configure the Bluetooth to the Raspberry, we initiate session typing “pi”, “raspberry” and once in the terminal of Linux put “hostname -I” to obtain the IP.
- At this point we have activated the SSH on the Raspberry, now we will use that configuration to make a connection from the mobile data of the cell phone.
- First we will have to configure the “wpa_supplicant.conf” of the Raspberry for the ssid and the key that we have in our “personal hotspot”.
- Since we have the IP, we enter MobileSSH or WebSSH as the case may be and we initiate session in the Linux terminal.
An example of the device running with the iPhone's mobile hotspot and running Wifite on an SSH console.
Schematics
Source: Portable Hacking Station RPI Zero W (Like Watch Dogs)