
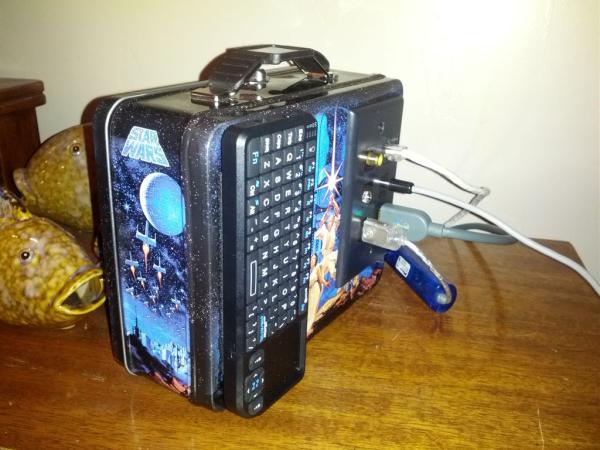
I wanted a portable XBMC system. I want to take this in my trailer camping, to hotels, friends house etc. Basically this is a Raspberry Pi running XMBC, powered USB hub, 2.5″ USB SATA enclosure with a 250GB laptop drive. This case needed to be all self enclosed. I can carry all the cables and accessories.
Parts List:
- Mini lunch box $10 http://www.amazon.com/Star-Wars-Galaxy-Embossed-Ca…
- 6 panel keystone panel $1 http://www.cablingplus.com/products/ic107f06bk-bla…
- Low voltage device ring $2.50 http://www.amazon.com/Arlington-LV1-1CS-Voltage-Mo…
- HDMI keystone jack $11 http://www.cablingplus.com/products/ic107hdmbk-bla…
- USB keystone jack $2.50 http://www.cablingplus.com/products/ic107uaawh-whi…
- Power barrel plug keystone jack $7 http://www.pimfg.com/Product-Detail/P-KS-POWER
- Cat5 keystone jack $2.50 http://www.cablingplus.com/products/ic1078e5bk-icc…
- RCA keystone jack $3 http://www.cablingplus.com/products/icc-ic107r8gbk…
- They do have yellow. Some reason not on their site. Call them.
- 3.5 mm Phono keystone jack $3.50 http://www.cablingplus.com/products/ic107sapbk-bla…
- 2.4Ghz Mini Wireless Keyboard w/ Touchpad $16 http://www.amazon.com/FE01-BL-Wireless-Keyboard-Mo…
- 2x Plastic DVD covers $2
- 4x Stand offs $1
- 2x Ball point pens $1
- 4x 3″ bolts w/ nuts $3
- Raspberry Pi Model B $35 http://www.newark.com/raspberry-pi/raspbrry-modb-5…
- SD card 16GB 40x $10 http://www.amazon.com/Sony-Class-Memory-SF16UY-TQ…
- Edimax USB wifi dongle $10 http://www.amazon.com/Edimax-EW-7811Un-Wireless-Ad…
- 7port USB powerd hub $14 http://www.monoprice.com/Product?c_id=103&cp_id=10…
- 5v / 2.1A power supply (iPad charger) $10 https://www.amazon.com/s?k=5v+%2F+2.1A+power+supply+%28iPad+charger%29&ref=nb_sb_noss
- 2.1mm Barrel plug
- 4 port USB hub (non powered) $5 http://www.amazon.com/Targus-ACH74US-Ultra-Mini-4-…
- Mine seems a bit expensive. Any cheap one will do.
- 2.5″ HD 250GB $45 http://www.amazon.com/Blue-250-Mobile-Hard-Drive/d…
Cables
- HDMI 3′ flat cable $7.50 http://www.amazon.com/Aurum-Flat-Ethernet-Supports…
- Phono to RCA Red/White
- RCA Video Cable
- USB cables with various ends to hack together for custom cables
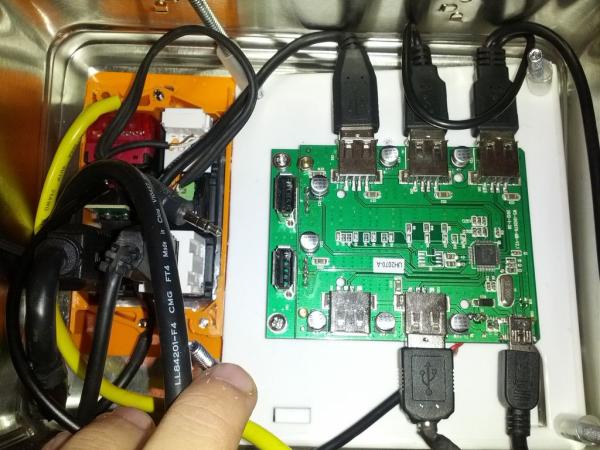
* For some reason my USB hub quit driving my hard drive. I tested everything and swapped it out. I used a 4 port hub with a 2.6A power supply. This seems to power the hard drive fine. This new hub had vertical ports. I unsoldered the ports and directly soldered wires in their place. This lowered the profile.
Step 1: Prep the lunch box
I used a mini lunch box. The dimensions are approximately 7-5/8″ x 6″ x 2-3/4″H
Cut metal and install keystone panel
- Determine where to put the keystone panel.
- Mark jack panel with sharpie marker
- Dremel out the rectangle
- Press in the keystone panel
- Mark holes for screws
- Drill holes
- Remove screws and extra plastic from low voltage device ring
- Place low voltage ring inside and screw faceplate to ring
- This is to make a securely sandwich the metal. Cables tend to tug.
- Screw panel into ring
Attach keyboard
- Velcro the keyboard to the back of the lunch box
Step 2: Build triple stack for Pi and Hub
I went though several orientations of the Pi and hub. This required that I have an easy way to change configurations and move the devices until I got the perfect orientation. I used plastic DVD covers. The width and length of the DVD cover worked well with the mini lunch box. I may redo this with acrylic now that I have the desired pattern.
Prep the DVD covers
- Trim clear plastic cover (what holds the paper)
- Split DVD case along seams
- Cut the DVD cover to length. Ideal is to snugly press against the low voltage device ring.
Mount components
- Screw standoffs on the Pi and Hub
- Orient Pi and Hub on their respective DVD plastic
- Mark stud location
- Exacto a X on the stud location
- Press stud in the X
* This will securely hold the component yet allow you to easily more the mount point if needed. Figuring out exactly where the Pi and Hub go and how they are oriented can be determined by the amount of space the cables take and your desired cable path.
Assemble the stack
- Measure the depth of the lunchbox. Mine would fit 3″ bolts.
- Measure the spacers needed between each stack
- Cut ball point pen tupe to length
- Mark and drill holes for bolts
- Thread bolts through holes and screw nut on top
Velcro HD
I wanted the hard drive removable so I could copy new data to it.
- Add large strip of velcro to top of stack and HD enclosure
Step 3: Custom cables
The lunch box is oriented. The keystone panel is installed. The component stack is cut to fit and slipped in. Now we have to make lots of custom cables.