INTRODUCTION
This project will show you how to control the rotational direction of a small motor without using any mechanical relays. The Texas Instruments L293D dual H-bridge IC has two separate control circuits and can control two conventional DC motors or one stepper motor. In this project we use one half of the IC to drive a single DC motor.
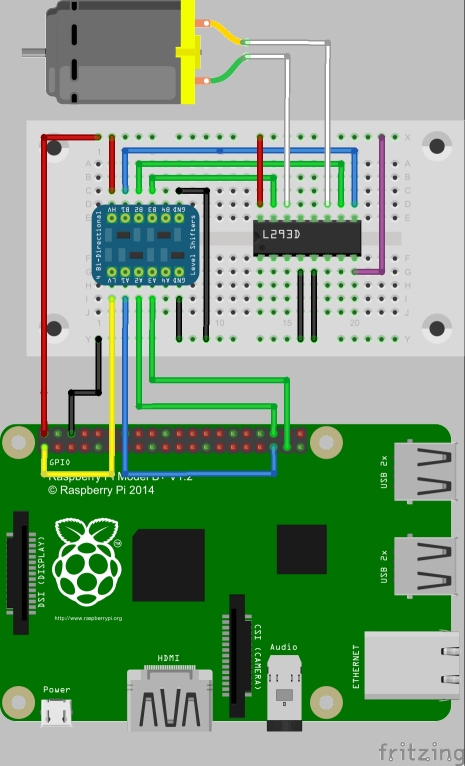
The Raspberry Pi controls the motor by setting the voltage on two of its GPIO output pins. These in turn connect through a logic level converter to the inputs of the L293D, which controls the motor.
- 00 and 11 both mean stop – no output voltage
- 01 means supply current to the motor in one direction
- 10 means supply current to the motor in the opposite direction
I have tried to avoid the temptation to use forwards and reverse because these words are too prescriptive and the direction of the motor clearly depends on how you have connected it up and how you define true forward and reverse for your application. The connections between the Pi, breadboard, ICs and motor are shown here. You can find the specification for the L293D IC on the Texas Instruments website. For a more precise diagram on exactly how to connect the L293D, please have a look at here.
The colour-coding for connections is:
- black – 0V or GND
- yellow – 3.3V for the logic level converter
- red – +5V for logic
- purple – +5V for motor supply – in this instance, fed from the Pi's 5V supply, though if you were driving a 12V motor this is where you would connect an external power supply
- blue – Enable/Disable signal
- green – 2-bit control signals

For more detail: PROJECT – CONTROLLING A MOTOR – FORWARD AND REVERSE SWITCHING


