
To keep the price of the raspberry pi down the developers left out some of the essentials one of those is the real time clock. At the moment the raspberry pi gets it time over the Ethernet from updating the time automatically from the global ntp (nework time protocol) server, but this means that when the Ethernet is unplugged and the Raspberry Pi Powered Down the raspberry pi has no way to keep the time or retrieve the correct time when powered back up again, for some applications this is unacceptable, but don't stress it is simple to add a real time clock to keep the time i will show you how in this simple tutorial with open source hardware that you can use for yourself.
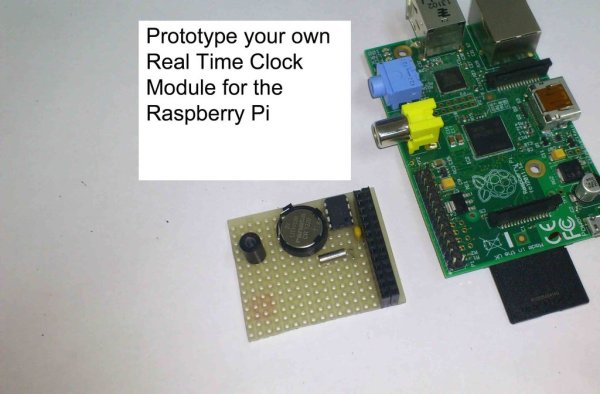
Step 1: Components
* Raspberry Pi
* DS1307 DIP8
* Raspberry Pi connector Spark fun part # 11765 or equivalent
* Battery 1220 3v
* 1220 Battery holder
* Crystal 32.768kHz
* Prototyping Board
* 11mm spacer
* 2 screws
* Solder
* Multicolored flexible wiresTools
* Wire cutters
* Soldering iron
* Drill
* Grinder ( optional )
 Datasheets.zip1 MB
Step 2: Schematic

Step 3: Make the circuit board
Step 4: Set Up the I2C Bus for the Raspberry Pi
I2c on the Raspberry Pi is disabled by default to enable it
Open the raspi-blacklist.conf file by running the command
sudo nano /etc/modprobe.d/raspi-blacklist.conf
Find the I2C line where the I2c is black listed
blacklist i2c-bcm2708
Comment it out by replacing it with the line below
#blacklist i2c-bcm2708
2. Load the required modules at startup.
The Raspberry Pi also needs the following I2c module to be loaded on start up
Open the modules file by running the command
sudo nano /etc/modules
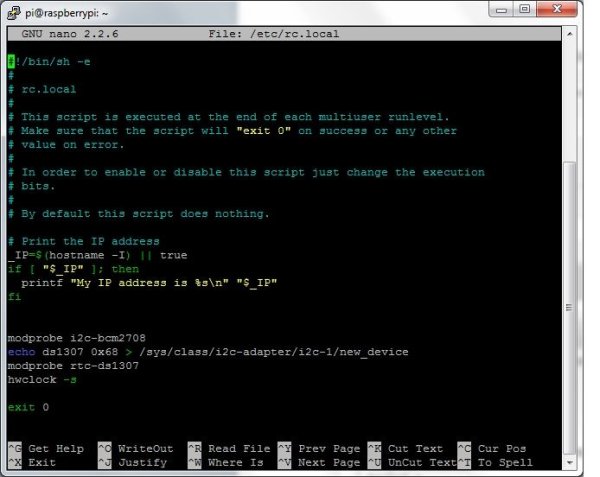
Add the following line at the end
i2c-bcm2708
i2c-dev
rtc-ds1307
For more detail: Prototype and configure your own Real Time Clock module for the Raspberry Pi ( Open Source Hardware and Software Configuration)