RaspbAIRy – the RaspberryPi-based Airplay speaker

With the delivery of my second RaspberryPi I finally got the chance to start this long-planned project:

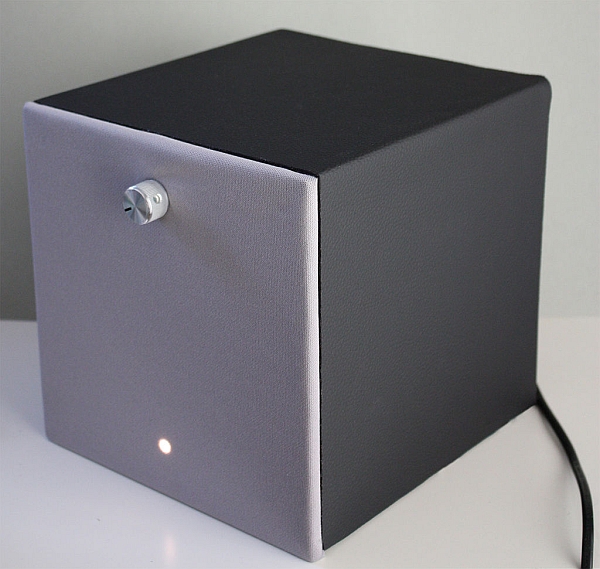
I wanted to replace my old bathroom radio with a  more contemporary device by building a network-enabled speaker. Because I'm a user of several iDevices, the idea of making the speaker AirPlay-compatible became the basis of my further work.
After some googling I discovered James Laird's amazing shairport client for Linux. The initial installation on the RasPi worked like a charm, so I decided to take the project one step further by making it wireless. With a little help from Google again and some twiddling I finally got it to work and started writing this Instructable.
the RaspberryPi-based Airplay speaker
Have fun reading how it all went down and maybe build your own version of the raspbAIRy.

Step 1: Parts & Tools

This Instructable is based on the metric system and originates from Germany, thus dimensions are in millimeters and line voltage is 220V. I got most of the parts at my local electronics retailer or already had them laying around. The RasPi was ordered online at Farnell, the speaker cloth was found on eBay and the MDF was bought and already cut in width at a local hardware store.
  • RaspberryPi
RaspberryPi Model B with SD Card
Supported USB WiFi Adapter, like my LogiLink Nano Adapter
220V AC to 5V DC power supply
  • Sound
3,5W Mono Amplifier, in my case a Kemo M031N
Broadband speaker
White LED, 5mm
5x 475Ω resistors
2x 20kΩ resistors
10kΩ rotary potentiometer with knob
Power switch
Dip switch
3,5 mm audio socket and cable
220V AC to 12V DC power supply
Cable with power plug
  • Case
250 x 250 mm speaker cloth
1500 x 200 x 5 mm Medium Density Fibreboard (MDF)
600 x 200 mm artificial leather
Wood glue
  • Tools
Saw
Screwdriver and screws
Soldering iron and solder
Stapler
Other typical workshop equipment
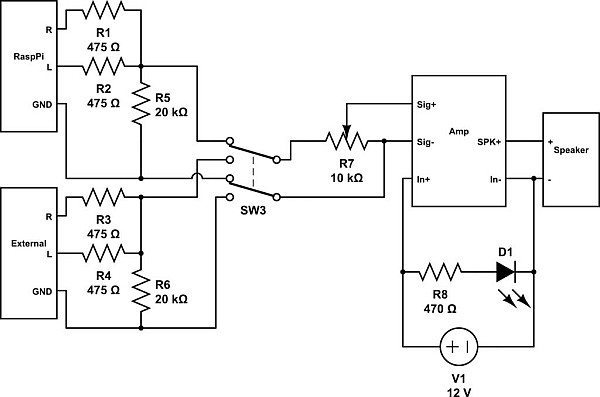
Step 2: Electronics

  • Stereo to Mono
Following the great guide of Dennis Bohn “Why not Wye“, I chose to integrate an easy summing circuit or actually two, one for each audio input.
  • Input Switch
A simple dip switch (ON-ON) for selecting the audio input for the amp. I added this to be able to connect other audio sources and to use the device as a ‘normal' speaker, independent from the RasPi.
  • Mono Amp and speaker
The selected amplifier was wired according to the datasheet. Basically it accepts input voltages from 5 to 12V DC and a mono input signal through an optional potentiometer for volume control. I connected a 8Ω broadband speaker, which sounds surprisingly good for only 10€.
  • Power Supply
I chose to integrate two separate power units to be able to independently turn off the amp/speaker while keeping the RasPi running. This is mainly due to the boot time of Raspbian of about 30-40 seconds. Because I had them laying around I used two plug-in adapters, one providing 5V DC (max. 2500mA) for the RasPi and the other providing 12V DC (max. 1500mA) for the whole audio setup.

Step 3: Installation

  • Raspbian ‘wheezy'
After downloading the official image and following these easy steps, the RasPi was set up in a few minutes.
The following steps require some basic command line skills but if you stick to the linked tutorials you should be good.
  • Shairport
I found two different documentations to be of great help, one in English and one in German. These include nearly the same steps:
  1. Install some packages and their dependencies, that shairport uses, via apt-get
  2. Get shairport and the perl module Net::sdp via git
  3. Install shairport as a service and make it run at startup
  • Wifi
Support for some Wifi chipsets is already included in Raspbian. I found a USB Adapter with the RT5370 chipset for a few bugs at a local electronics store. In addition to its Linux ability it is also very economical on power. It therefore can be driven on one of the onboard USB ports of the RasPi. Avideo tutorial from Adafruit then did the trick for me.
the RaspberryPi-based Airplay speaker scemetic
  • Here is what I did (commands in italic):
  1. Updated apt-get
    • sudo apt-get update
  2. Installed vim (personal preference)
    • sudo apt-get install vim
  3. List USB devices to get infos on wifi dongle
    • $ lsusb
  4. Installed Ralink-Firmware
    • $ sudo apt-get install firmware-ralink
  5. Modified the interfaces config
    • $ sudo vim /etc/network/interfaces
    • auto lo
      iface lo inet loopback
      iface eth0 inet dhcp
      auto wlan0
      iface wlan0 inet dhcp
      wpa-ssid “my_ssid
      wpa-psk “my_password


For more detail: RaspbAIRy – the RaspberryPi-based Airplay speaker


About The Author

Ibrar Ayyub

I am an experienced technical writer with a Master's degree in computer science from BZU Multan University. I have written for various industries, mainly home automation and engineering. My writing style is clear and simple, and I am skilled in using infographics and diagrams. I am a great researcher and am able to present information in a well-organized and logical manner.

Follow Us:
LinkedinTwitter
Scroll to Top