
Intro & Parts List
This tutorial was designed to help you build an in-car infotainment system or carputer using a Raspberry Pi, and a few other components. The concept was something that I found when I got my first Raspberry Pi for a class, and was exploring some of the things that could be done with it. I kicked around the idea, and made a few steps towards it, but I never got serious about it until I took a Microcomputer Interfacing class at Utah State University that allowed me to do it as a project. This carputer allows you to have music, FM radio, GPS, and OBD-II information all at the touch of a finger. To start off here are the parts that I used to build this carputer.
1 – Raspberry Pi
1 – 7″ Official Raspberry Pi Touchscreen
1 – Nitro Miniature Amplifier
1 – USB drive with music
1 – GPS module
1 – tea5767 module
1 – 3.5mm splitter cable male-to-female
1 – 3.5mm splitter cable male-to-female
2 – 3.5mm to rca adapter cables
6 – female to female jumper wires
1 – 12VDC to 5VDC power adapter
1 – Project Box
2 – USB 90 degree elbows
1 – OBDLink LX
1 – FM Radio Antenna connector from old car radio
Step 1: Hardware Setup
Begin by pairing the screen to the Raspberry Pi and setting it up. There are a lot of tutorials on how to set up the Pi, so I will not cover that in this tutorial. Once you have a functioning Raspberry Pi attach the TEA5767 module as follows:
V3.3 with GPIO V3.3 (pin 1)
SDA with GPIO SDA (pin 3)
SCL with GPIO SCL (pin 5)
Ground with GPIO GND (pin 9 or pin 6)
Take the short antenna that comes with the TEA5767 module and strip the cut end of it. Solder the three wires to each of the three prongs of the antenna connector from the old radio.
Next attach the GPS module and the USB drive containing music to your Pi.
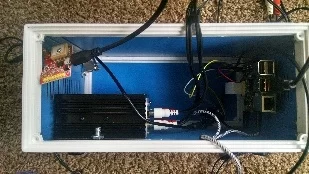
Finally connect the Pi and the TEA5767 module to your amp. Place all of the items in a project box.
Step 2: Software Setup
The code was created using multiple sources, with a few changes to bring it all together. Below are the sources that were used:
Main Structure and MPD Controller – https://www.development-cycle.com/2016/02/building-a-raspberry-pi-car-computer/
TEA5767 Controller – https://github.com/packetgeek/tea5767
OBD-II Monitor – http://www.cowfishstudios.com/blog/obd-pi-raspberry-pi-displaying-car-diagnostics-obd-ii-data-on-an-aftermarket-head-unit
You can download my completed code from here: https://gitlab.com/McKord/carputer
Once you have downloaded the code you will need to make a few changes to the Raspberry Pi. Run the following commands:
Install and configure GPSD
sudo apt-get install gpsd gpsd-clients python-gps
sudo gpsd /dev/ttyUSB0 -F /var/run/gpsd.sock
cgps -S
Start Chromium on boot
vim ~/.config/lxsession/LXDE-pi/autostart
Add the following lines to the file.
/home/pi/Carputer/start.sh
/home/pi/Carputer/pyobd/start.sh
/usr/bin/chromium-browser --kiosk --disable-infobars http://localhost:8000
Enable the Raspberry Pi i2c module
sudo raspi-config
Go to the advance menu, and enable i2c module and load on boot
Step 3: Installation
The installation of this project will differ for every vehicle. I am putting this in a 2003 Ford Ranger. My dash will almost perfectly hold the Raspberry Pi Touchscreen, so installation wasn't too difficult for me.
First you will need to remove your current head unit, and make any modifications that allow for the Pi touchscreen to fit comfortably. Next you will need to plug in your speakers into the amplifier, attach the power cable, attach the GPS antenna, and attach the FM antenna. Finally slide the unit into your dashboard and attach securely.
Now you can enjoy your Infotainment system!