Introduction
This project uses a Raspberry Pi 2 to collect temperature and humidity data from a DHT22 sensor, which is then uploaded to the ThingSpeak Internet of Things platform to be displayed in real-time.

This write-up is primarily intended to serve as documentation for the project, but may also be of use as a tutorial for others. It assumes a beginner skill level and that you are running the Raspberry Pi without a screen (referred to as a headless setup). It is broken into three main parts, with an optional fourth:
- Part 1: Setting up the Raspberry Pi 2
- Part 2: Configuring the Adafruit DHT22 Sensor
- Part 3: Getting Started with ThingSpeak
- Part 4: Running an Email Notification Script (Optional)
Part 1: Setting up the Raspberry Pi 2
The instructions provided below are for Mac OSX. Instructions for other operating systems can be found in the official documentation for the Raspberry Pi (RPi): https://www.raspberrypi.org/documentation/
Step 1. Download Operating System Image
Download the latest Raspbian “lite” image from: https://www.raspberrypi.org/downloads/raspbian/
Note: The latest Raspbian image now by default has SSH disabled. As I've been unable to get it to work properly following their instructions, I've reverted to the September 23rd image, available here:
After downloading the .zip file, unzip it to get the image file (.img) that will be written to the micro SD card.
Step 2. Write Image to SD Card
In order to locate the disk identifier of your SD card (e.g. disk4), open a terminal and run:
diskutil list
Using this disk identifier, unmount the SD card to prepare for copying data to it:
diskutil unmountDisk /dev/disk<disk# from diskutil>
Copy the data to your SD card:
sudo dd bs=1m if=image.img of=/dev/rdisk<disk# from diskutil>
where image.img is the filename of the latest Raspian image, e.g.:
sudo dd bs=1m if=2016-09-23-raspbian-jessie-lite.img of=/dev/rdisk<disk# from diskutil>
Insert the SD card to the Raspberry Pi, and provide power using either a micro USB cable or DC adapter.
Step 3: Configure the Raspberry Pi
On a headless setup, the command line of the Raspberry Pi can be accessed remotely from another computer or device on the same network using SSH (Secure Shell).
In this case, the RPi is connected to the local network via ethernet, and Internet Sharing is enabled. Instructions on how to enable Internet Sharing are listed below:
1. Open Sharing preferences (choose Apple menu > System Preferences, then click Sharing).
2. Select the Internet Sharing checkbox.
3. Click the “Share your connection from” pop-up menu, then choose Wi-Fi as the Internet connection you want to share.
4. Select how you want to share your Internet connection to the Raspberry Pi in the “To computers using” list. In this case, the Internet connection will be shared over Ethernet.
Once connected via ethernet, the RPi will typically bind to an IP address in the 192.168.2.* range. You can find its IP by using Nmap to scan the local network. An active IP address with an open port 22 (SSH connects via this port) is your likely target.
nmap 192.168.2.*
- Note: If required, install Nmap using Homebrew:
/usr/bin/ruby -e "$(curl -fsSL https://raw.githubusercontent.com/Homebrew/install/master/install)"
brew install nmap
Once the local IP address of the RPi has been found, open terminal and establish an SSH connection using the default username/password combination of “pi” and “raspberry”:
ssh [email protected].#
- Note: If you encounter the warning: “WARNING: REMOTE HOST IDENTIFICATION HAS CHANGED!”, you simply need to clear out the known_hosts file. Run the following code and remove the line of code pertaining to the IP address associated with the RPi.
sudo nano /Users/<username>/.ssh/known_hosts
Step 4: Update the Raspberry Pi
Upon first login to SSH, it is suggested to update/upgrade the Raspberry Pi using the following commands:
sudo apt-get update
sudo apt-get dist-upgrade
df -h #to check space
sudo apt-get clean #to removed archived .deb files
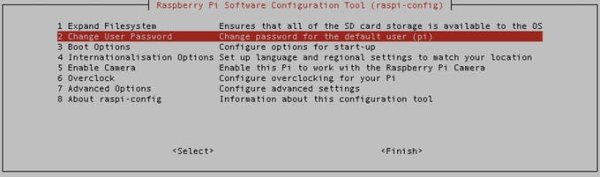
If you would like to change default password for pi user, you can access the Raspberry Pi Software Configuration Tool by running the command below and selecting option 2:
sudo raspi-config