
Our hackerspace (Bloominglabs) recently received an ADS-WS1 weather station from a generous benefactor. Additionally, we were selected by Instructables for the Raspberry Pi 2 hackathon so we got some RPi2's to hack on. For my project, I decided to use an RPi2 to put our weather station online.
Our station can measure wind direction, wind speed, rain, temperature, and humidity. The unit can output data in a number of ways, including serial. I needed a way to read the data and get it down off the pole and onto our network. The Raspberry Pi 2 will do this nicely with a PoE run to a water tight enclosure on the mast.
Step 1: Parts list
1) ADS-WS1 Weather station (any weather station which supports serial data output will work though)
2) Raspberry Pi (any version will work, we used version 2)
3) Serial-to-USB adapter
4) Serial cable with at least one female DB9 shell
5) Ethernet – enough to reach to your outdoor weather station
6) 5V power supply, 1-2A
7) Outdoor enclosure
Optional but recommended:
8) Ethernet surge suppressor
9) Power-Over-Ethernet injection adapters
The first thing to acquire is a weather station. I used an ADS-WS1 station by Argent Data but that is not required. However this unit is very well documented and also has an integrated TNC for broadcasting weather data via APRS (if you hook it up to a ham radio). However that is not required for what I am doing, all I need is a serial port output to read in data. The power draw is only 50mA so it can be fed by RPi or by splitting off from the supply power to the RPi.
http://wiki.argentdata.com/index.php?title=ADS-WS1…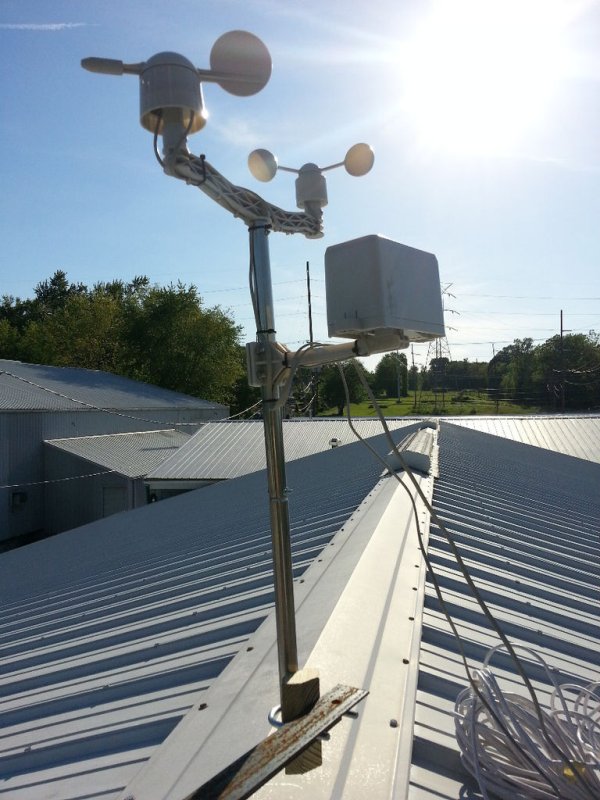
Step 2: Setup an OS on the Rasperry Pi 2
You can use any OS, however I used Raspbian 7.1 on an 8GB SDcard. Follow the directions for the OS you are working from:
https://www.raspberrypi.org/documentation/installa…
Once you have your SDcard prepped, install it in the RPi2 and power it on. It helps to have a local console (display that supports HDMI, and a USB keyboard). Raspbian should use DHCP by default and get on your network if you have a router. However I've found this to be hit-and-miss.
The rest of this document assumes you have some basic familiarity with Linux, the Raspberry Pi docs are very good if you have problems getting your RPi2 setup from here:
https://www.raspberrypi.org/documentation/
One last thing for this step is to plug in your USB-to-Serial adapter. Assuming it's a standard FTDI or other common Serial-to-USB device, Raspbian will automatically configure it. After you plug it in you should see a new /dev/ttyUSBx device show up.
pi@raspberrypi ~ $ ls /dev/ttyUSB*
/dev/ttyUSB0
Assuming it's the only USB-to-Serial device plugged in it will be /dev/ttyUSB0. The “lsusb” command will display all of your USB devices which may help you identify the device if it's not showing up correctly:
dosman@raspberrypi ~ $ lsusb<br>Bus 001 Device 002: ID 0424:9514 Standard Microsystems Corp.
Bus 001 Device 001: ID 1d6b:0002 Linux Foundation 2.0 root hub
Bus 001 Device 003: ID 0424:ec00 Standard Microsystems Corp.
Bus 001 Device 005: ID 0403:6001 Future Technology Devices International, Ltd FT232 USB-Serial (UART) IC
I prefer to setup a static IP as it's one less thing to worry about going wrong when the RPi2 is up on a pole in the sky. Edit /etc/network/interfaces and change this line:
iface eth0 inet dhcp
To this line:
iface eth0 inet static
And add these lines. Replace with the IP address and gateway with appropriate values for your network:
address 192.168.x.x
netmask 255.255.255.0
gateway 192.168.x.x
Now install the software we need, Apache2 for a webserver and some other utilities. Minicom is a good tool for verifying serial communications are working correctly, and wget is for downloading the weather.sh script in the next section.
apt-get install apache2
apt-get install wget
apt-get install minicom
For future testing purposes I recommend downloading this script:
wget -O weather.sh "http://server1.nuge.com/~weather/software/weather-...
If for some reason the above link fails you can find the latest version of the weather.sh script here:
http://server1.nuge.com/~weather/
Last but not least, you may need to edit your /etc/group file and add the account “pi” or whichever account you will be testing with to the “dialout” group. This will give appropriate permissions for the account to read and write to the serial device (/dev/ttyUSBx).
Step 3: Install and configure weewx, configure services to start on boot
Weewx is a program that reads in serial data from several makes of weather station and presents a web interface for graphing the data.
apt-get install weewx
Now you will want to configure it. Edit /etc/weewx/weewx.conf and adjust the variables that make sense. The config file is self-documented so it's easy to customize.
# $Id: weewx.conf 2901 2015-02-05 21:15:03Z tkeffer $
#
# WEEWX CONFIGURATION FILE
#
# Copyright (c) 2009-2014 Tom Keffer
# See the file LICENSE.txt for your full rights.

##############################################################################

# This section is for general configuration information
# Set to 1 for extra debug info, otherwise comment it out or set to zero.
debug = 0

# Root directory of the weewx data file hierarchy for this station.
WEEWX_ROOT = /

# How long to wait before timing out a socket (FTP, HTTP) connection:
socket_timeout = 20

# Do not modify this - it is used by setup.py when installing and updating.
version = 3.1.0

##############################################################################
[Station]
    # This section is for information about your station

    # Description of the station location.
    location = "Bloominglabs - Bloomington, Indiana"

    # Latitude and longitude in decimal degrees

...
Lastly, configure apache2 and weewx to start on boot:
update-rc.d apache2 defaults 99 2
update-rc.d weewx defaults 99 2
Now these services will come up automatically every time the RPi2 powers on. That should be about everything you need for your RPi2.
Step 4: Prepare the serial cable and power cables
You only need 3 wires plus 2 power wires to wire up the controller. In my photo there are wires in the top 5 screw-down terminals, those are for sending TNC/APRS data to a ham radio and are not required for this tutorial.
So, first you need to wire up a serial cable to the weather controller. Connect your cable to your Serial-to-USB adapter. Now cut the remaining end of the serial cable off, be sure to give yourself enough slack to route the cable as needed and to strip the outer sheath over the wires at least 2 inches. The individual wires only need to be stripped 1/4″ or so. You will need to use a multimeter to map out the pins of the cable and find the wires which match up to pins 2, 3, and 5 of the pins inside the DB9 shell. Usually if you look closely the pin numbers are listed next to the pins.
The wire for pin 2 goes to TXD1 on the controller.
The wire for pin 3 goes to RXD1 on the controller.
The wire for pin 5 goes to ground on the controller.
Once that is all wired up you need some power for the controller. A 9V battery will work fine for testing, or a 5V or 12V supply. Wire the positive up to the “DC in” and the ground wire to the lower GND input on the controller.
I used a pair of Power-over-Ethernet (PoE) adapters for this install. I powered both my RPi2 and the weather controller off 5V, I made up an adapter for the remote end to split power between them. Since this will be in the elements I used shrink tubing to make the connection tidy and more weather resistant. Even though this will all be in a weather tight box, it doesn't hurt to add extra layers of protection in case there's a leak.
Last but not least, the 5V supply for the RPi2 is fine to power both devices. In fact, you can cut the microUSB connector off and use that on the remote end of the PoE adapter.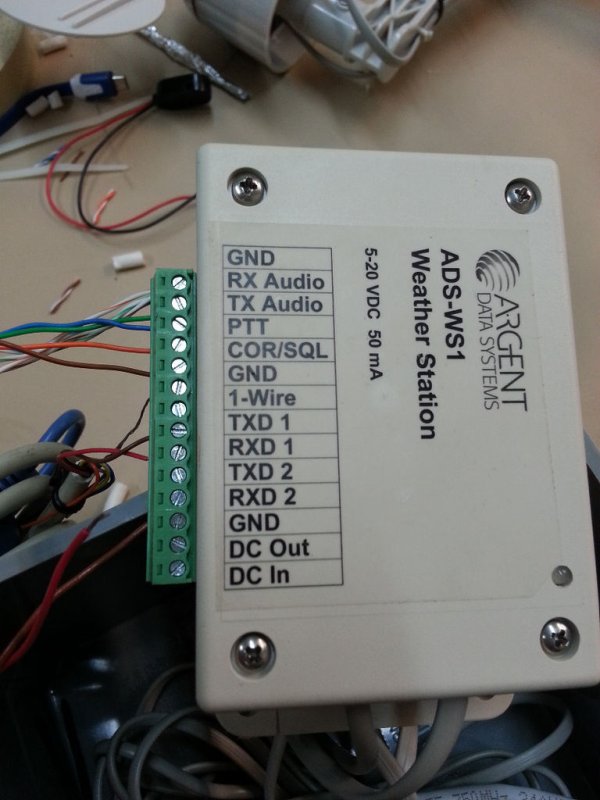
Step 5: Verify you can read in data from the weather station
Now you should be able to power up the RPi2 and the controller. Once they are both powered up, use minicom to verify communication is working. We had to reflash the firmware in our ADS-WS1 controller before it would work correctly. There is an interactive serial interface on the controller which may require configuration. Argent maintains a wiki for the controller which includes the commands you can send to the unit:
http://wiki.argentdata.com/index.php?title=ADS-WS1…
Once the controller is sending out regular data try using the weather.sh script. That should confirm that you are getting intelligent data out.
Step 6: Prep the gear for outdoor use
Now you need to put everything into some type of container for outdoor container. Technically you should build a Stephenson screen to ensure proper outdoor temperature readings. The temp and humidity sensors are inside the weather controller box (with an opening for readings).
http://en.wikipedia.org/wiki/Stevenson_screen
I used a PVC NEMA 4″ water tight enclosure though for now. The downside is that we won't get humidity readings and day-time temp readings may be increased by 10-15 degrees F. At a future date we plan to build a Stephenson screen to get accurate readings.
For more detail: Raspberry Pi 2 Weather Station