
Vintage tube radios are nostalgic. The crackle of the game on the after dark high powered AM station from 500 miles away. The smell of the tubes and the warmth of the tones. They remind us of simpler times. Times when families sat together – not blankly staring unengaged at the TV, bur rather talking, reading, playing games and enjoying each other’s company.
So often I see these beautiful old radios ripped apart and stuffed with trendy soon to be outdated electronics. This is not that kind of story. This is a story of a radio rescue and a modern modular non-invasive upgrade.
Step 1: Radio Resurrection
I was clunking around the depths of a damp dark warehouse garage of a charity thrift store. They proprietor walked by and asked if he could help me find anything. I told him I was looking for an old radio. He pointed to the corner and said lets look in this pile. We pulled two empty mid 70's cabinets off this well worn console under the pile of junk. He said he plugged in it a while ago and it did not work. (I know better than to plug in a tube radio without checking it first.) We pulled it out and the leg broke off. I felt bad for him, asked how much. He said $20 and it went into my truck.
After getting it home I realized he was pointing to the wrong switch to power it on. I pulled the chassis and checked for wax capacitors. To my surprise this 1967 Westinghouse had modern capacitors and some changed out tubes. This radio was taken care of and repairs in the past. Re-assembly and a quick power on test and it played wonderfully – even the turntable worked. One side did not play as loud so I had to get that sorted. It turned out to be a weak tube. $5 later I was back in business.
I wanted to find a way to modernize this radio while still preserving its original integrity. I noticed the turntable had 2 RCA jacks on it for sound output. That means I can hijack that input for an auxiliary source. I just got a Raspberry Pi 2 and this was the perfect project.
The cabinet was beat up. It had white and brown paint on it. I gave it a quick sandpaper scuff and a wipe down in a walnut stain. I opted to keep the wear marks in the wood and not do a full refinish job. The broken leg got a few few screws and some glue.
I'm no finish carpenter but overall I like how it turned out.
Step 2: Raspberry Pi
The central piece of this build is the Raspberry Pi. I wanted the process to be simple and out of the box. I chose to install OSMC as the operating system.
I won't go into detail here because the process is so simple and well documented. At the time I wrote this article OSMC is in Alpha. Still very new, but it is where XBMC is headed. Installing it was very easy. Go to their website, download the installer, choose the install location (you will need a card reader), put in your wifi info and it is working off the bat. TheETReviews has a great 2 min video on how to install OCMC on your Pi.
I run mine without a keyboard, mouse or a TV. However during initial setup you do need to use a TV and keyboard once to change two things:
Enable AirPlay
Enable Remote Control App
They can be found under Settings – Services – AirPlay and Remote.
Grab the XBMC Remote from your mobile device's app store for remote reboots.
Note – please save your self a pile of hassle and find a wifi card that has the correct chipset. It will save you so much grief. Any of the adapters on the AdaFruit page will work. In theory anything with the Realtek RTL8188CUS Chipset will work.
Pi Parts I used:
Pi 2 (Any Pi will work)
Pi 2 case
USB power adapter
USB cable
16 GB MicroSD card (should to be between 8 and 32gb)
3.5mm stereo to RCA adapter
WiFi nub adapter
Step 3: Input Hum and building an Audio Isolation Transformer
The real secret sauce here is the audio isolation transformer. Tube radios have energized chassis, meaning current is flowing through the metal. If you touch it you will get shocked. This is why it is so important to keep the back on while in operation. Lets say in theory you plan on using the phonograph inputs to run a Raspberry Pi. Guess what – you will get a nasty buzz or hum from the power supply. (Not the I have a cheap transformer and it makes noise kind either.) Additionally if you have a metal device – say an aluminum macbook or iPhone – when you have the audio plugged in and you make physical contact with the metal device case you get a nice buzz out of the speakers.
This buzz is so loud you can't hear the music. No bueno. The only solution is complete electrical separation – but how in the world do you do that and still use the input? You use an inductive field from a transformer. Unlike magic smoke or snake oil this actually works – and it was about $8 to build.
As an added benefit you get a passive amplification of the input volume to the radio.
This is what I used: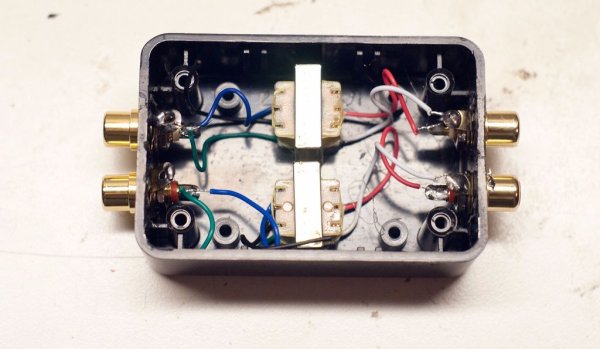
Project Enclosure – Radio Shack 2701801
4 RCA Panel Mount Jacks – Radio Shack 2740346 or 2740852
2 Audio Transformers – Radio Shack 2731380
Drill and mount your phono jacks.
Glue the transformers in the middle of the enclosure with the wires in the same orientation.
The wire scheme I used is as follows:
White Input –
Red Input +
Green Output –
Blue Output +
Black Not used
Mark the input and output sides on the case.
Step 4: Put it all together
I picked up a four channel audio selector (Radio Shack 1500313). This allows us to use one amp input with multiple sources. Currently I'm using Input 1 for the Pi and input 2 for the turntable. I opted for the extra channels incase I wanted to add a cable for a computer or an iPhone.
The Pi, switch and cables are tucked into the record storage next to the dials. A small hidden hole in the rear of the storage area allows for cables to pass between the selector and the factory amp input line that was originally used for the turntable. You will need a few RCA cables. I also had to fab up a pair of female to female RCA adapters.
For more detail: Raspberry Pi AirPlay Tube Radio